Katonic MLOps Platform on On-Premise Infrastructure
This guide describes installing, operating, administering, and configuring the Katonic Platform in your own Kubernetes cluster. This content is applicable to Katonic users with self-installation licenses.
Deploying Katonic involves two discrete steps:
Set up compatible Kubernetes infrastructure for Katonic
Install the Katonic application on Kubernetes
If you are interested in running Katonic as a managed service in your cloud or in a single-tenant vendor cloud, contact Katonic. Managed service customers will have installation, operations, and administration handled via professional services, and the content of this guide will not be required or applicable.
Overview
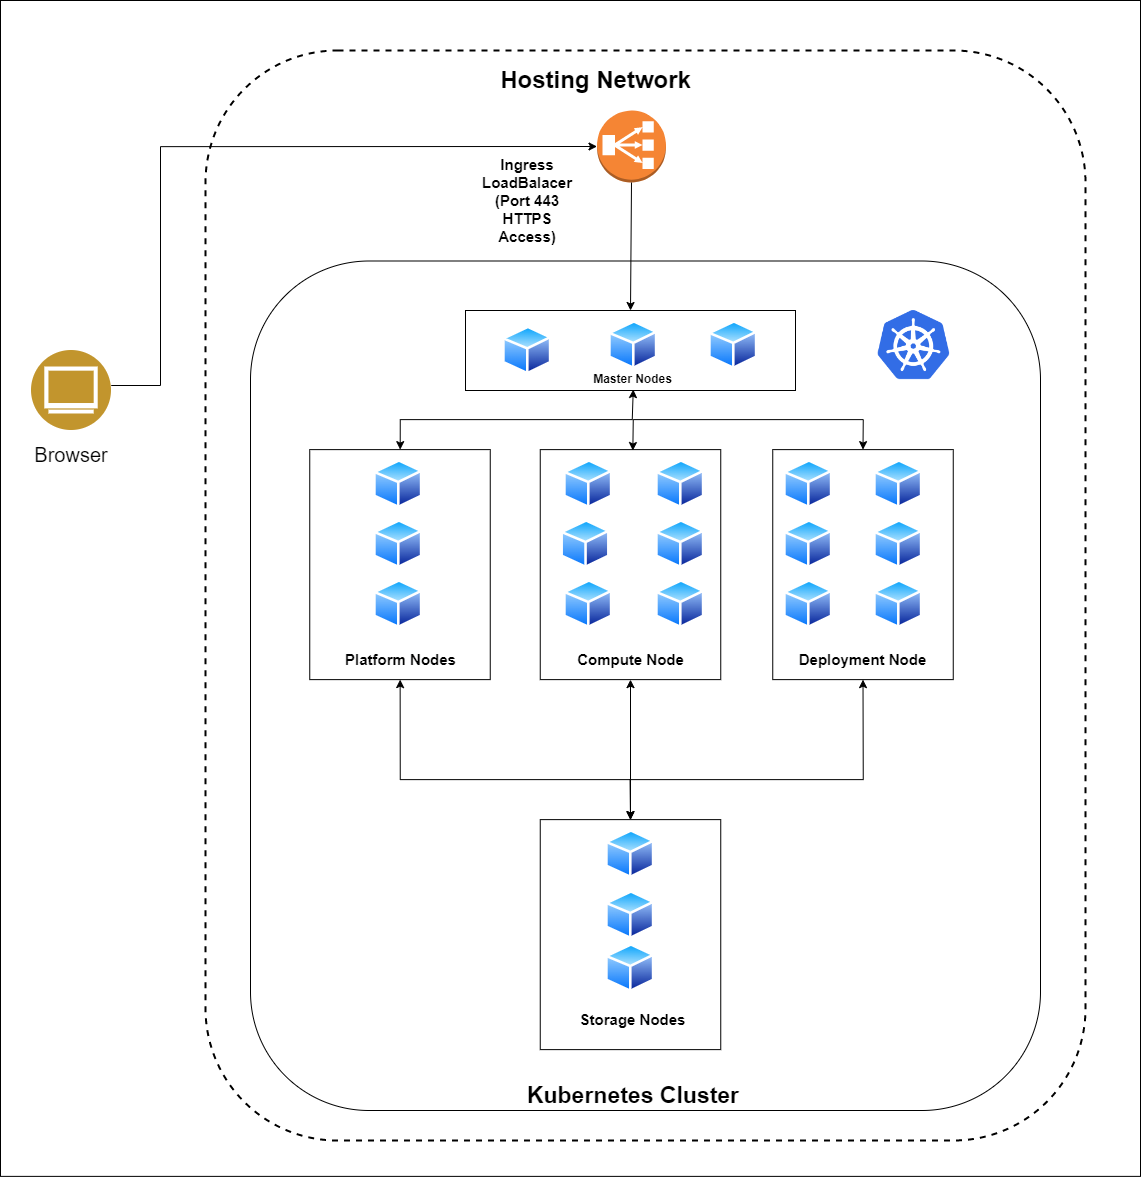
Katonic runs in a Kubernetes cluster with a set of master nodes, worker nodes dedicated to hosting Katonic platform services, worker nodes dedicated to hosting compute workloads and a set of worker nodes dedicated to storage, and a load balancer that regulates connections from users.
The Katonic application hosts three major workloads:
1. Platform nodes
- These are worker nodes of Kubernetes that handle platform-specific components. These components provide user interfaces, the Katonic API server, orchestration, metadata and supporting services.
- These nodes are of the highest importance in a cluster as they keep all the essential components of the Katonic MLOps platform running.
- No other workloads can be assigned to these nodes and they have a fixed number. The number of platform nodes required in a cluster is static.
2. Compute nodes
- These are worker nodes of Kubernetes that handle all the users' data. This is where users’ data science, engineering, and machine learning workflows are executed.
- As the name suggests, Compute nodes handle all the computation needs of the users and so require high resources and numbers.
- Compute node failures will not take the platform offline and are therefore of lower priority than Platform Nodes.
- The workloads assigned to the compute nodes are dynamic and thus these nodes are usually auto-scaled to meet these demands.
3. Deployment Nodes
- These are worker nodes of Kubernetes that handle all models api and app deployments.
- These set of nodes are separtaed from other nodes to ensure enough compute resources are available for model apis and app deployments.
- Deployment node failures will not take the platform offline and are therefore of lower priority than Platform Nodes.
4. GPU Nodes
- GPU nodes refer to worker nodes within a Kubernetes cluster that are equipped with GPUs (Graphics Processing Units). GPUs are specialized hardware components designed to accelerate parallel processing tasks, particularly for computationally intensive workloads such as machine learning, deep learning, data analytics, and scientific simulations.
- GPU node failures will not take the platform offline and are therefore of lower priority than Platform Nodes.
- The workloads assigned to the GPU nodes are dynamic and thus these nodes are usually auto-scaled to meet these demands.
The Katonic application leverages containerized processes orchestrated by Kubernetes, an industry-standard container orchestration system. Developed by Google, Kubernetes enjoys widespread support from communities and vendors, including managed services offered by major cloud providers. Typically, Katonic customers take charge of provisioning and managing their Kubernetes cluster, enabling them to install Katonic within it.
The Katonic Platform offers remarkable flexibility, accommodating various deployment environments for the application layer. Once the platform is deployed, users can seamlessly add different worker layers regardless of their hosting methods.
Services
The Katonic platform offers a variety of services, comprising both proprietary and third-party open-source tools and libraries. These services are exposed as application services and managed through Kubernetes. Users can conveniently access and manage these services using the platform dashboard, following a self-service model. It is important to note that certain services, which operate without user intervention, may not be visible in the dashboard. The platform consists of two types of managed application services, each serving specific functions:
Platform Services:
The platform services encompass the Katonic API server, Pipelines, Keycloak authentication service, and metadata services. These services enable features such as reproducibility and collaboration. Application object metadata is stored in MongoDB, code and file versioning are managed by Git, and the Docker registry is utilized by Katonic Environments. These services are hosted on platform nodes, which also include dedicated master nodes for the Kubernetes cluster. While users cannot delete default services, service administrators have the ability to disable or restart them and modify certain configurations.
Compute Services:
The compute services function as the execution layer where Katonic launches and manages ephemeral pods for user workloads. These pods handle various tasks such as Pipeline Runs, Workspaces, and docker image builds. Compute nodes are responsible for running these pods.
Deployment Services:
Similar to compute services, deployment services operate as the execution layer where Katonic launches and manages ephemeral pods for user workloads. These pods primarily handle Model APIs, Apps, and docker image builds. Deployment nodes are dedicated to running these pods.
Pre Deployed Services
The following software packages, services, and tools are pre-deployed as part of the version 4.3 platform installation:
| SERVICE | NAMESPACE | TYPE | DESCRIPTION |
|---|---|---|---|
| Istio Ingress | istio-system | Networking Service | Istio extends Kubernetes to establish a programmable, application-aware network using the powerful Envoy service proxy. |
| Katonic UI | application | UI Component | The platform's graphical user interface. |
| Katonic API Server | application | API Server | The Katonic Platform’s API server and endpoint |
| Katonic File manager | default | Service | The distributed File storage and Management system. MinIO |
| Keycloak | keycloak | Identity Provider | Keycloak is an enterprise-grade open-source authentication service. Katonic uses Keycloak to store user identities and properties, and optionally for identity brokering or identity federation to SSO systems and identity providers. |
| MLflow | mlflow | Service | MLflow is an open-source platform to manage the ML lifecycle, including experimentation, reproducibility, deployment, and a central model registry. |
| MLflow-MinIO | mlflow | Service | The distributed File storage and Management system. MinIO |
| MongoDB | application | Database | MongoDB is an open-source document database. Katonic uses MongoDB to store Katonic entities, like projects, users, and organizations. Katonic stores the structure of these entities in MongoDB, but underlying data is stored separately in encrypted blob storage. |
| Monitoring (monitoring) | monitoring | Logging and Monitoring | A platform service for monitoring application services and gathering performance statistics and additional data. The gathered data is visualized on Grafana dashboards using the platform's Grafana services. |
| Pipelines (pipelines) | kubeflow | Service | The Google Kubeflow Pipelines open-source framework for building and deploying portable, scalable machine learning (ML) workflows based on Docker containers. |
| Postgres Database | application | Database | Postgres is an open-source relational database system. Katonic uses Postgres as a storage system for Keycloak data on user identities and attributes. In addition to the Keycloak data, It stores Experimentation Meta information and is also used for Feature store offline meta DB. |
| Redis | application | Database | Redis is an open-source (BSD licensed), in-memory data structure store, used as a database, cache, and message broker. It stores Katonic deployment ML Meta information and is also used for the online Feature store |
User Accounts
Katonic uses Keycloak to manage user accounts. Keycloak supports the following modes of authentication to Katonic.
Local accounts
When using local accounts, anyone with network access to the Katonic application may create a Katonic account. Users supply a username, password, and email address on the signup page to create a Katonic-managed account. Katonic administrators can track, manage, and deactivate these accounts through the application. Katonic can be configured with multi-factor authentication and password requirements through Keycloak.
Learn more about Keycloak Administration.
Identity federation
Keycloak can be configured to integrate with an Active Directory (AD) or LDAP(S) identity provider (IdP). When identity federation is enabled, local account creation is disabled and Keycloak will authenticate users against identities in the external IdP and retrieve configurable properties about those users for Katonic usernames and email addresses.
Learn more about Keycloak Identity Federation.
Identity brokering
Keycloak can be configured to broker authentication between Katonic and an external authentication or SSO system. When identity brokering is enabled, Katonic will redirect users in the authentication flow to a SAML, OAuth, or OIDC service for authentication. Following authentication in the external service, the user is routed back to Katonic with a token containing user properties.
Learn more about Keycloak identity brokering.
Set up compatible Kubernetes infrastructure for Katonic Cluster Requirements
You can deploy Katonic into a Kubernetes cluster that meets the following requirements.
Kubernetes version
Katonic MLOps platform 4.3 version has been validated with Kubernetes version 1.25 and above.
Network Requirement on Machines
All Virtual Machines should be in the same network.
All ports should be open and accessible between the VMs.
A network LoadBalancer is to be provided for the application endpoint with port 443 open.
Performance-oriented networking connection between the VMs with high throughput (Preferably SSDs).
Network interfaces
Ensure the host has a single-port 10 Gbps (minimum) NIC dedicated to each type of VM node, including storage-node, platform-node, compute-node, and deployment-node VMs.
Cluster permissions
Katonic needs permission to install and configure pods in the cluster via our Installer. The Katonic installer is delivered as a containerized Python utility that operates ansible through a kubeconfig that provides service account access to the cluster.
Namespaces
No namespace configuration is necessary prior to installation. Katonic creates the dedicated namespaces as part of the installation
Cluster networking
Katonic relies on Kubernetes network policies to manage secure communication between pods in the cluster. Network policies are implemented by the network plugin, so your cluster uses a networking solution that supports NetworkPolicy, such as Calico.
Ingress and SSL
Katonic must be configured to serve from a specific FQDN, and DNS for that name must resolve to the address of an SSL-terminating load balancer with a valid certificate. The load balancer must target incoming connections from ports 80 and 443 to port 80 on all nodes in the Platform pool. This load balancer must support WebSocket connections.
Kubernetes Cluster Installation
For a hassle-free Kubernetes cluster setup, we recommend using Kubespray. This powerful tool simplifies the installation and management of Kubernetes, allowing you to quickly deploy a production-ready cluster. Before getting started, make sure you have the following prerequisites in place:
Prerequisites:
Deployment Machine: Prepare a dedicated machine or virtual machine that will serve as the deployment machine. Ensure that this machine meets the minimum system requirements and has network access to the target cluster nodes.
Python and Ansible: Install Python (version 3.x) and Ansible (version 2.10 or higher) on the deployment machine. You can refer to the official Python and Ansible documentation for installation instructions.
Target Cluster Nodes: Set up the target cluster nodes where you want to deploy Kubernetes. These can be bare-metal servers, virtual machines, or instances on a cloud provider. Ensure that these nodes meet the minimum system requirements and are accessible from the deployment machine.
SSH Access: Enable SSH access from the deployment machine to the target cluster nodes. Ensure that the SSH keys or credentials are properly set up to establish secure communication between the machines.
Installation Steps:
Follow these steps to install Kubernetes using Kubespray:
Install Kubespray: Begin by installing Kubespray on your deployment machine. You can clone the Kubespray repository from GitHub or use any preferred method mentioned in the official Kubespray documentation.
Configure Your Cluster: Next, customize the Kubespray configuration to match your requirements. Modify parameters such as the number of master and worker nodes, network settings, and storage options. This flexibility ensures that your Kubernetes cluster is tailored to your specific needs.
Deploy Your Cluster: Once you have configured Kubespray, run the deployment command to initiate the Kubernetes installation. Kubespray will automatically handle the installation of Kubernetes components, including the master and worker nodes, networking, and storage.
Verify Your Cluster: After the deployment completes, verify the status of your Kubernetes cluster. Ensure that all components are running correctly and that your cluster is ready to use. Kubespray provides helpful commands to check the health of your cluster.
With Kubespray, setting up a Kubernetes cluster has never been easier. Its straightforward installation process, coupled with extensive customization options, empowers you to quickly deploy a robust Kubernetes infrastructure. Ensure you have met the prerequisites and follow the steps provided to experience the benefits of container orchestration with Kubespray today!
Data Visualisation
Katonic MLOps platform 4.3 include Superset Version 2.0.1 for Data Visualization.
You require an additional DNS if you're installing Superset.
Example:
- If your domain name to access platform is katonic.tesla.com.
- Then, the domain for data visualisation would look like dash-katonic.tesla.com.
Connectors
Katonic MLOps platform 4.3 include Airbyte Version 0.40.32 for Connectors.
You require an additional DNS if you're installing Airbyte.
Example:
- If your domain name to access platform is katonic.tesla.com.
- Then, the domain for connectors would look like connectors-katonic.tesla.com.
Katonic Platform Installation
Installation of the Katonic platform has been segmented based on product. When you click the link, you will be redirected to the installation process documentation.