Onnx
This example provides the steps to deploy a simple Onnx model from scratch using Katonic Deploy.
Introduction
ONNX is an open format built to represent machine learning models. ONNX defines a common set of operators - the building blocks of machine learning and deep learning models - and a common file format to enable AI developers to use models with a variety of frameworks, tools, runtimes, and compilers. By the end of this guide you’ll have an API endpoint that can handle any scale of traffic by running inference on serverless CPU’s/GPU’s.
Deploy Onnx custom model
Katonic simplifies the deployment of any ONNX models, offering a user-friendly interface and streamlined workflow. Deploy your models as an API service with ease and make them available for use in various applications.
Step 1. Prepare a model
In the first phase of the tutorial, we need to prepare a model for deployment. In order to do it in the right way you can follow a checklist below:
1. Train your model
Before you start model preparation you need to train your model. For the purpose of the following tutorials, we will use one that is already trained.
2. Create a Git repository
Your main model files need to be placed in a git repository. However, if you have large files (e.g. with model weights) you can store them in separate storage or drive. You can write code to download it in loadmodel method.
As far as our image classifier is concerned, all files are placed in the git repository since the model is very lightweight cnn model.
Prepare for the deployment
In order to deploy a model with Katonic Deploy, you need to add the following pre-requisite files to the git repository:
requirement.txt - Text file containing all your required
  #packages along with the version.
  pandas
  tensorflow
  tf2onnx
  onnx
  onnxruntime
schema.py - This file will contain the schema of input that will be excepted by your endpoint API. You can modify the below code to match your input schema.
For the below code the schema is List.
from typing import List, Any, Dict, Union
from pydantic import BaseModel

class PredictSchema(BaseModel):
  data: List[Any]
launch.py - This is the most important file, containing loadmodel, preprocessing and prediction functions. The template for the file is shown below:
Notes:
- Please don't change the method names.
- If there are no preprocessing steps you can just return False in the method.
- You can update the code under respective methods covering the required functionality.
loadmodel: Any model you have in github or somewhere on the internet should be loaded here and return it in the end.
preprocessing: If there is any preprocessing required before calling predict write the code for it here and return the transformed features in the end.
predict: Final prediction with the data is performed here and return the result in desired format in the end.
Note: Don't call any of the 3 methods inside the file.
loadmodel function takes logger object as parameter, please do not define your own logging object. preprocessing takes the data and logger object as parameters, prediction takes preprocessed data, model and logger object as its parameter
  import pandas as pd
  import numpy as np
  import tf2onnx
  import onnxruntime as rt

  def loadmodel(logger):
      """Get model from cloud object storage."""
      providers = ['CPUExecutionProvider']
      model = rt.InferenceSession("pytorch.onnx", providers=providers)
      logger.info("returning model object")
      return model

  def preprocessing(features,logger):
      """ Applies preprocessing techniques to the raw data"""
      logger.info("no preprocessing required")
      return False

  def predict(features,model,logger):
      """Predicts the results for the given inputs"""
      input_name = model.get_inputs()[0].name
      output_name = model.get_outputs()[0].name
      outputs = model.run([output_name], {input_name: np.float32(features)})
      logger.info("model prediction")
      return np.argmax(outputs[0])
Deploy the Model
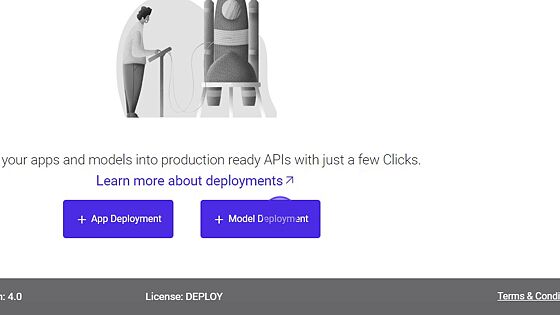
To deploy the model, the user needs to go to the deployment section of the platform and follow the below steps:
Note: You can place the model files into GitHub repository before starting the deployment processing.
- Navigate to Deploy section from sidebar on the platform.
- Click on Model Deployment.
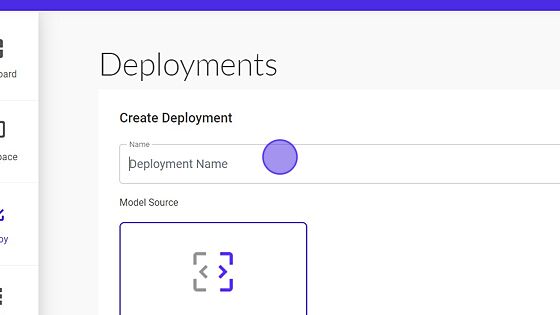
- Fill the model details in the dialog box.
- Provide Name of the deployment for example
onnx_model.
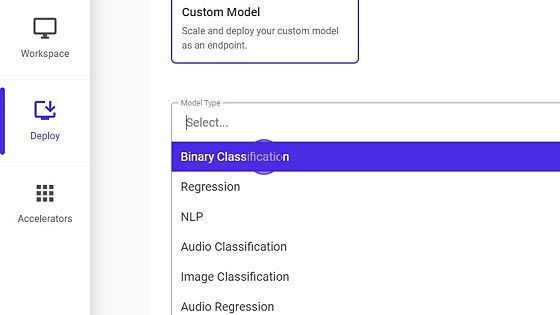
- Select Custom Model as deployment type.
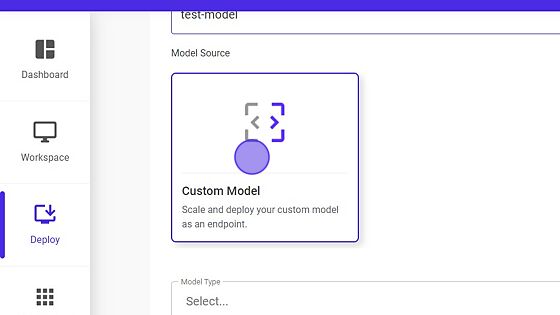
- Select Model Type as
Others.
- Provide the GitHub token.
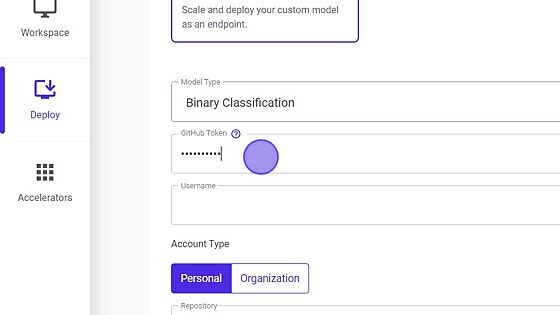
Your username will appear once the token is passed.
Select the Account Type.
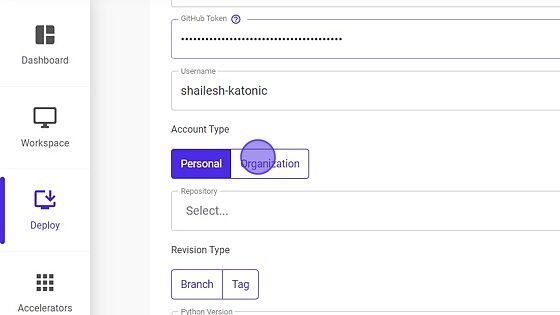
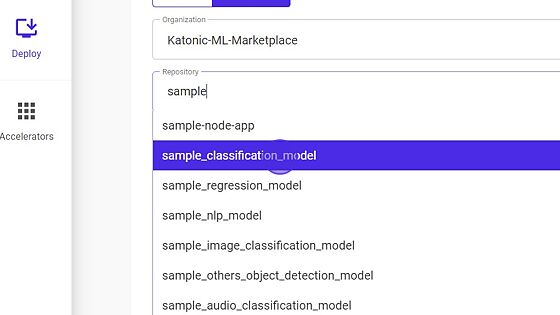
Select the Organization Name, if account type is
Organization.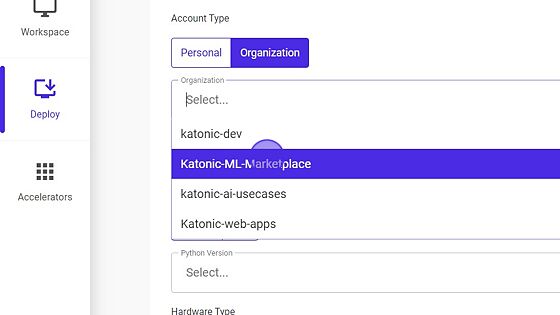
Select the Repository Name.
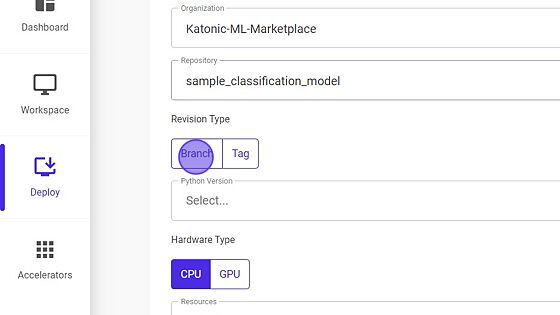
- Select the Revision Type.
Select the Branch Name, If revision type is
Branch.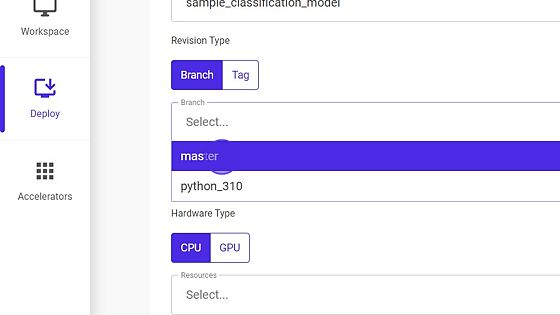
Note: your GitHub repository must contain onxx model file, requirements.txt, schema.py and launch.py files whose templates are discussed above.
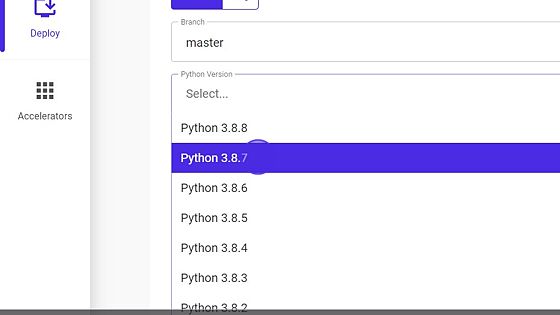
- Select Python Version.
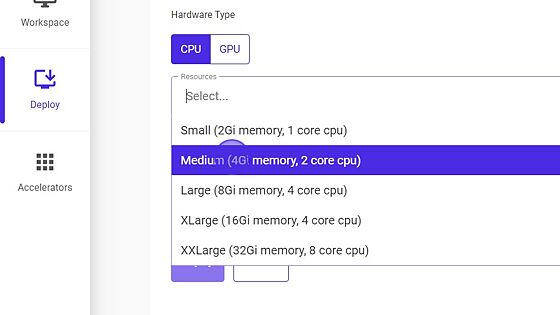
- Select Resources.
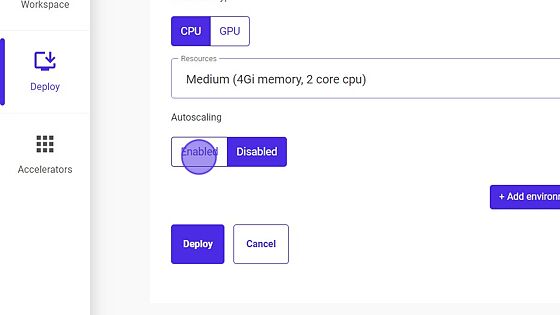
- Enable or Disable Autoscaling.
Select Pods Range, if the user
EnabledAutoscaling.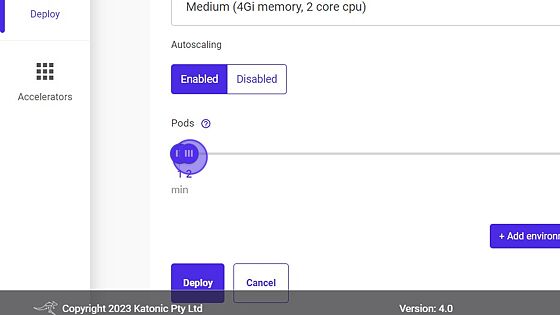
Click on Environment Variables to add environment variables (if any).

- Click on Deploy.

- Once your Custom Model API is created you will be able to view it in the Deploy section where it will be in "Processing" state in the beginning. Click on Refresh to update the status.
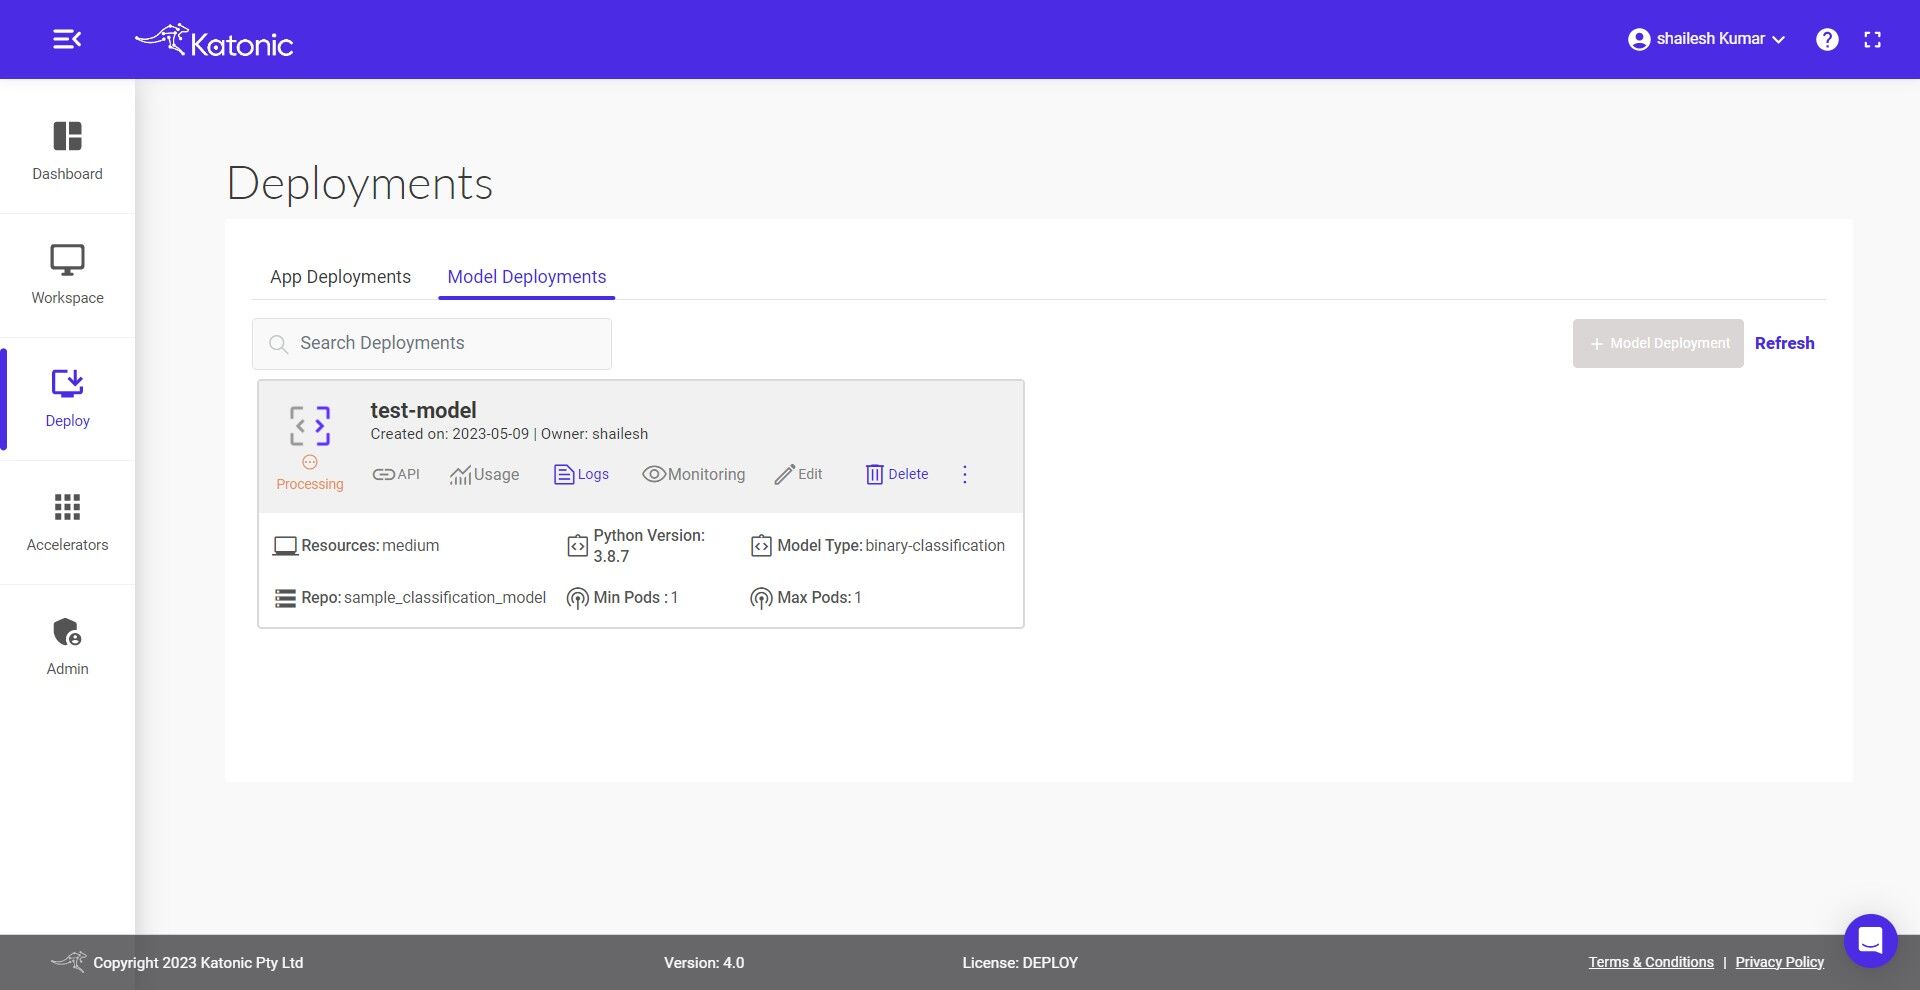
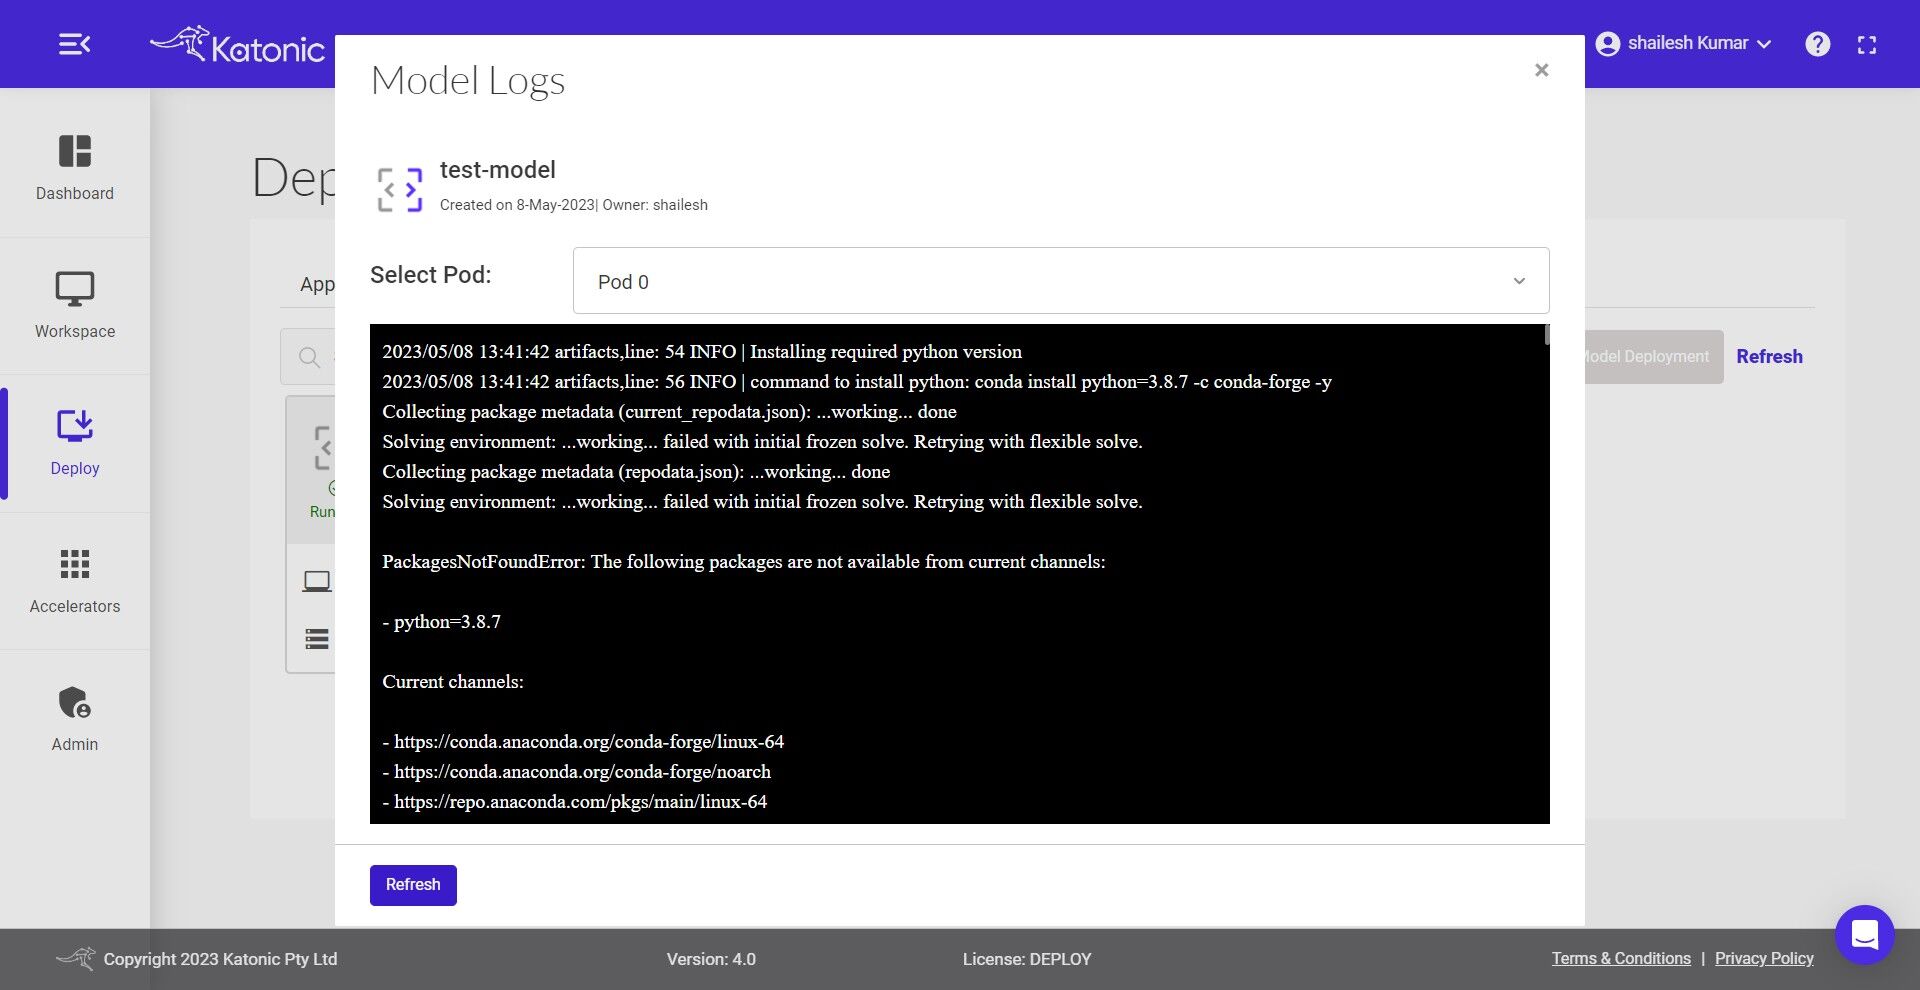
- You can also check out the logs to see the progress of the current deployment using Logs option.
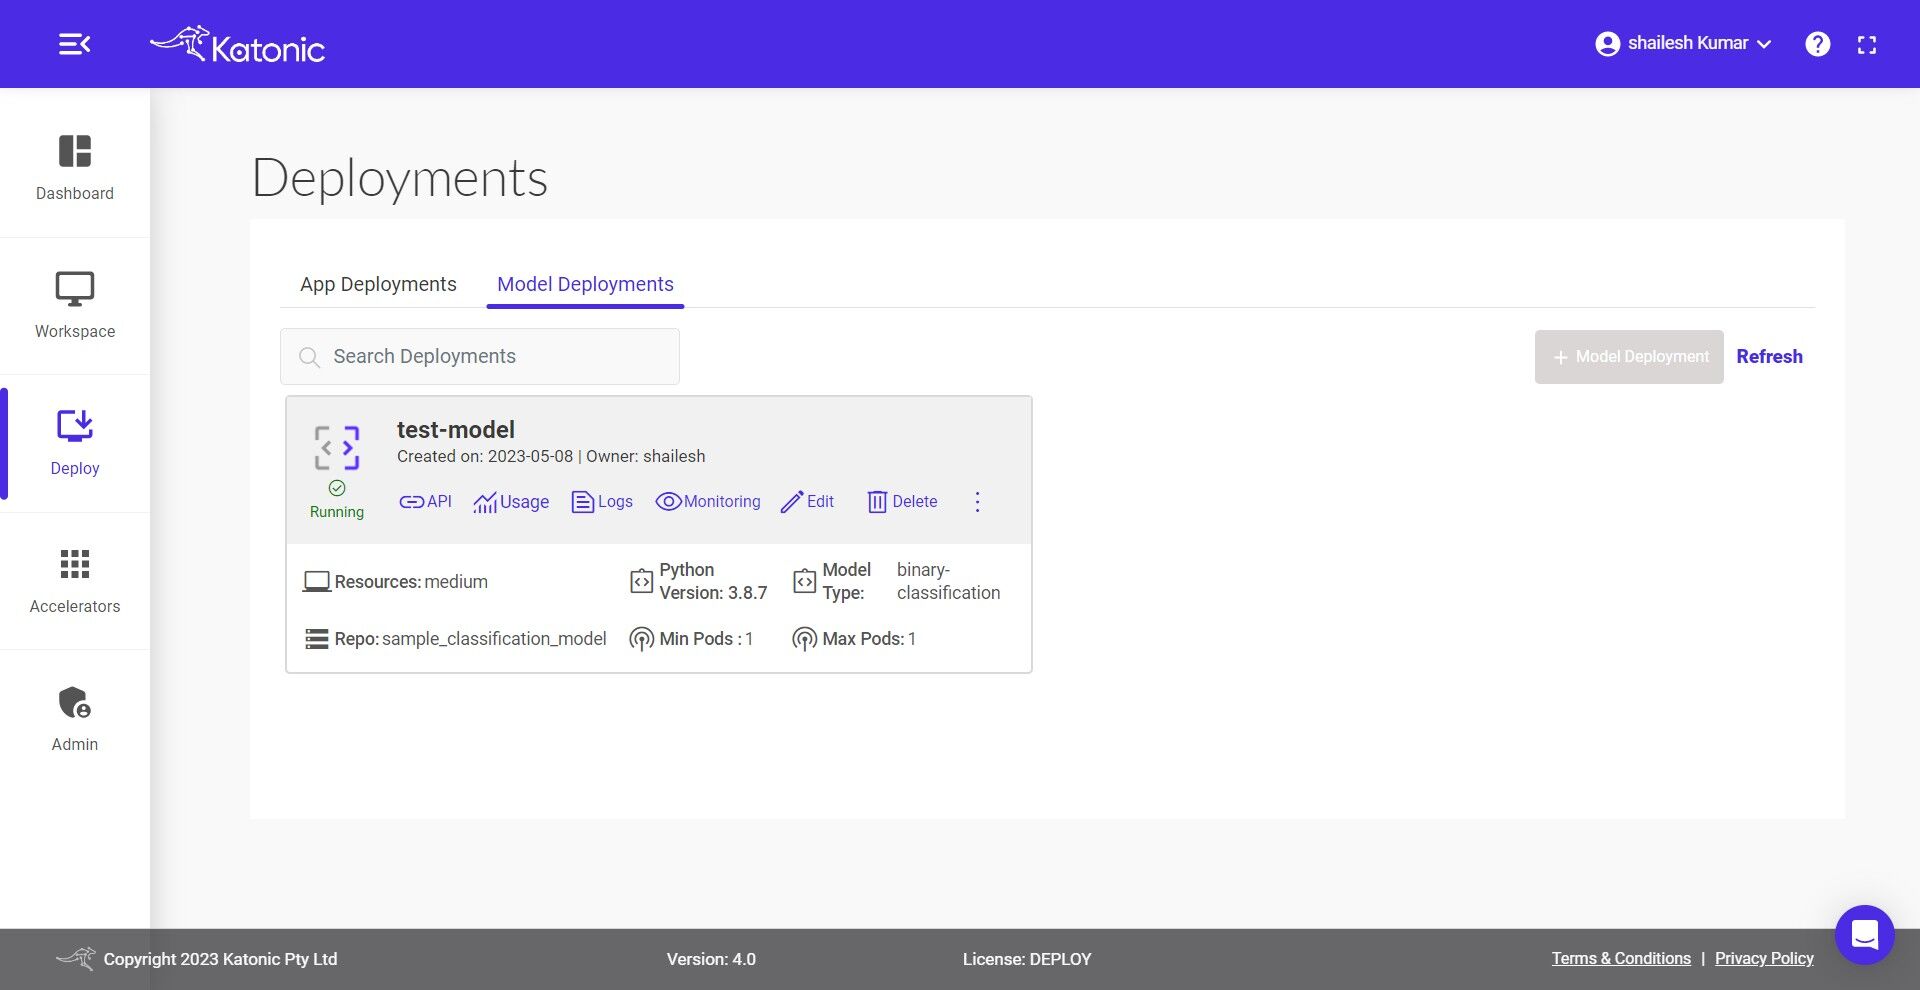
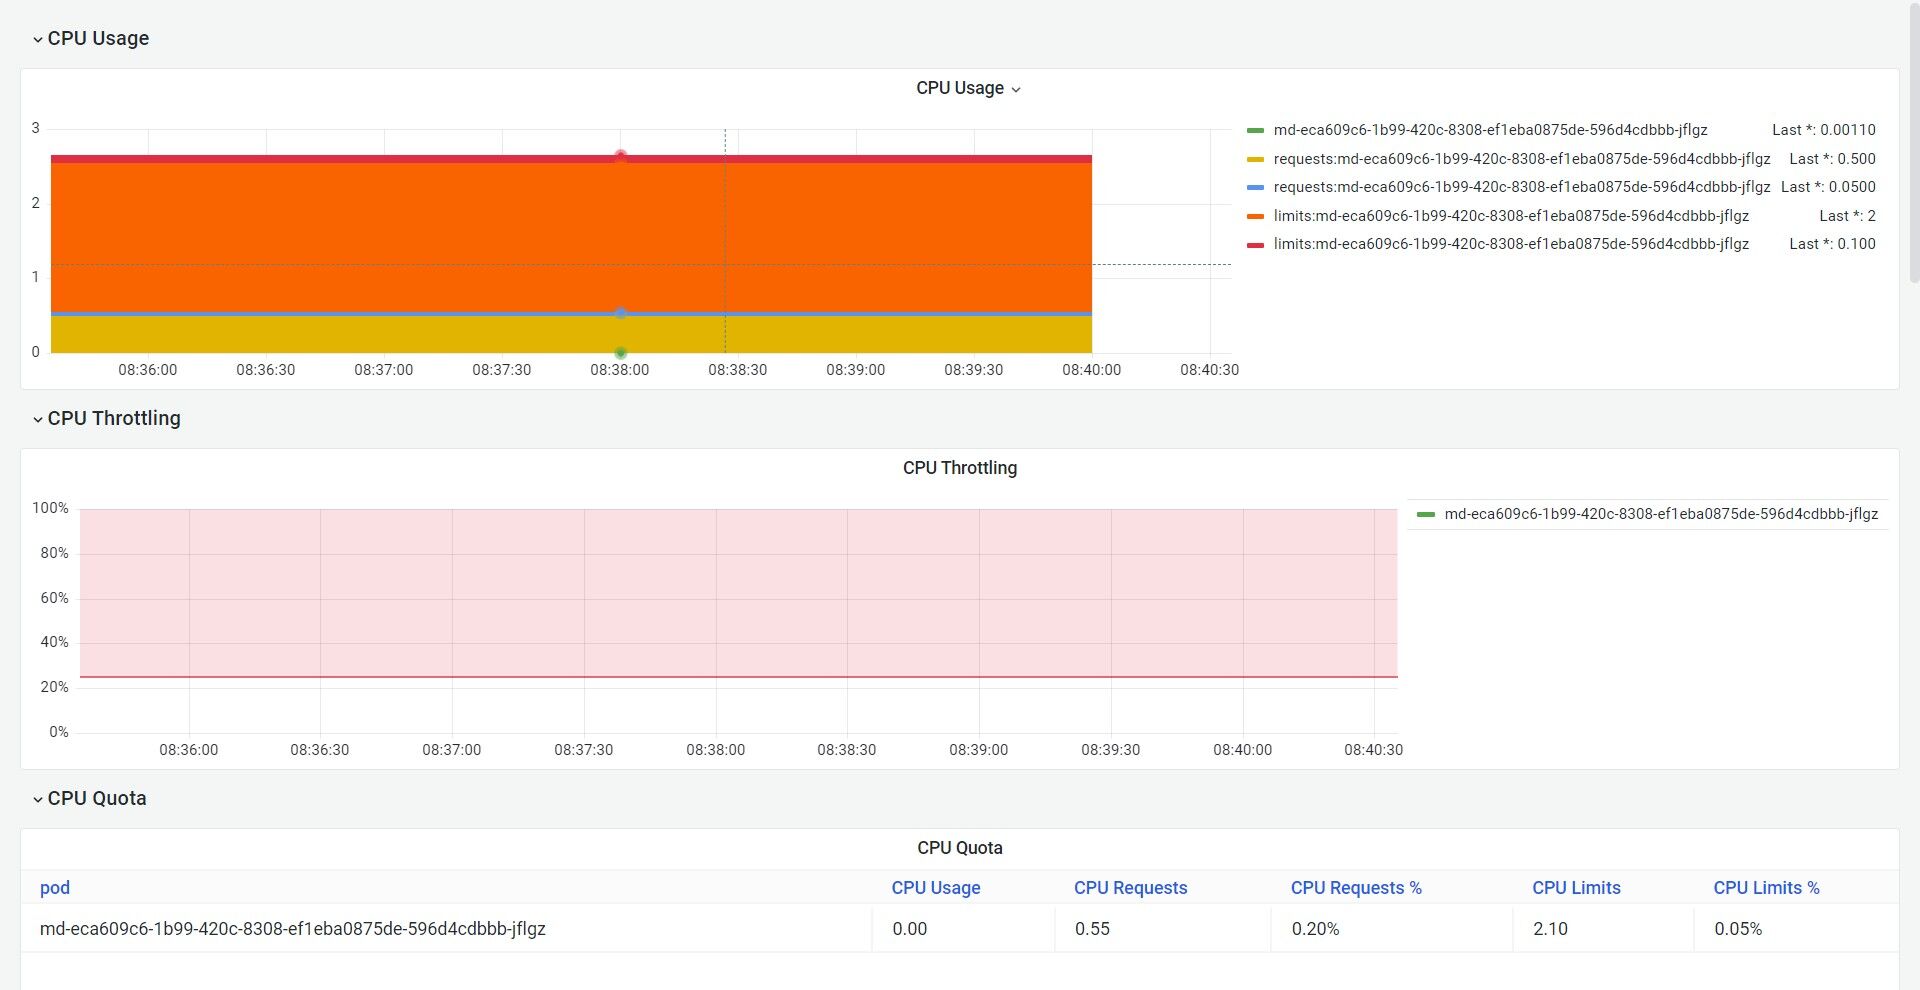
- Once your Model API is in the Running state you can check consumption of the hardware resources from Usage option.
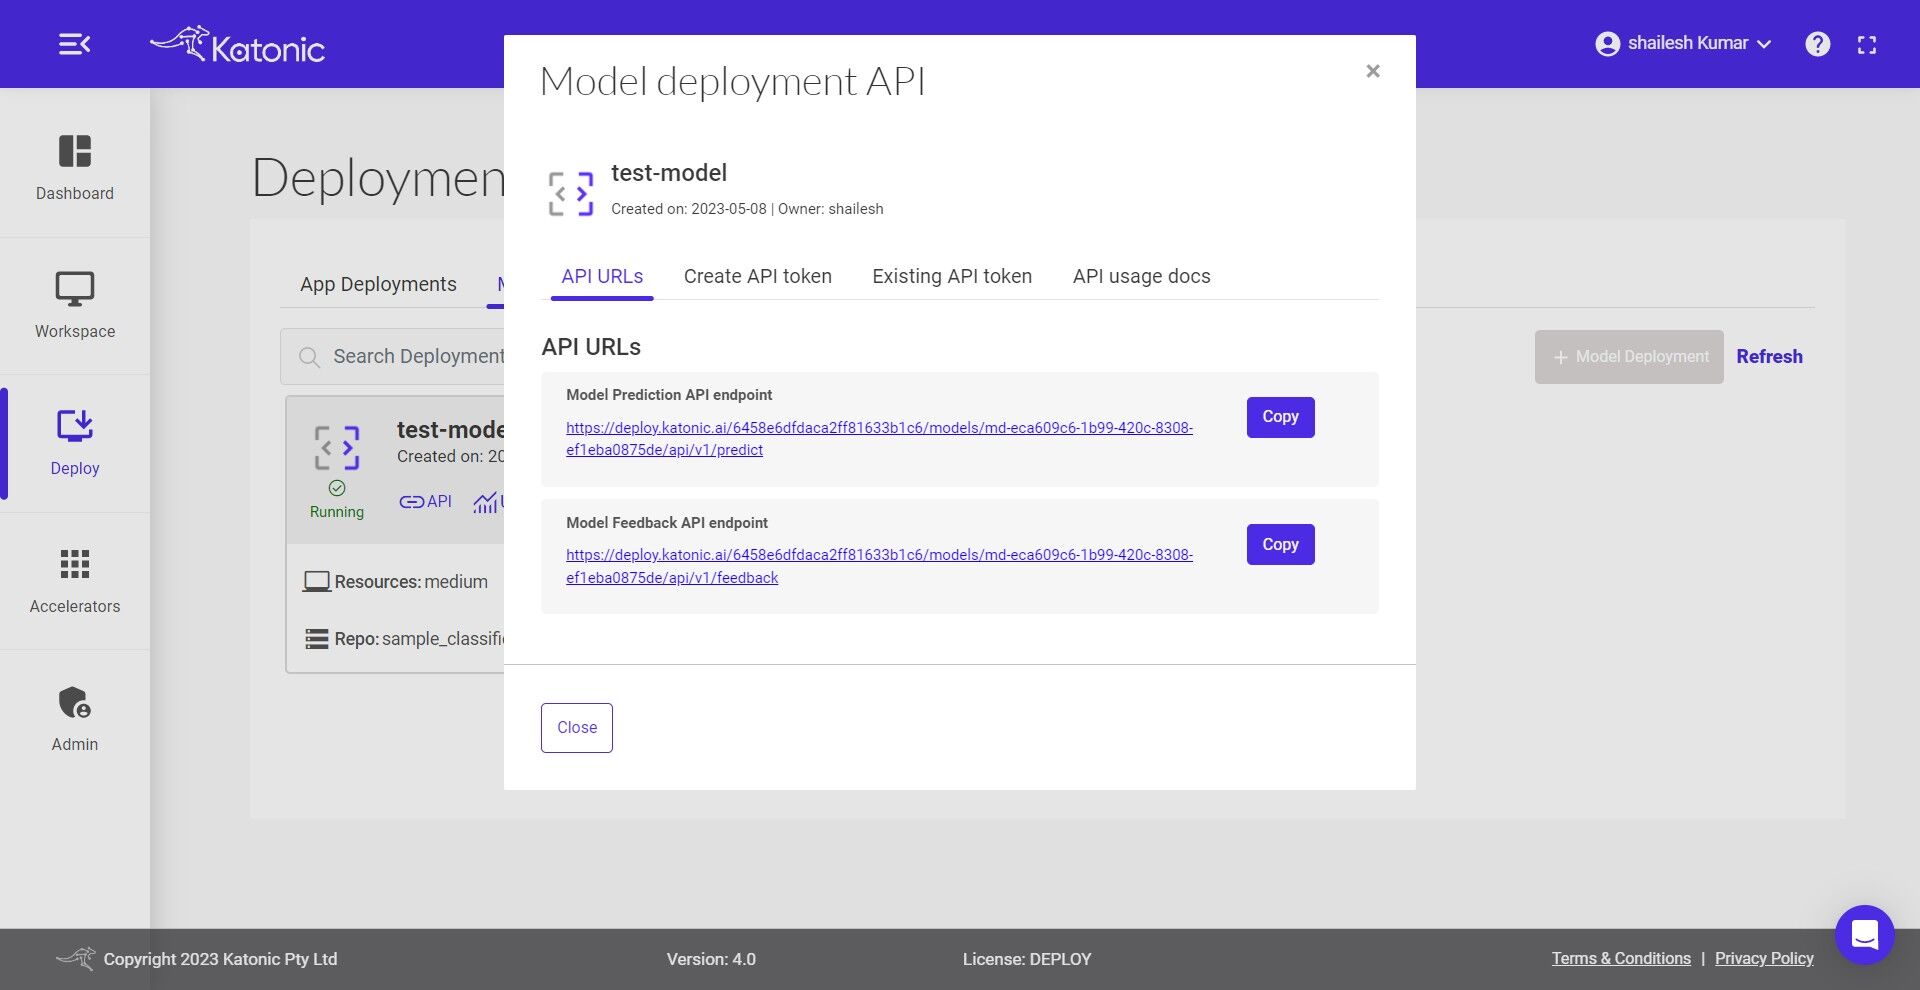
- You can access the API endpoints by clicking on API.
There are two APIs under API URLs:
- Model Prediction API endpoint: This API is for generating the prediction from the deployed model Here is the code snippet to use the predict API:
    MODEL_API_ENDPOINT = "Prediction API URL"
    SECURE_TOKEN = "Token"
    data = {"data": "Define the value format as per the schema file"}
    result = requests.post(f"{MODEL_API_ENDPOINT}", json=data, verify=False, headers = {"Authorization": SECURE_TOKEN})
    print(result.text)
- Model Feedback API endpoint: This API is for monitoring the model performance once you have the true labels available for the data. Here is the code snippet to use the feedback API. The predicted labels can be saved at the destination sources and once the true labels are available those can be passed to the feedback URL to monitor the model continuously.
MODEL_FEEDBACK_ENDPOINT = "Feedback API URL"
SECURE_TOKEN = "Token"
true = "Pass the list of true labels"
pred = "Pass the list of predicted labels"
data = {"true_label": true, "predicted_label": pred}
result = requests.post(f"{MODEL_API_ENDPOINT}", json=data, verify=False, headers = {"Authorization": SECURE_TOKEN})
print(result.text)
Click on the Create API token to generate a new token in order to access the API
- Give a name to the token.
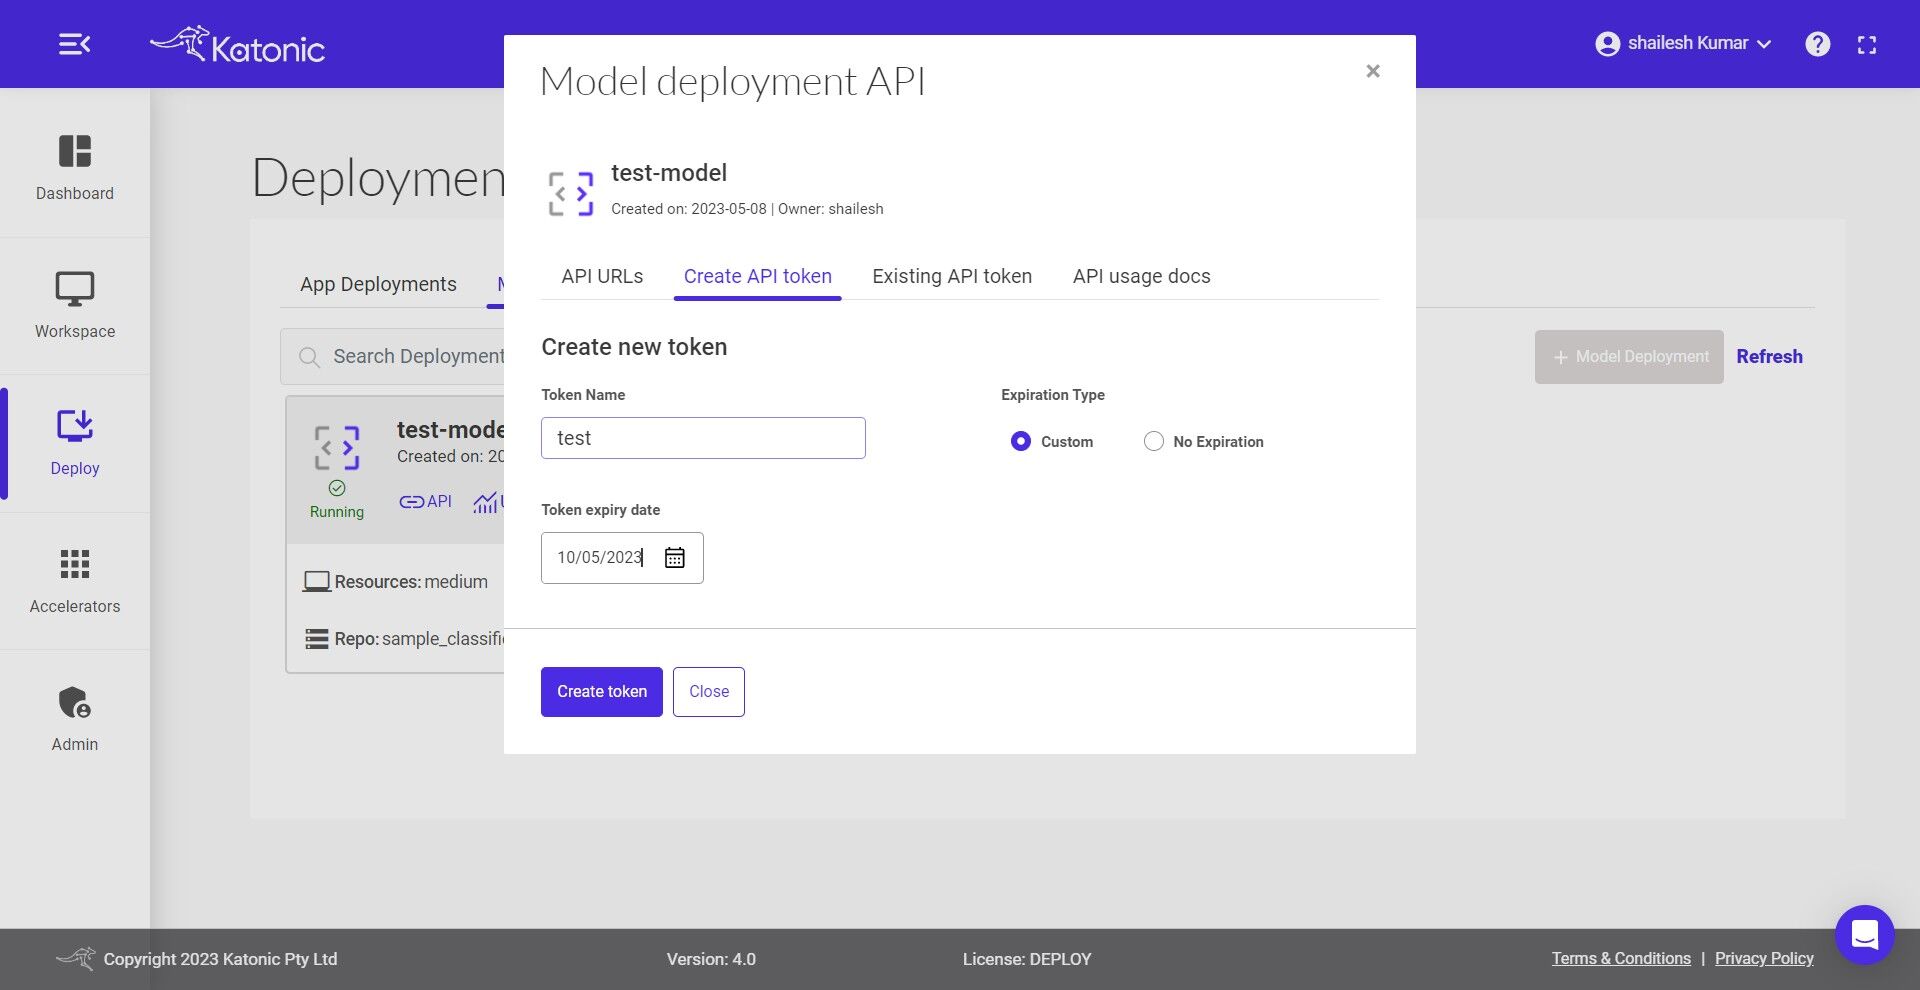
Select the Expiration Type
Set the Token Expiry Date
Click on Create Token and generate your API Token from the pop-up dialog box.
Note: A maximum of 10 tokens can be generated for a model. Copy the API Token that was created. As it is only available once, be sure to save it.
Under the Existing API token section you can manage the generated token and can delete the no longer needed tokens.
API usage docs briefs you on how to use the APIs and even gives the flexibility to conduct API testing.
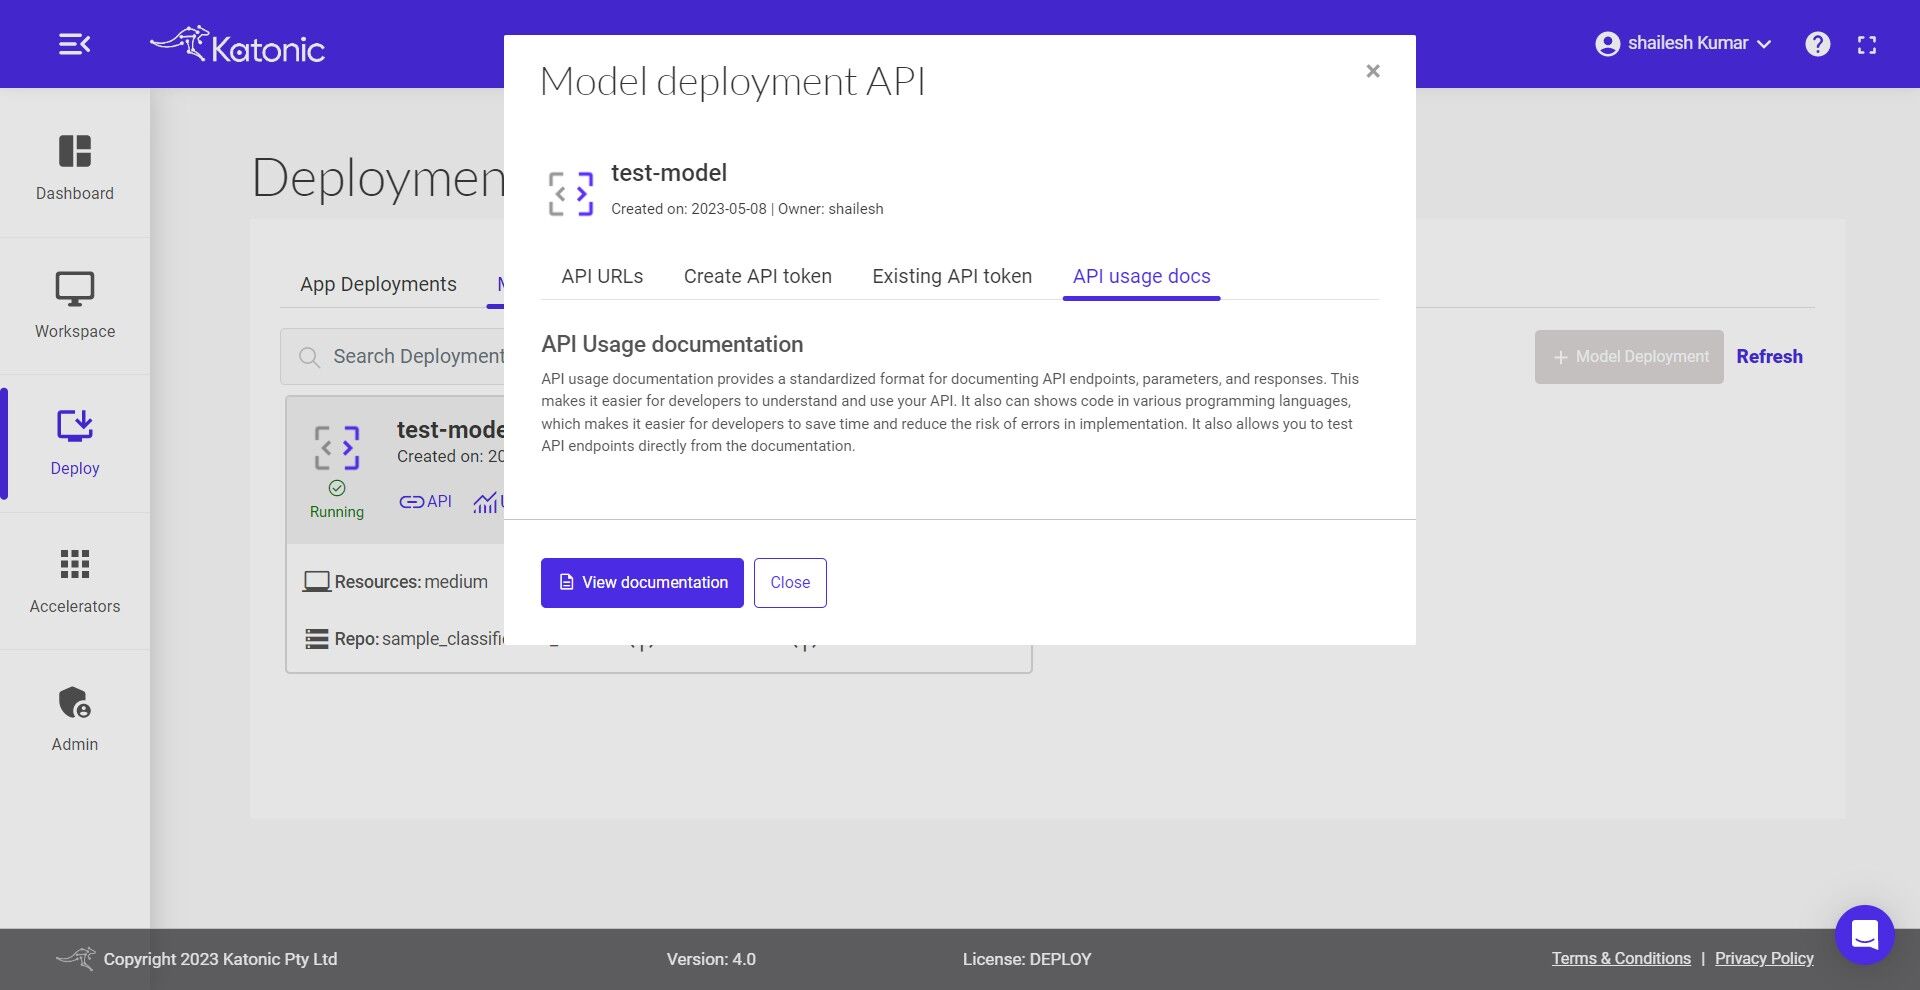
To know more about the usage of generated API you can follow the below steps:
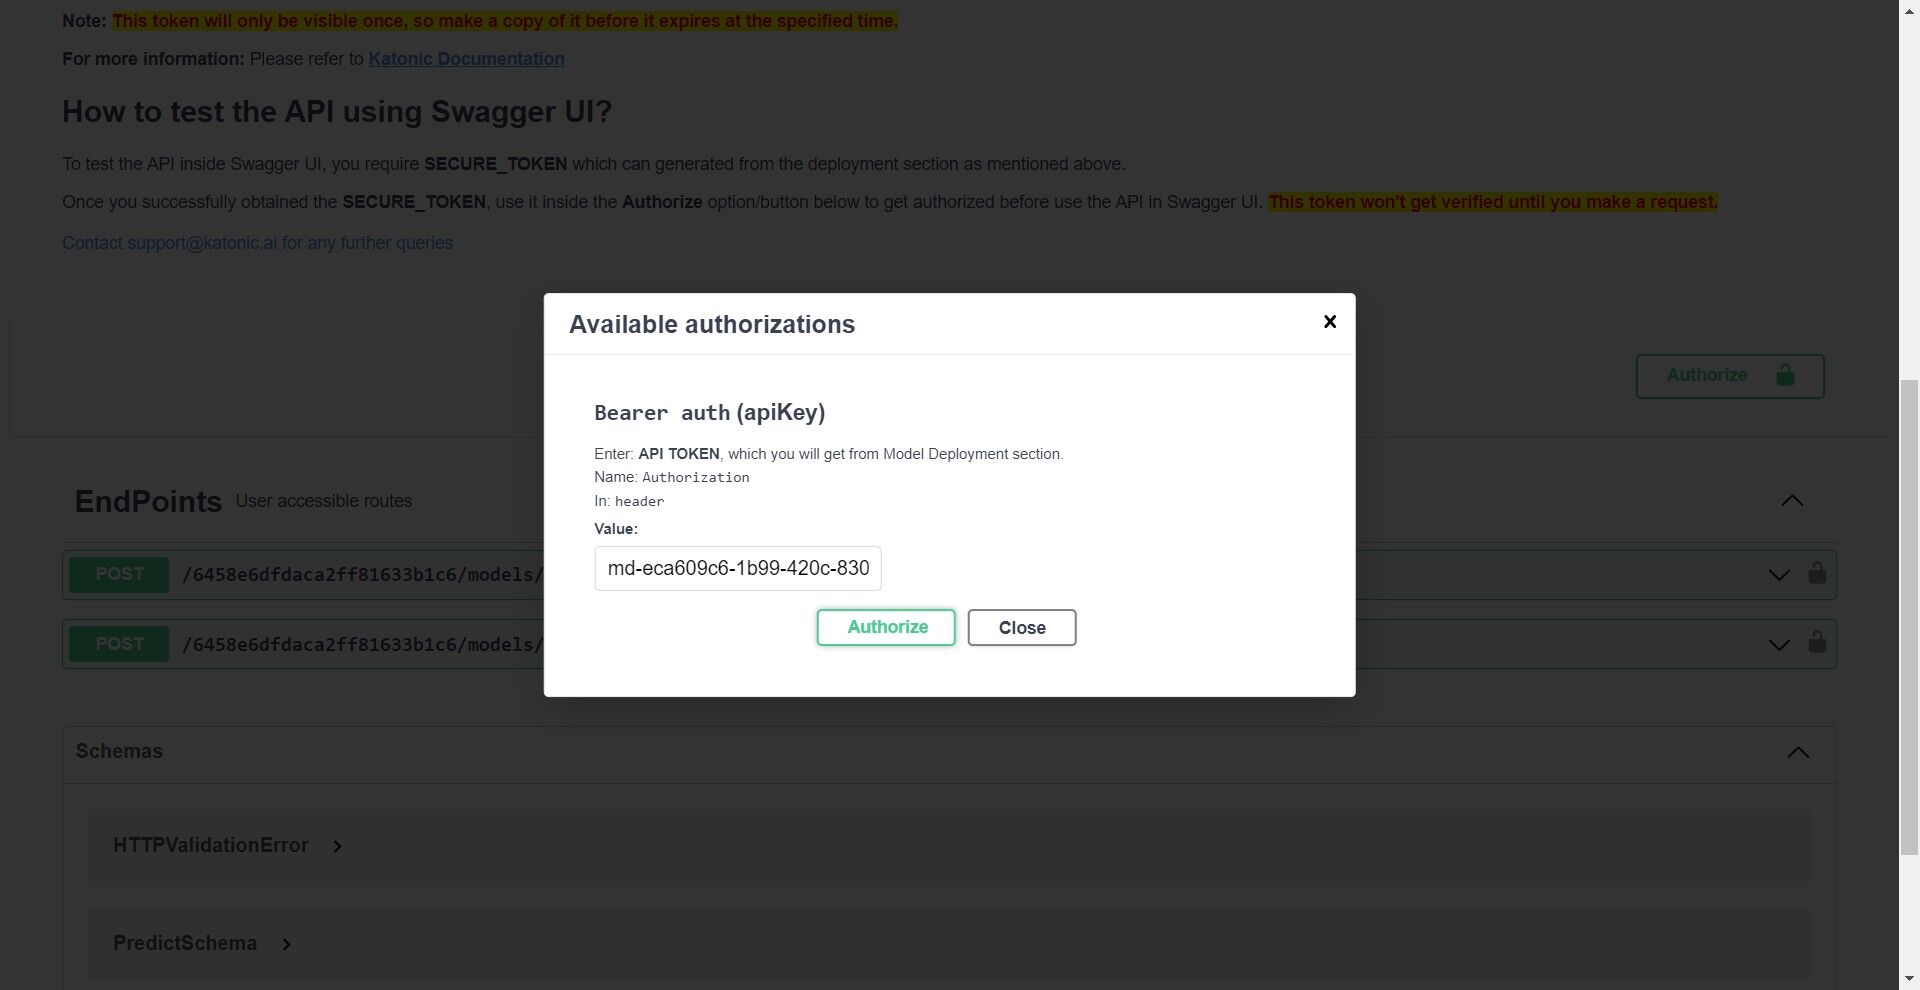
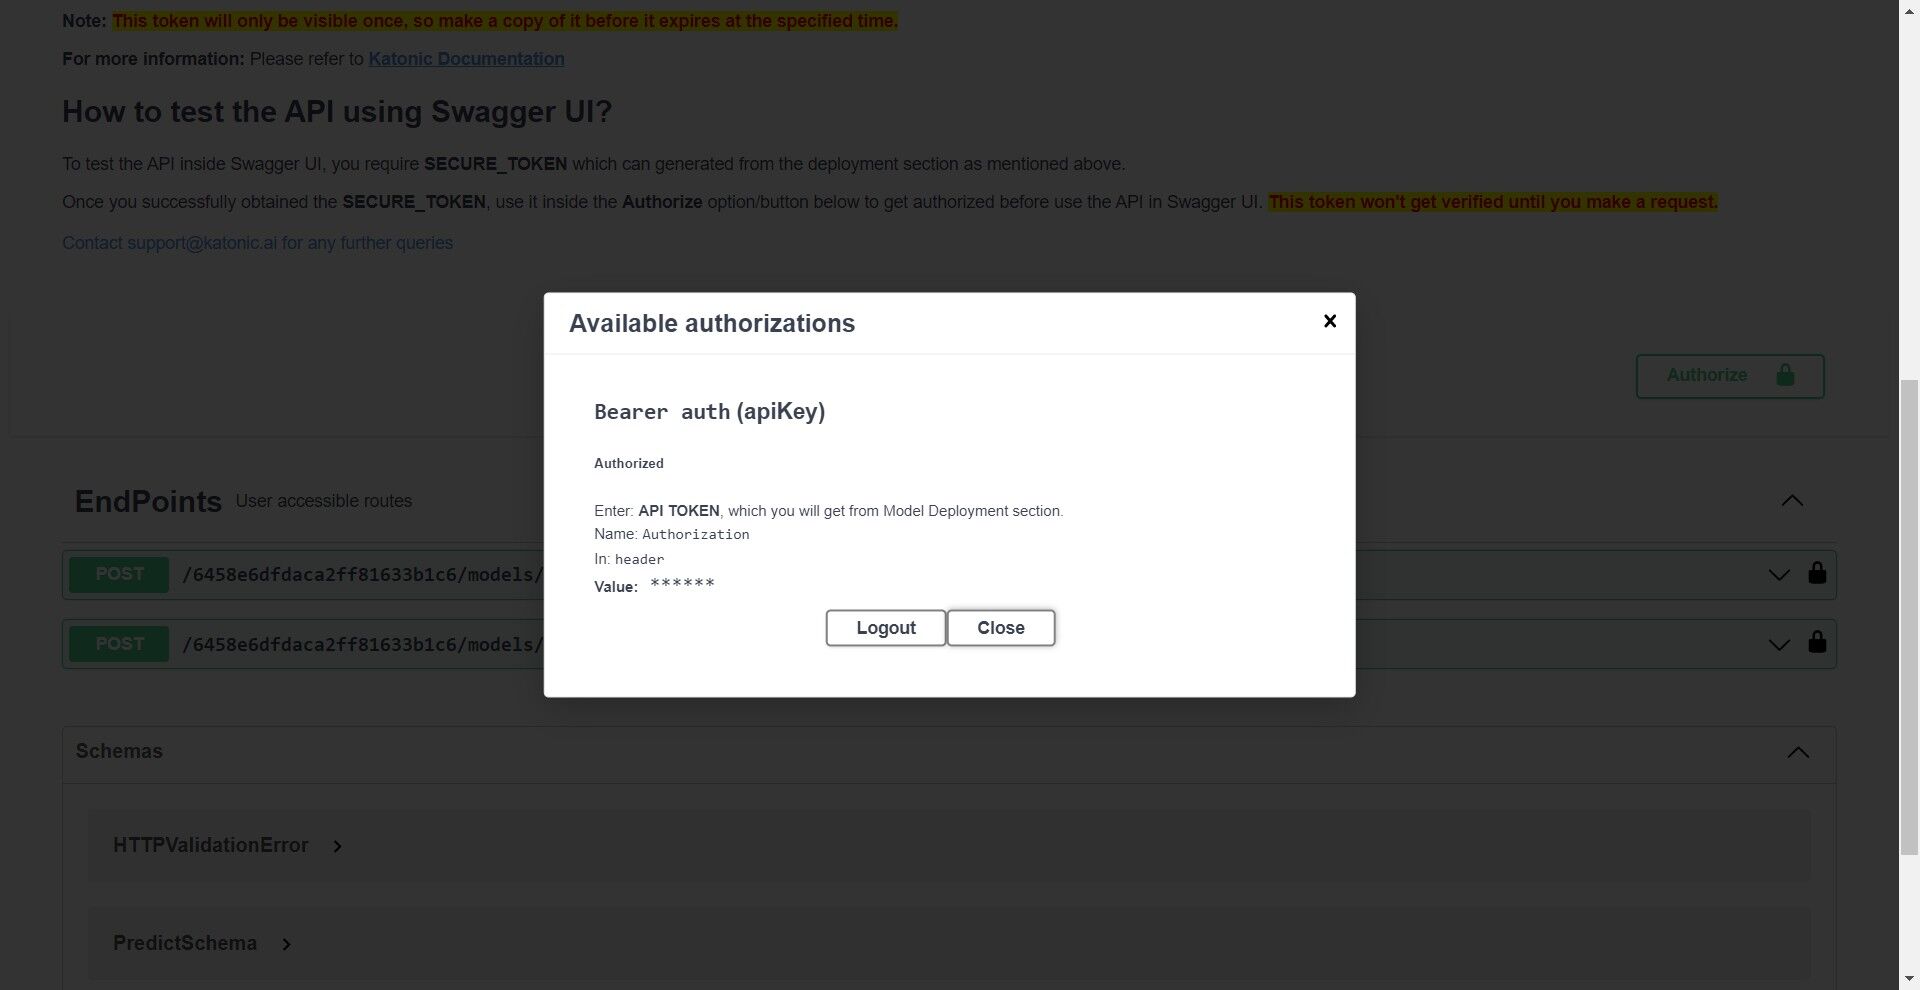
This is a guide on how to use the endpoint API. Here you can test the API with different inputs to check the working model. In order to test API you first need to Authorize yourself by adding the token as shown below. Click on Authorize and close the pop-up.
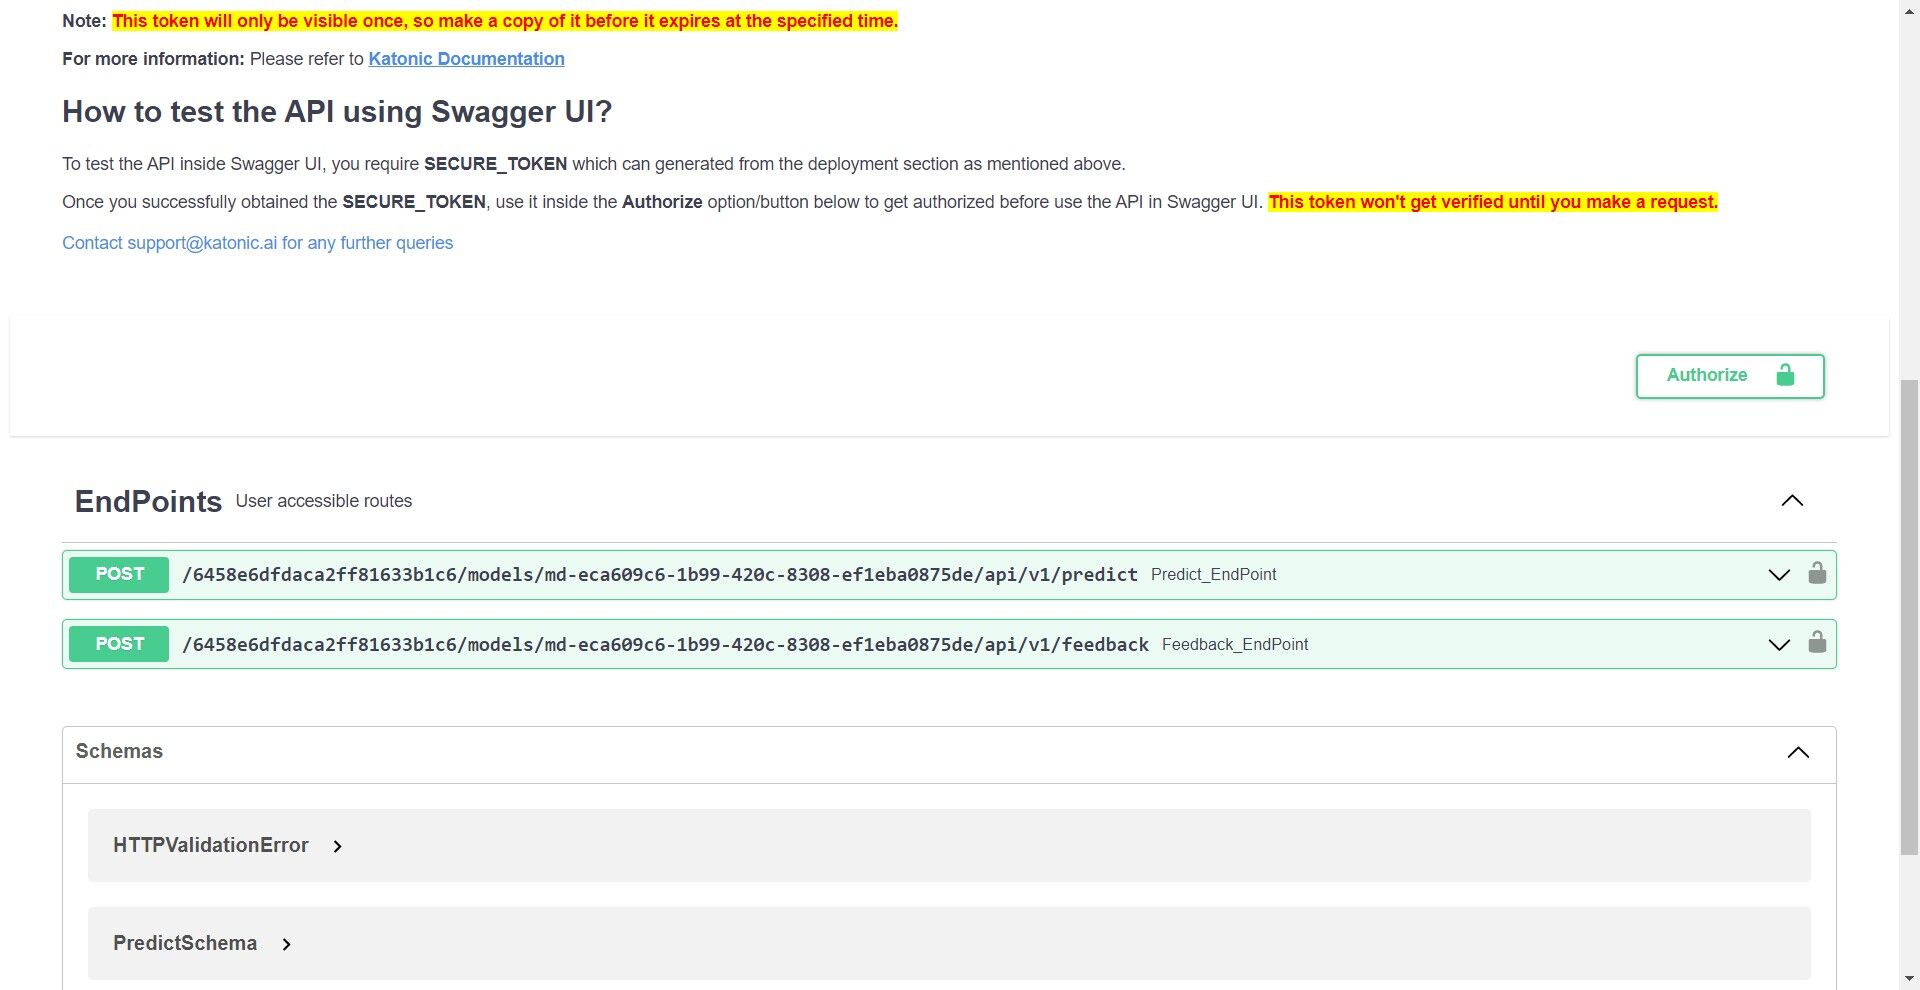
Once it is authorise you can click on Predict_Endpoint bar and scroll down to Try it out.
If you click on the Try it out button, the Request body panel will be available for editing. Put some input values for testing and the number of values/features in a record must be equal to the features you used while training the model.
If you click on execute, you would be able to see the prediction results at the end. If there are any errors you can go back to the model card and check the error logs for further investigation.
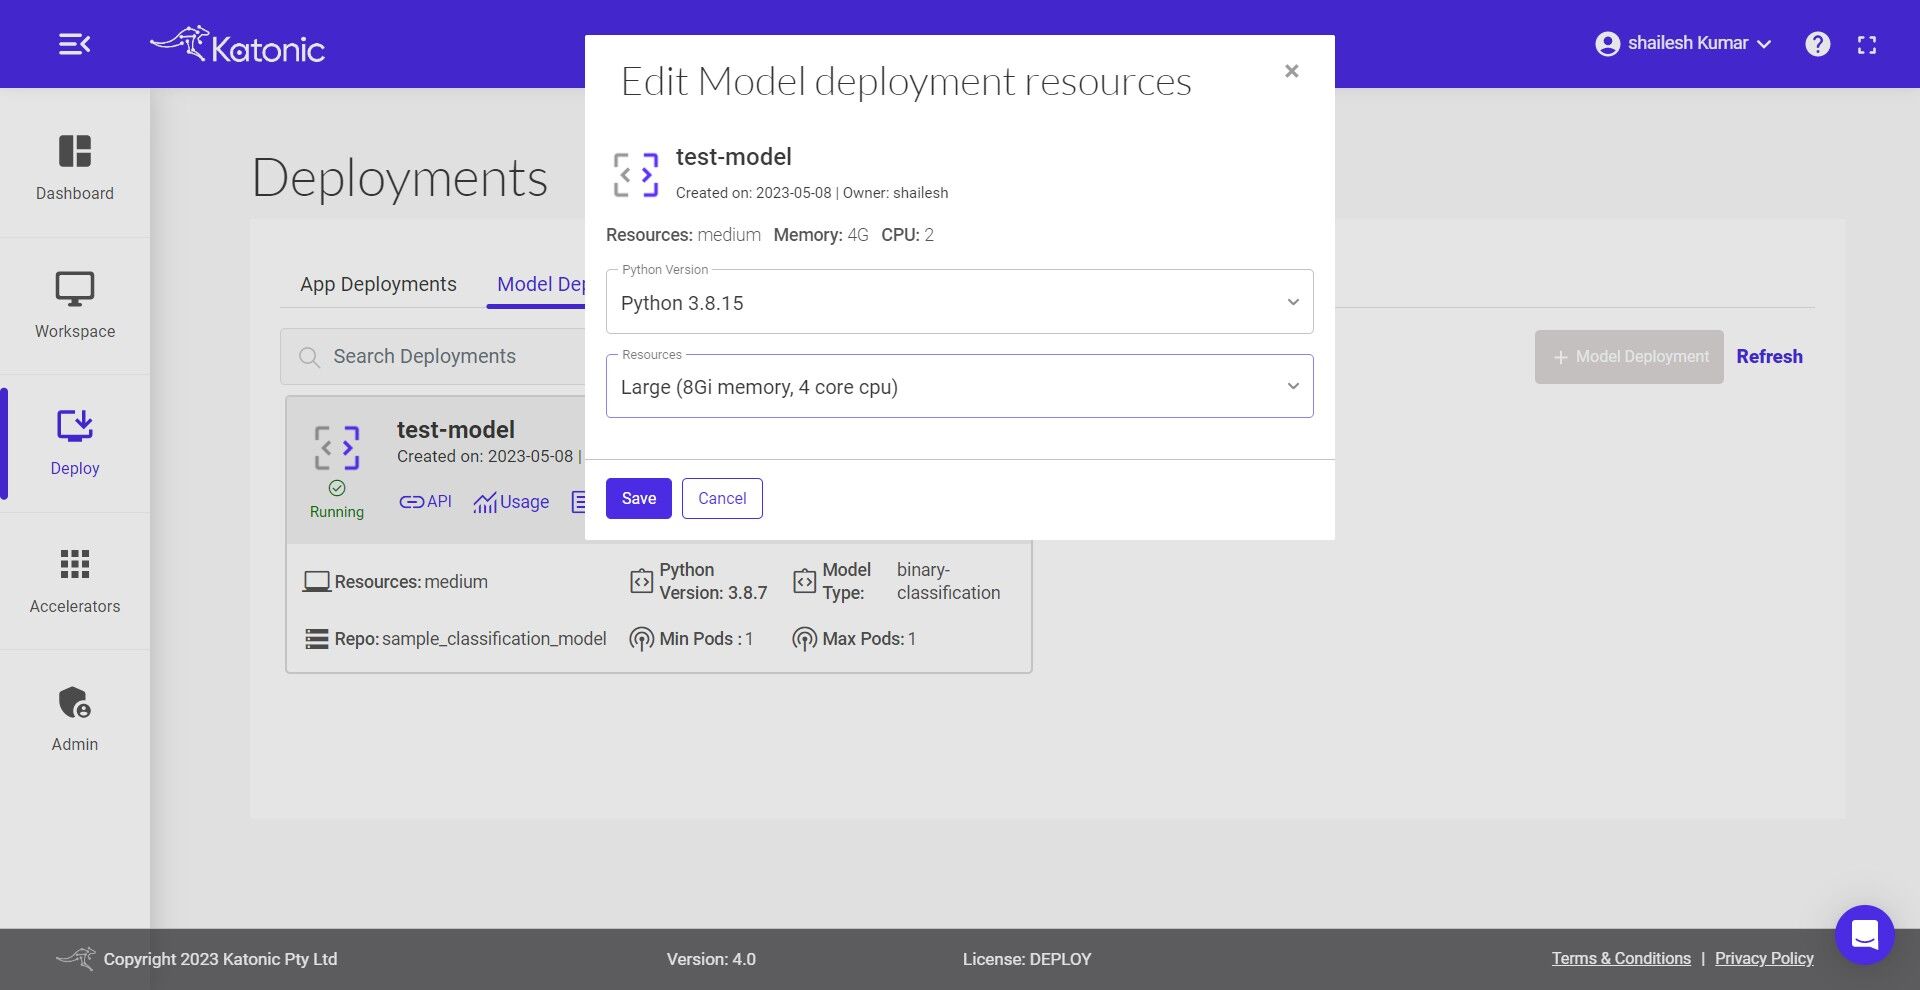
- You can also modify the resources, version and minimum & maximum pods of your deployed model by clicking the Edit option and saving the updated configuration.
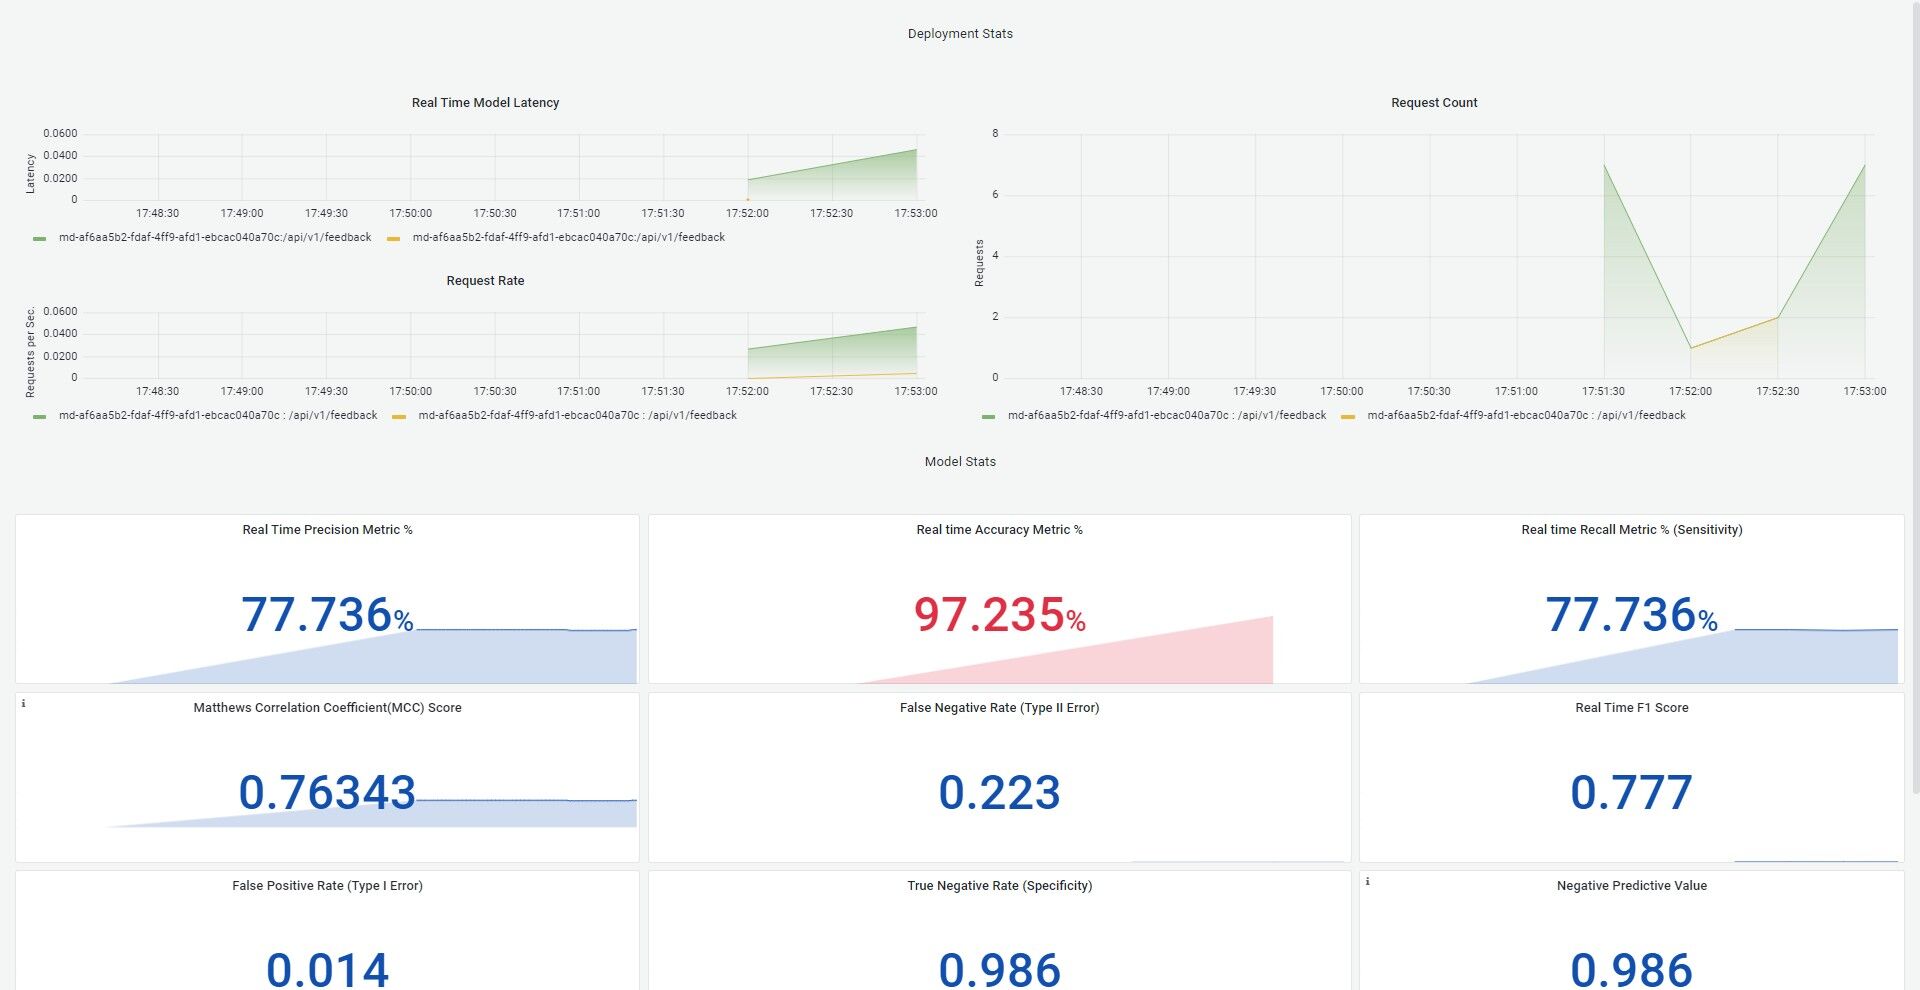
- Click on Monitoring, and a dashboard would open up in a new tab. This will help to monitor the effectiveness and efficiency of your deployed model. Refer the Model Monitoring section in the Documentation to know more about the metrics that are been monitored.
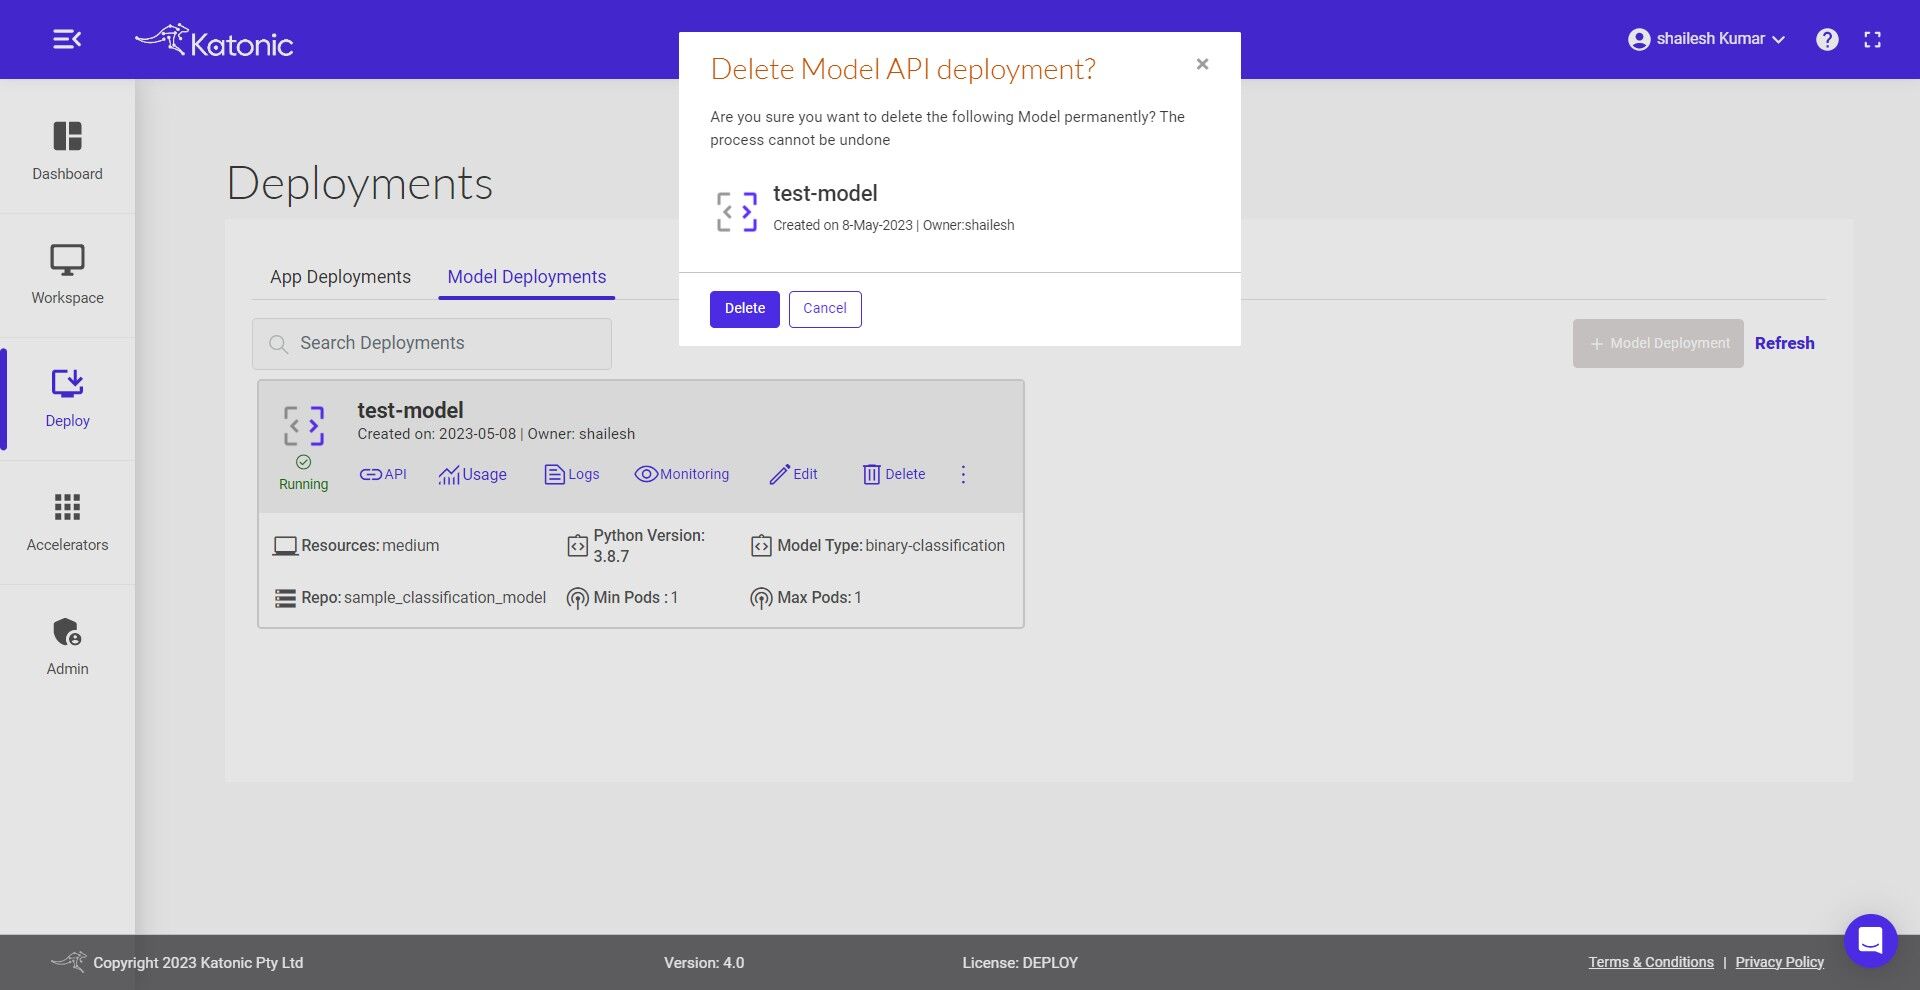
- To delete the unused models use the Delete button.