Katonic Platform Azure Installation Guide
Katonic Installer
This guide describes how to install, operate, administer, and configure the Katonic Platform in your own Azure Kubernetes cluster. This content is applicable to Katonic users with self-installation licenses.
Hardware Configurations
The platform is available in two configurations, which differ in a variety of aspects, including the performance capacity, footprint, storage size, and scale capabilities:
Proof of Concept
A single platform-node cluster with a single compute node implementation. This configuration is designed mainly for proof of concepts and evaluations and doesn't include high availability (HA) or performance testing.
Operational Cluster
A scalable cluster implementation that is composed of a standard set of three master nodes, a set of worker nodes dedicated to hosting Katonic platform services, and a set of worker nodes dedicated to hosting compute workloads. This configuration is designed to achieve superior performance that enables real-time execution of analytics, machine learning (ML), and artificial intelligence (AI) applications in a production pipeline.
Katonic on Azure
Katonic 3.3 can run on a Kubernetes cluster provided by the Azure Kubernetes Service.
Runtime platform:
AKS cluster deployed in 3 Availability Zones (AZ), versions 1.19+,Node/instances: virtual machine scale set.
Platform nodes: Node pool (min 2) Standard_D4s_v3
Compute nodes: Node pool (Variable) Standard_D8s_v3
GPU compute nodes: Nodepool (Variable) Standard_NC6s_v3
Storage:
Shared filesystem and datasets: Azure Storage Account
Backups: Azure Storage Account
Environment and model image: Azure Container Registry
Networking:
Ingress Load Balancer: Standard SKU (Azure Load Balancer)
Cluster network: Azure Virtual Network with a subnet with 65536 IP addresses (/16 subnet mask).
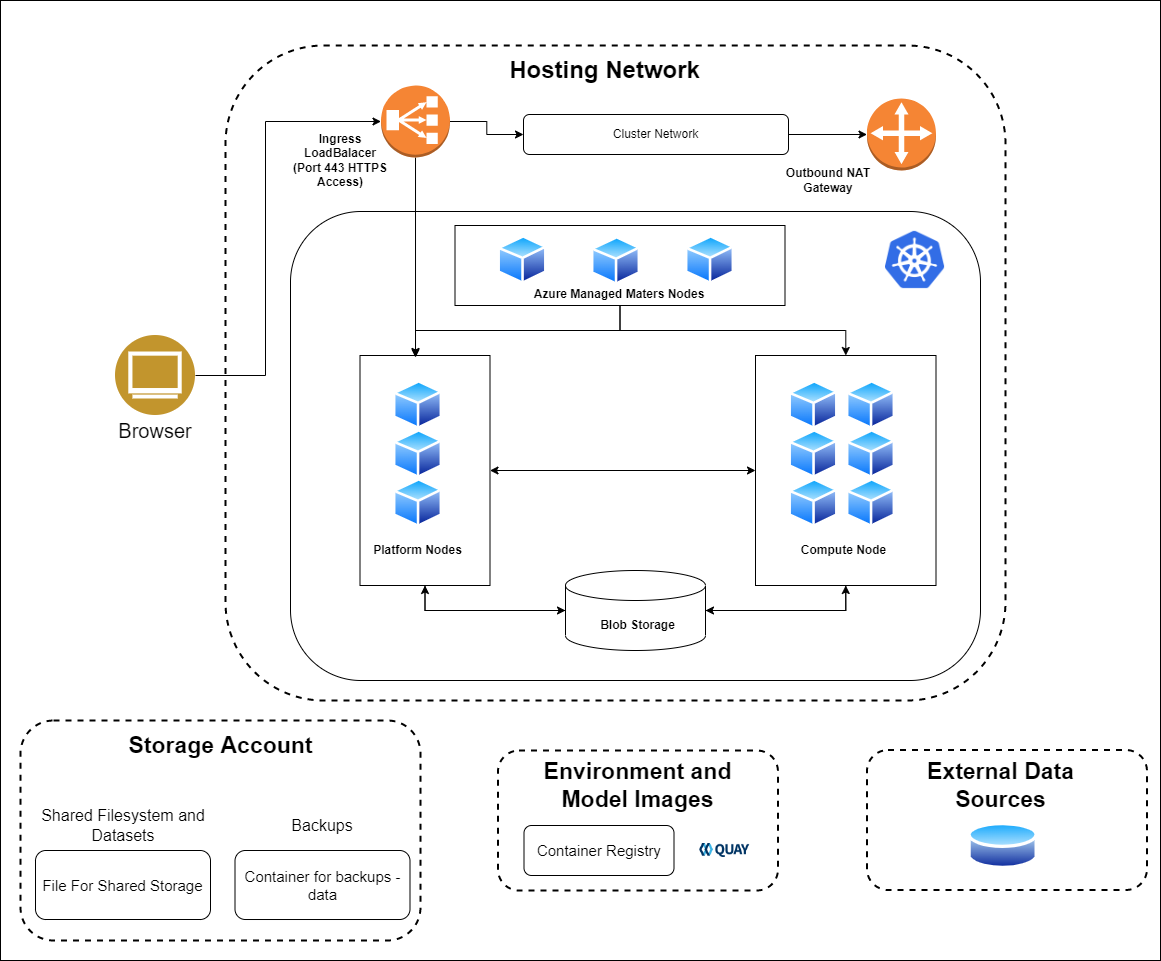
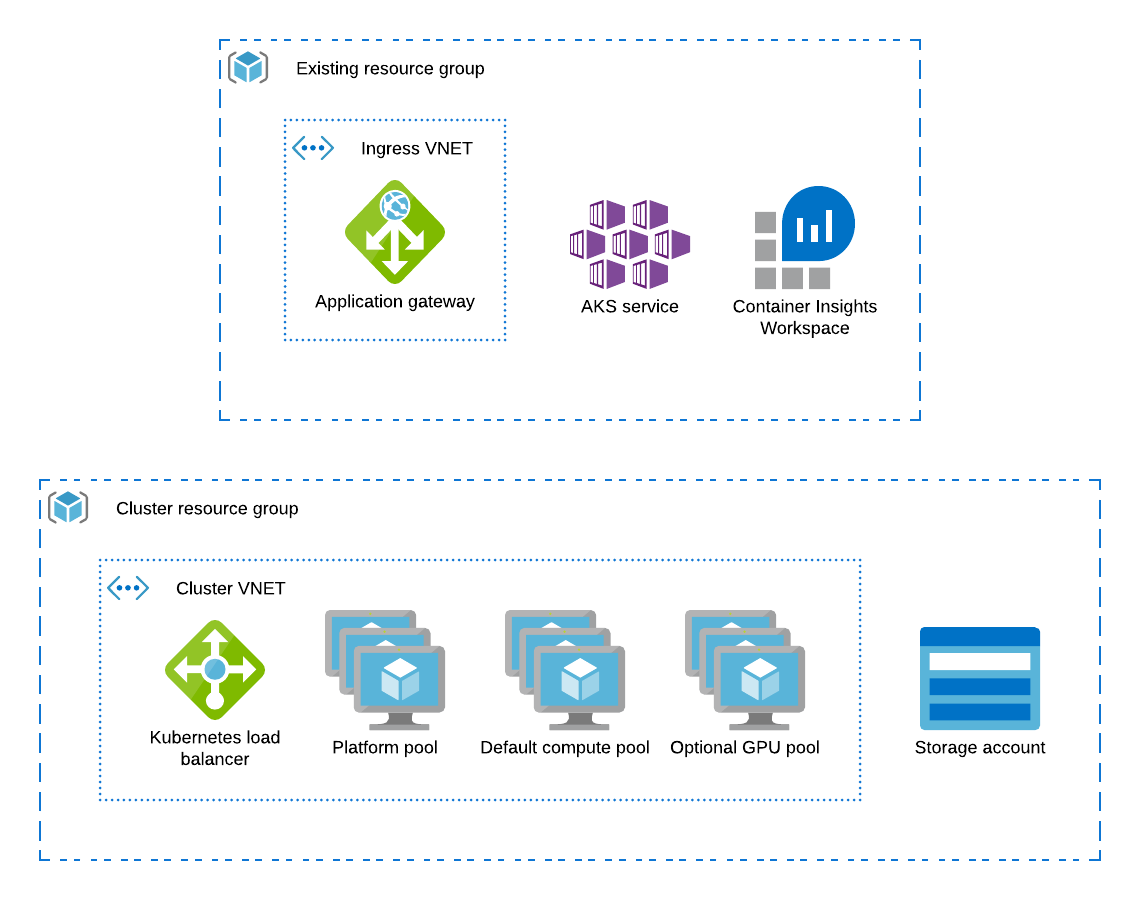
When running on AKS, the Katonic uses Azure resources to fulfil the cluster requirements as follows:
Kubernetes control is handled by the AKS control plane with managed Kubernetes masters
The AKS cluster’s node pool which is labeled katonic.ai/node-pool=platform is configured to host the Katonic platform
Additional AKS node pools provide compute(labelled katonic.ai/node-pool=compute) and GPU(labelled katonic.ai/node-pool=gpu) nodes for user workloads
An Azure storage account stores Katonic blob data and datasets
The kubernetes.io/azure-disk provisioner is used to create persistent volumes for Katonic executions
Ingress to the Katonic application is handled by an SSL-terminating Application Gateway that points to a Kubernetes load balancer
Dynamic block storage
AKS clusters come equipped with several kubernetes.io/azure-disk backed storage classes by default. Katonic recommends the use of premium disks for better input and output performance. The managed-premium class that is created by default can be used.
Dynamic shared storage
AKS clusters come equipped azurefile storage class by default. Katonic recommends the use of premium disks for better input and output performance. The azurefile-premium class that is created by default can be used.
Calculating Required Infrastructure Resources (Azure)
Allocated Infrastructure Resources
When the platform is installed, it creates the following resources. Take this into account when selecting your installation configuration.
| Type | Amount | When | Notes |
|---|---|---|---|
| Network interface | 1 per node | Always | |
| OS boot disk (Azure managed disk) | 1 per node | Always | |
| Public IP address | 1 per node | The platform has public IP addresses. | |
| VNet | 1 | The platform is deployed to a new VNet. | |
| Network security group | 1 | Always | See Network Security Groups Configuration (Azure). |
| AKS Cluster | 1 | When AKS is used as the application cluster |
Node Pools
The AKS cluster must have at least two node pools that produce worker nodes with the following specifications and distinct node labels, and it might include an optional GPU pool:
| Pool | Min-Max | VM | Labels | Taints |
|---|---|---|---|---|
| platform | 2-4 | Standard_D4s_v3 | katonic.ai/node-pool=platform | katonic.ai/node-pool=platform:NoSchedule |
| compute | 1-20 | Standard_D8s_v3 | katonic.ai/node-pool=compute | |
| Optional: gpu | 0-5 | Standard_NC6 | katonic.ai/node-pool=gpu | katonic.ai/node-pool=gpu:NoSchedule |
The recommended architecture configures the cluster’s initial default node pool with the correct label and size to serve as the platform node pool.
Azure Platform-Node Specifications
Platform nodes in platform Azure cloud deployments must fulfill the following hardware specification requirements according to the deployment type:
| Component | Specification (POC) | Specification (Operational) |
|---|---|---|
| Node count | min 2 | min 2 |
| Instance type | Standard_D4s_v3 | Standard_D8s_v3 |
| vCPUs | 4 | 8 |
| Memory | 16 GB | 32 GB |
Azure Compute-Node Specifications
Compute nodes in platform Azure cloud deployments must use one of the following instance types; choose the type that best fits your requirements. Azure Kubernetes Service (AKS) is also supported for application nodes, using the instance types listed below. For specification details for each type, refer to the Azure documentation.
Note
Supported compute node configurations
Standard_D8s_v3 (default configuration)
Standard_D16s_v3
Standard_D32s_v3
Standard_D48s_v3
Standard_D64s_v3
NCv3-series (GPU optimized)
Additional node pools can be added with distinct katonic.ai/node-pool labels to make other instance types available for Katonic executions.
Network plugin
The Katonic-hosting cluster should use the default network plugin created which gets created when AKS is deployed.
Katonic Platform Installation
Installation process
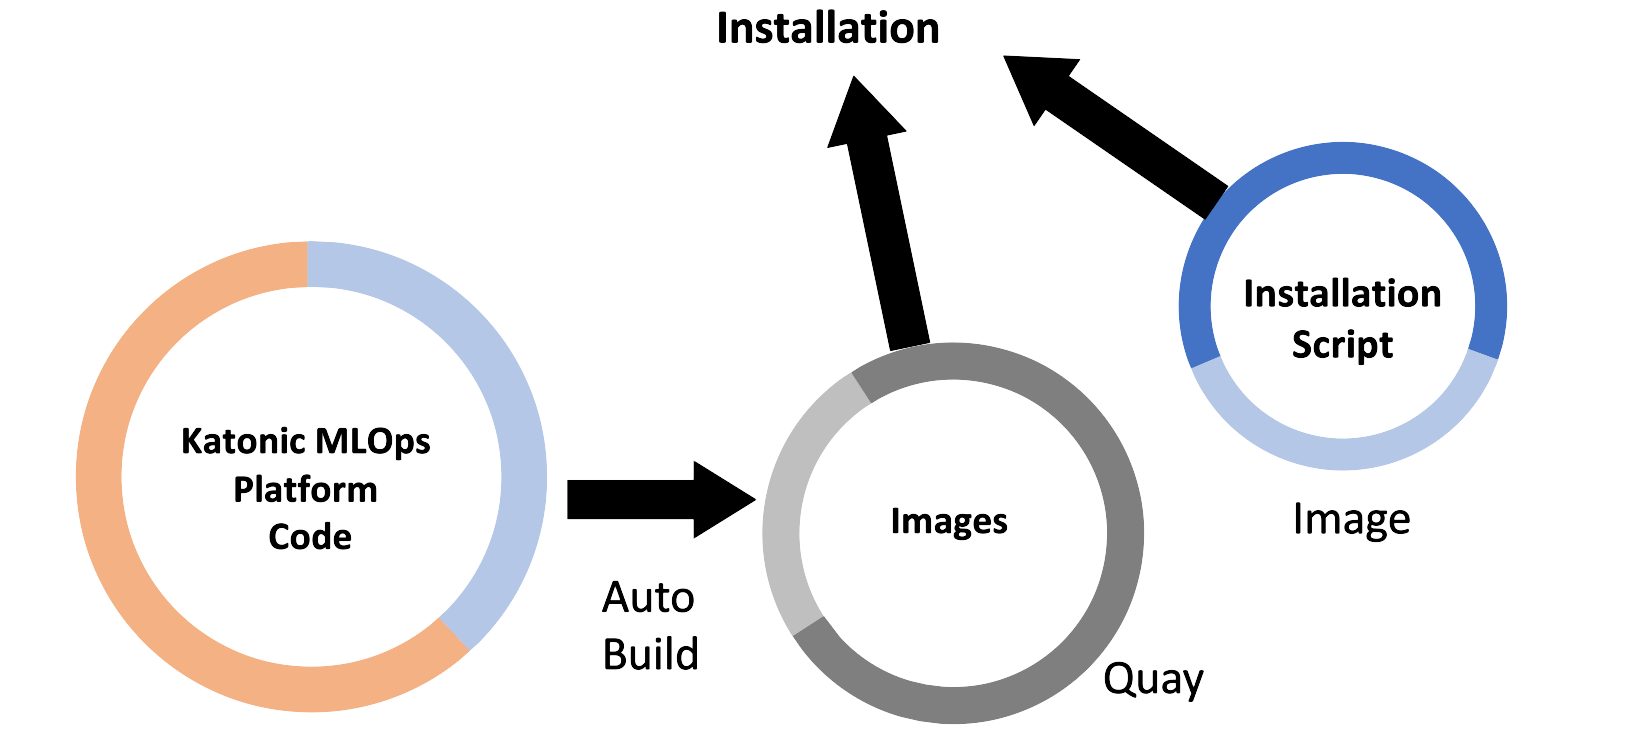
The Katonic platform runs on Kubernetes. To simplify the deployment and configuration of Katonic services, Katonic provides an install automation tool called the katonic-installer that will deploy Katonic into your compatible cluster. The katonic-installer is an ansible role delivered in a Docker container and can be run locally.
Prerequisites
To install and configure Katonic in your Azure account you must have:
- quay.io credentials from Katonic.
Required:
PEM encoded public key certificate for your domain and private key associated with the given certificate.
An Azure subscription with enough quota to create:
At least 4 Standard_D8s_v3 VMs.
NC6s_v3 or similar SKU VMs, if you want to use GPU.
A Linux-based machine having 4GB RAM and 2vcpus. Skip to step b if you already have the machine with the given specifications. TIP: After the platform is deployed successfully, the VM can be deleted.
Switch to the root user inside the machine.
Azure CLI version 2.35.0 specifically must be installed and logged in your Azure account using az login command, with a user that has a contributor role on the subscription. Note: To achieve this on Debian based machines, follow install Azure CLI v2.35+
If your Azure has tenants, use the following command to get your subscription ID.
az account list --output table*
Save this as later on you need to pass it to the katonic-installer.
az group create --name <RESOURCE_GROUP> \ --location <ZONE>*
TIP
You can get a list of all available locations by running the following command:
az account list-locations
The Katonic Installer can deploy the Katonic MLOps platform in two ways:
Creating AKS and deploying Katonic MLOps Platform
Deploying Katonic MLOps platform on existing AKS(requirements must be satisfied)
Install Katonic Platform with Azure Kubernetes Service
- Log in to Quay with the credentials described in the requirements section above.
docker login quay.io
- Retrieve the Katonic installer image from Quay
docker pull quay.io/katonic/katonic-installer:v3.3
Create a directory.
mkdir katonic
cd katonicPut the PEM encoded public key certificate (having extension .crt) for your domain and private key associated with the given certificate(having extension .key) inside the current directory(katonic).
Initialize the installer application to generate a template configuration file named katonic.yml.
docker run -it --rm --name generating-yaml -v $(pwd):/install quay.io/katonic/katonic-installer:v3.3 init azure <license_type>
Edit the configuration file with all necessary details about the target cluster, storage systems, and hosting domain. Read the following configuration reference:
| Parameter | Description | Value |
|---|---|---|
| deployment_type | Katonic MLOps platform can be installed in either POC or Operational(HA) mode | POC or Operational |
| resource_group_name | Azure resource group name | eg. my-resource-group |
| resource_group_location | Azure resource group location | eg. centralindia |
| kubernetes_distribution | Distribution of Kubernetes | has to be kubernetes |
| azure_subscription_id | Azure Subscription ID | |
| platform_nodes.instance_type | Platform node VM size | eg. Standard_D8s_v3 |
| platform_nodes.min_count | Minimum number of platform nodes | eg. 2 |
| platform_nodes.max_count | Maximum number of platform nodes | eg. 4 |
| compute_nodes.instance_type | Compute node VM size | eg. Standard_D8s_v3 |
| compute_nodes.min_count | Minimum number of compute nodes | eg. 2 |
| compute_nodes.max_count | Maximum number of compute nodes | eg. 4 |
| gpu_enabled | Add GPU nodepool | True or False |
| gpu_nodes.instance_type | gpu node VM size | eg. Standard_NC6s_v3 |
| gpu_nodes.min_count | Minimum number of gpu nodes | eg. 2 |
| gpu_nodes.max_count | Maximum number of gpu nodes | eg. 4 |
| domain_name | domain on which Katonic MLOps Platform will be accessed | eg. mydomain.example.com |
| autoscaler | Enable Autoscaling | True or False |
| quay_username | username for quay | |
| quay_password | password for quay | |
| adminUsername | email for admin user | eg. john@katonic.ai |
| adminPassword | password for admin user | at least 1 special character at least 1 upper case letter at least 1 lower case letter minimum 8 characters |
| shared_storage.storage | create shared storage | True or False |
| backup_enabled | enable entire platform backup | True or False |
| backup_schedule | schedule of backups | eg. "@every 24h" |
| backup_expiration | backup expiration | eg. 2160h0m0s |
| create_k8s_cluster | create AKS | True or False |
| cluster_name | name of cluster |
- Installing Katonic MLOps Platform
docker run -it --rm --name install-katonic -v /root/.azure:/root/.azure -v $(pwd):/inventory quay.io/katonic/katonic-installer:v3.3
Installation Verification
The installation process can take up to 45 minutes to fully complete. The installer will output verbose logs, and commands to take kubectl access of deployed cluster and surface any errors it encounters. After installation, you can use the following commands to check whether all applications are in a running state or not.
az aks get-credentials --resource-group {{ resource_group_name }} --name katonic-mlops-platform
kubectl get pods --all-namespace
This will show the status of all pods being created by the installation process. If you see any pods enter a crash loop or hang in a non-ready state, you can get logs from that pod by running:
kubectl logs $POD_NAME --namespace $NAMESPACE_NAME
If the installation completes successfully, you should see a message that says:
TASK [platform-deployment : Credentials to access Katonic MLOps Platform] *******************************ok: [localhost] => {
    "msg": [
        "Platform Domain: $domain_name",
        "Username: $adminUsername",
        "Password: $adminPassword"
    ]
}
However, the application will only be accessible via HTTPS at that FQDN if you have configured DNS for the name to point to an ingress load balancer with the appropriate SSL certificate that forwards traffic to your platform nodes.
Install Katonic Platform on existing Azure Kubernetes Service
- Log in to Quay with the credentials described in the requirements section above.
docker login quay.io
- Retrieve the Katonic installer image from Quay
docker pull quay.io/katonic/katonic-installer:v3.3
- Take kubectl access to your AKS cluster using the following command
az aks get-credentials --resource-group {{ resource_group_name }} --name katonic-mlops-platform
- Create a directory.
mkdir katonic
cd katonic
Put the PEM encoded public key certificate (having extension
.crt) for your domain and private key associated with the given certificate(having extension.key) inside the current directory(katonic).Initialize the installer application to generate a template configuration file named
katonic.yml.
docker run -it --rm --name generating-yaml -v $(pwd):/install quay.io/katonic/katonic-installer:v3.3 init <license_type>
Edit the configuration file with all necessary details about the target cluster, storage systems, and hosting domain. Read the following configuration reference, these are the only parameters required when installing the Katonic MLOps platform on existing AKS.
| Parameter | Description | Value |
|---|---|---|
| kubernetes_distribution | Distribution of Kubernetes | has to be kubernetes |
| domain_name | domain on which Katonic MLOps Platform will be accessed | eg. mydomain.example.com |
| adminUsername | email for admin user | eg. john@katonic.ai |
| adminPassword | password for admin user | at least 1 special character at least 1 upper case letter at least 1 lower case letter minimum 8 characters |
| shared_storage.storage | create shared storage | True or False |
| backup_enabled | enable entire platform backup | True or False |
| backup_schedule | schedule of backups | eg. "@every 24h" |
| backup_expiration | backup expiration | eg. 2160h0m0s |
| create_k8s_cluster | create AKS | True or False |
| cluster_name | name of cluster |
- Installing Katonic MLOps Platform
docker run -it --rm --name install-katonic -v /root/.kube:/root/.kube -v $(pwd):/inventory quay.io/katonic/katonic-installer:v3.3
Installation Verification
The installation process can take up to 45 minutes to fully complete. The installer will output verbose logs, and commands to take kubectl access of deployed cluster and surface any errors it encounters. After installation, you can use the following commands to check whether all applications are in a running state or not.
kubectl get pods --all-namespace
This will show the status of all pods being created by the installation process. If you see any pods enter a crash loop or hang in a non-ready state, you can get logs from that pod by running:
kubectl logs $POD_NAME --namespace $NAMESPACE_NAME
If the installation completes successfully, you should see a message that says:
TASK [platform-deployment : Credentials to access Katonic MLOps Platform] *******************************ok: [localhost] => {
    "msg": [
        "Platform Domain: $domain_name",
        "Username: $adminUsername",
        "Password: $adminPassword"
    ]
}
However, the application will only be accessible via HTTPS at that FQDN if you have configured DNS for the name to point to an ingress load balancer with the appropriate SSL certificate that forwards traffic to your platform nodes.
Post-Installation steps
1. File Manager
kubectl rollout restart deploy minio-server
kubectl rollout status deploy minio-server
2. Domain
You can identify a domain for your cluster. This allows you to use any domain as the location for the cluster. For example, you could set the domain for the cluster as katonic.company.com.
For this option to work, you will need to set the required DNS routing rules between the domain and the IP address of the cluster after the katonic-installer has finished running.
You will need to create a CNAME/A listing for .<your_domain> with the IP address of the auto scaler for the cluster. Make sure you include the wildcard: .
The domain is the same domain you entered as <your_domain> in the katonic-installer
To get the IP address of the cluster run the following command has been deployed:
kubectl get svc istio-ingressgateway -n istio-system | awk '{print $4}' | tail -n +2
Test and troubleshoot
Run the following tests to verify that your Katonic installation was successful:
- Login to the Katonic application and that all the navigation panel options are operational.
Failure of this test means you must check that Keycloak was set up properly.
- Create a new project and launch a Jupyter/JupyterLab workspace.
Failure of this test means you must check that default environment images have been loaded in the cluster.
- Publish an app with flask or shiny apps.
Failure of this test means you must check that the environment images have flask and shiny installed.