Katonic OneClick
This guide describes how to install the Community version of the Katonic MLOps platform on AWS using a One-click installation strategy.
Hardware Configurations
A scalable cluster implementation is composed of a standard set of master nodes, a set of worker nodes dedicated to hosting Katonic platform services, and a set of worker nodes dedicated to hosting compute workloads. This configuration is designed to achieve superior performance that enables real-time execution of analytics, machine learning (ML), and artificial intelligence (AI) applications in a production pipeline.
Katonic on EKS
Katonic can run on a Kubernetes cluster provided by AWS Elastic Kubernetes Service. When running on EKS, the Katonic architecture uses AWS resources to fulfil the Katonic Generative AI platform requirements as follows:
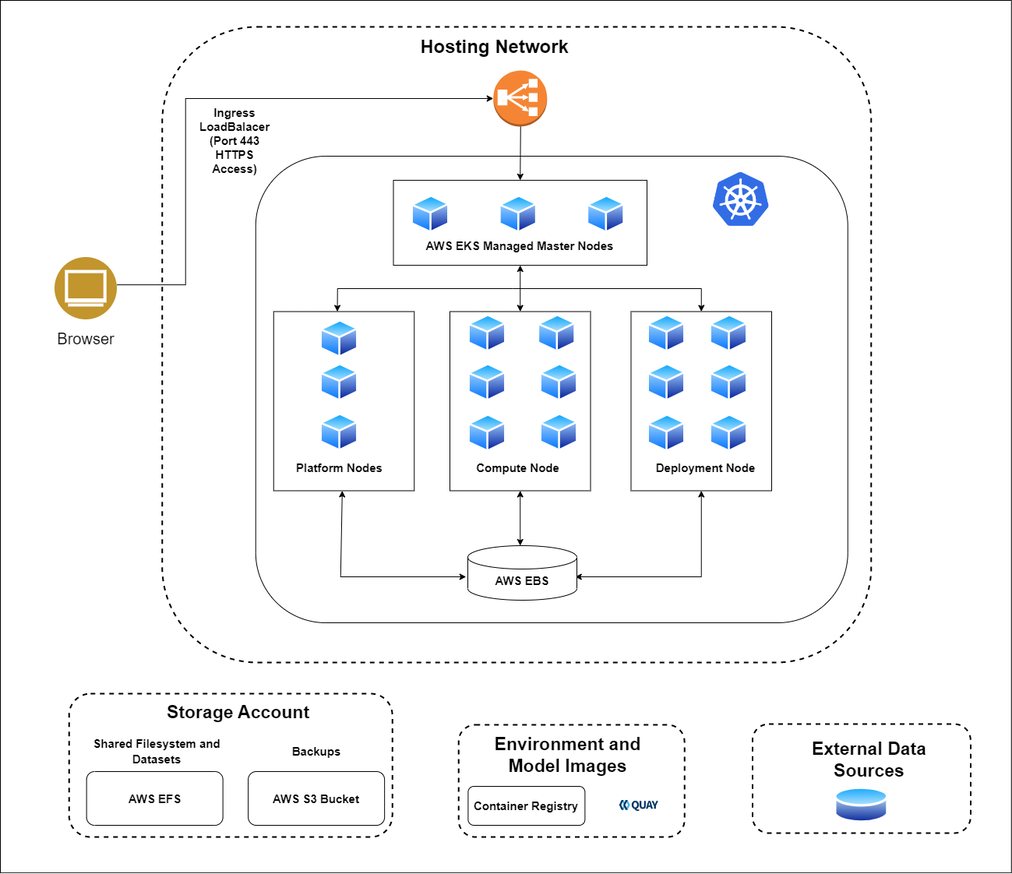
The control of Kubernetes is transferred to the EKS control plane, which offers managed Kubernetes masters.
Katonic uses a dedicated Auto Scaling Group (ASG) of EKS workers to host the Katonic platform.
ASGs of EKS workers host elastic compute for Katonic executions.
The kubernetes.io/aws-ebs provisioner is used to create persistent volumes for Katonic executions.
Katonic cannot be installed on EKS Fargate since Fargate does not support stateful workloads with persistent volumes.
All AWS services listed previously are required except GPU compute instances.
Your annual Katonic license fee will not include any charges incurred from using AWS services.
You can find detailed pricing information for the Amazon services listed above at (https://aws.amazon.com/pricing.)
Security considerations
To provision an EKS cluster, it is essential to create IAM policies in the AWS console. Katonic recommends following the standard security practice of granting the least privilege when creating IAM policies. It is advised to start with minimal privileges and only grant elevated privileges when necessary.
For more information, refer to the concept of Grant Least Privilege concept.
IAM permissions for user
The only permission required for a user to carry out the installation is IAMFullAccess
And here are the permissions that are granted to an EC2 instance to complete the installation.
AmazonEC2FullAccess
IAMLimitedAccess
AmazonVPCFullAccess
AmazonEKSAllAccessPolicy
AWSCloudFormationFullAccess
AmazonElasticFileSystemFullAccess
Service quotas
Amazon maintains default service quotas for each of the services listed previously. You can check the default service quotas and manage your quotas by logging in to the AWS Service Quotas console.
Domain
Katonic allocates a domain that has user required prefix with additional random suffix to provide a *.katonic.cloud domain to access the Katonic Generative AI Platform. eg. tesla-07092023.katonic.cloud
Calculating Required Infrastructure Resources (AWS)
Allocated Infrastructure Resources
When the platform is installed, it creates the following resources. Take this into account when selecting your installation configuration.
| Sr. No. | Type | Amount | When | Notes |
|---|---|---|---|---|
| 1 | Classic Elastic Load Balancer | 1 | Always | Only 1 is required. Automatically gets created by EKS when required. |
| 2 | Network interface | 1 per node | Always | |
| 3 | OS boot disk (AWS EBS ) | 1 per node | Always | |
| 4 | Public IP address | 1 per node | The platform has public IP addresses. | |
| 5 | VPC | 1 | The platform is deployed to a new VPC. | |
| 6 | Security Group | 1 | Always | See Security Groups Configuration (AWS). |
| 7 | SNS | 1 | Always | Our platform ensures a seamless installation process, requiring user confirmation via an SNS confirmation email before initiating the installation. The email will only be valid for 10 minutes. The installation will fail if you fail to subscribe within 10 mins of receiving the email. |
| 8 | EKS Cluster | 1 | EKS is used as the application cluster | version 1.28 |
| 9 | AWS EFS | 1 | When you enable shared storage while installing Katonic platform. |
Kubernetes(EKS) version
Katonic Generative AI platform 4.5 version has been validated with Kubernetes(EKS) version 1.28.
Node pools
The EKS cluster consists of three node pools, each designed to deliver worker nodes with specific specifications and unique node labels
| Pool | Min-Max | Instance | Labels | Taints | |
|---|---|---|---|---|---|
| 1 | platform | 2-4 | m5.xlarge | katonic.ai/node-pool=platform | katonic.ai/node-pool=platform:NoSchedule |
| 2 | compute | 1-10 | m5.2xlarge | katonic.ai/node-pool=compute | |
| 3 | deployment | 1-10 | m5.2xlarge | katonic.ai/node-pool=deployment | katonic.ai/node-pool=deployment:NoSchedule |
AWS Platform-Node Specifications
For platform nodes in AWS cloud deployments, hardware specifications will align with the following requirements based on the deployment type:
| Component | Specification |
|---|---|
| Node count | min 2 |
| Instance type | m5.xlarge |
| vCPUs | 4 |
| Memory | 16 GB |
| Boot disk size | 128 GB |
AWS Compute-Node Specifications
In the context of one-click installation, the Katonic Generative AI platform streamlines the setup process for AWS cloud deployments.
For compute nodes, we have the flexibility to select the instance type that best suits the needs from the provided options. Additionally, AWS Elastic Kubernetes Service (EKS) is supported for application nodes, utilizing the specified instance types. The community version of Katonic requires a minimum of 1 compute node, which is automatically provisioned during the one-click setup. For detailed specifications for each type, please refer to the AWS documentation.
Note: Supported compute node configurations
m5.xlarge
m5.2xlarge (default configuration)
m5.4xlarge
m5.8xlarge
m5.12xlarge
Boot disk size:
- Boot Disk: 128GB
AWS Deployment-Node Specifications
For deployment nodes, we have the flexibility to select the instance type that best suits the needs from the provided options. Additionally, AWS Elastic Kubernetes Service (EKS) is supported for application nodes, utilizing the specified instance types. The community version of Katonic requires a minimum of 1 compute node, which is automatically provisioned during the one-click setup. For detailed specifications for each type, please refer to the AWS documentation.
Note: Supported deployment node configurations
m5.xlarge
m5.2xlarge (default configuration)
m5.4xlarge
m5.8xlarge
m5.12xlarge
Boot disk size:
- Boot Disk: 128GB
Katonic Platform Installation
Completion Time
General completion time: 1 hour
Prerequisites
To install and configure Katonic in your AWS account you must have:
AWS region with enough quota to create:
- At least 4 m5.2xlarge EC2 machines
IAM Full Access to the user.
At least one EC2 Key Pair (RSA encrypted and .pem file format) must exist in the region where you want to deploy the Katonic Generative AI Platform. If not present, follow the provided link for creating SSH Key Pair in AWS. https://docs.aws.amazon.com/AWSEC2/latest/UserGuide/create-key-pairs.html
Installation Process
- First, click on the One-Click install button on the katonic.ai website.
Note: Make sure the AWS user has prerequisites satisfied
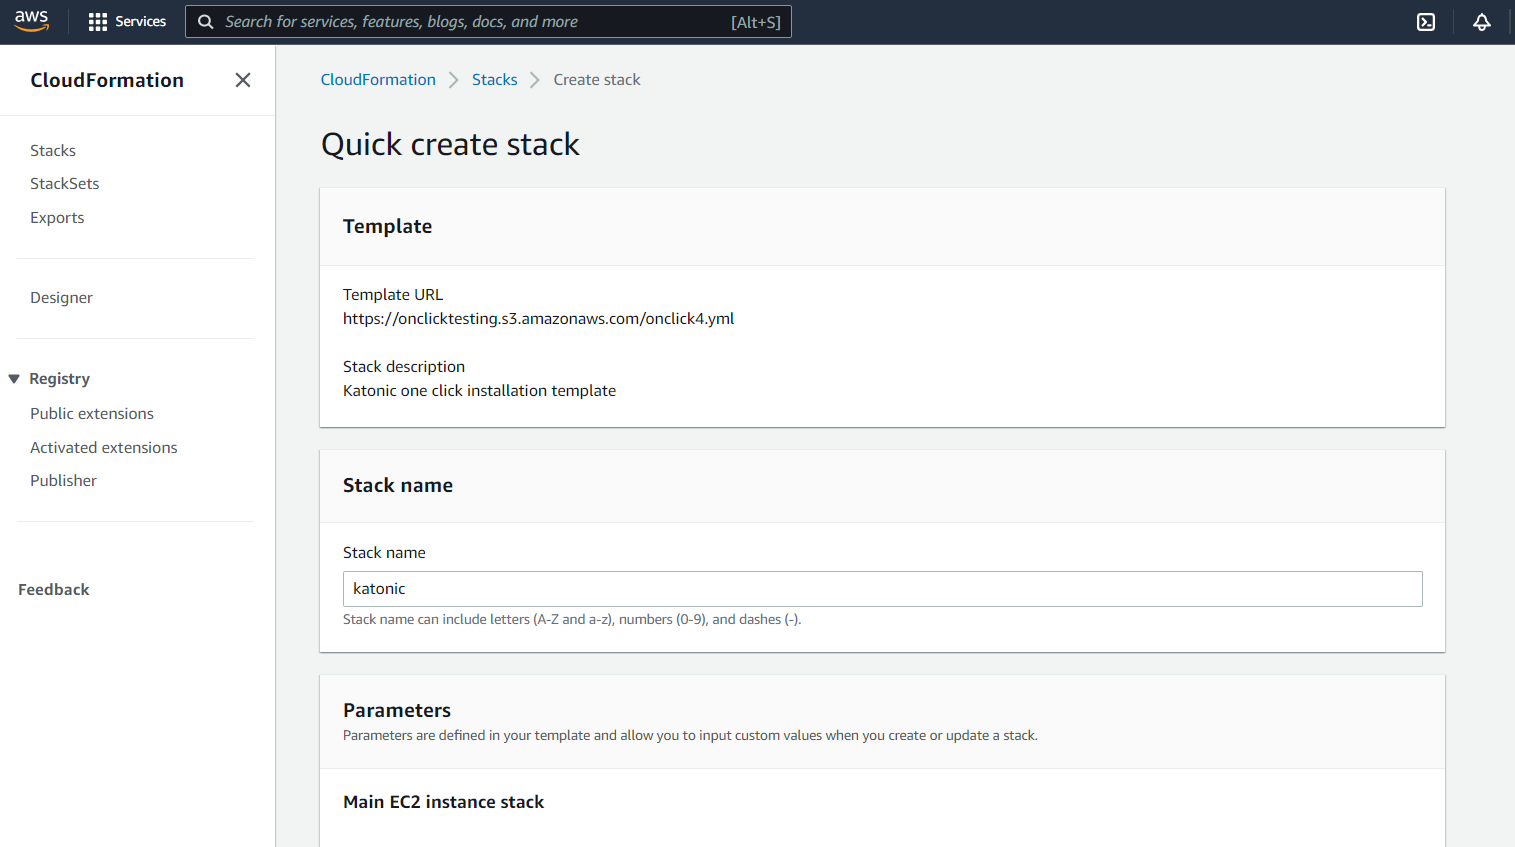
- Fill the CloudFormation Stack Template with all necessary details about the target cluster, storage systems, and hosting domain. Read the following configuration reference:
| Parameter | Description | Value | |
|---|---|---|---|
| 1 | Stack Name | Name of the Stack | default : katonic |
| 2 | Instance Type | Type of ec2 instance | eg t3.medium |
| 3 | SSH Location | SSH access to CIDR | default : 0.0.0.0 |
| 4 | KeyPairName | EC2 kay pair name. | eg. oneclick Note: If you don’t have keypair already then first you need to create it. |
| 5 | Region | AWS region name | eg. us-east-1 |
| 6 | Platform Nodes Type | Platform node VM size | eg. m5.xlarge |
| 7 | PlatformNodesMinCount | Minimum number of platform nodes should be 2 | eg. 2 |
| 8 | PlatformNodesMaxCount | Maximum number of platform nodes | eg. 4 |
| 9 | PlatformNodesOsSize | Platform Nodes OS Disk Size | eg. 128 GB |
| 10 | Compute Nodes Type | Compute node VM size | eg. m5.2xlarge |
| 11 | ComputeNodesMinCount | Minimum number of platform nodes should not be less than 1 | eg. 1 |
| 12 | ComputeNodesMaxCount | Maximum number of platform nodes | eg. 4 |
| 13 | ComputeNodesOsSize | Compute Nodes OS Disk Size | eg. 128 GB |
| 14 | Deployment Nodes Type | Deployment Node VM size | eg. m5.xlarge |
| 15 | DeploymentNodesMinCount | Minimum number of Deployment nodes should be 1 | eg. 1 |
| 16 | DeploymentNodesMaxCount | Maximum number of Deployment nodes | eg. 4 |
| 17 | DeploymentNodesOsSize | Deployment Nodes OS Disk Size | eg. 128 GB |
| 18 | GenerativeAIstoragesize | Generative AI Storage Size in GiB | eg: 64 |
| 19 | OpenAI_Key | Valid OpenAI Key | Format: "^sk-[A-Za-z0-9]{20}T3BlbkFJ[A-Za-z0-9]{20}$" |
| 20 | AD_Group_Management | Set "True" to enable functionality that provides you ability to sign in using Azure AD | False |
| 21 | AD_CLIENT_ID | Client ID of App registered for SSO in client's Azure or Identity Provider | |
| 22 | AD_CLIENT_SECRET | Client Secret of App registered for SSO in client's Azure or any other Identity Provider | |
| 23 | AD_AUTH_URL | Authorization URL endpoint of app registered for SSO. | |
| 23 | AD_TOKEN_URL | Token URL endpoint of app registered for SSO. | |
| 25 | Admin Username | Email for the admin user | eg. john@katonic.ai |
| 26 | Admin Password | Password for the admin user | at least 1 special character at least 1 upper case letter at least 1 lower case letter minimum 8 characters |
| 27 | Admin First Name | Admin first name | eg. john |
| 28 | Admin Last Name | Admin last name | eg. musk |
Note: Permissions : IAM role for CloudFormation to use for all operations performed on the stack Important: Do not make any alterations to the IAM role or its settings in this section. Please retain the default values and configurations as they are.

Note: This one-click installation currently does not support the ap-south-1 (Mumbai) region. Please ensure that you select a supported region.
- After putting the values, users should check the box to indicate their acknowledgment before proceeding to create the stack.
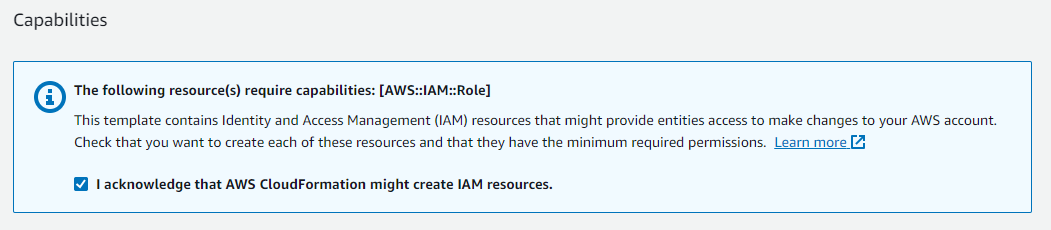
- Finally, click on Create Stack.
Note: you’ll get an email for subscribing to the AWS SNS topic created for this installation.
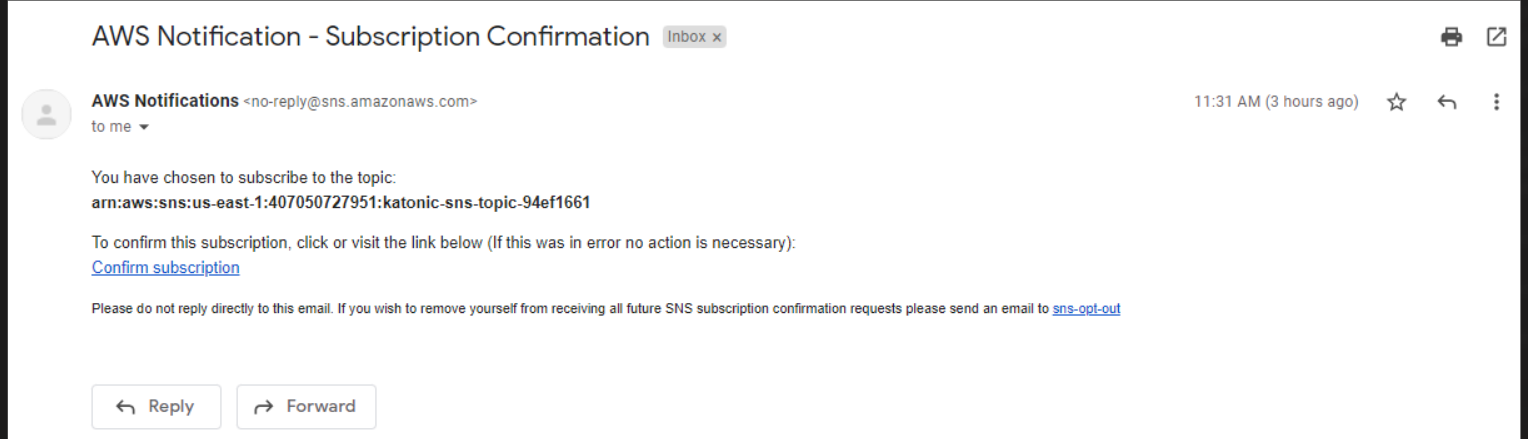
You have 10 mins to subscribe to the SNS after receiving an email on the mail provided in adminUsername. The installation will fail if you fail to subscribe within 10 mins of receiving the email.
After that, you must wait an hour for the installation to complete.
Accessing deployed platform.
Note: You will receive an email once the installation is complete
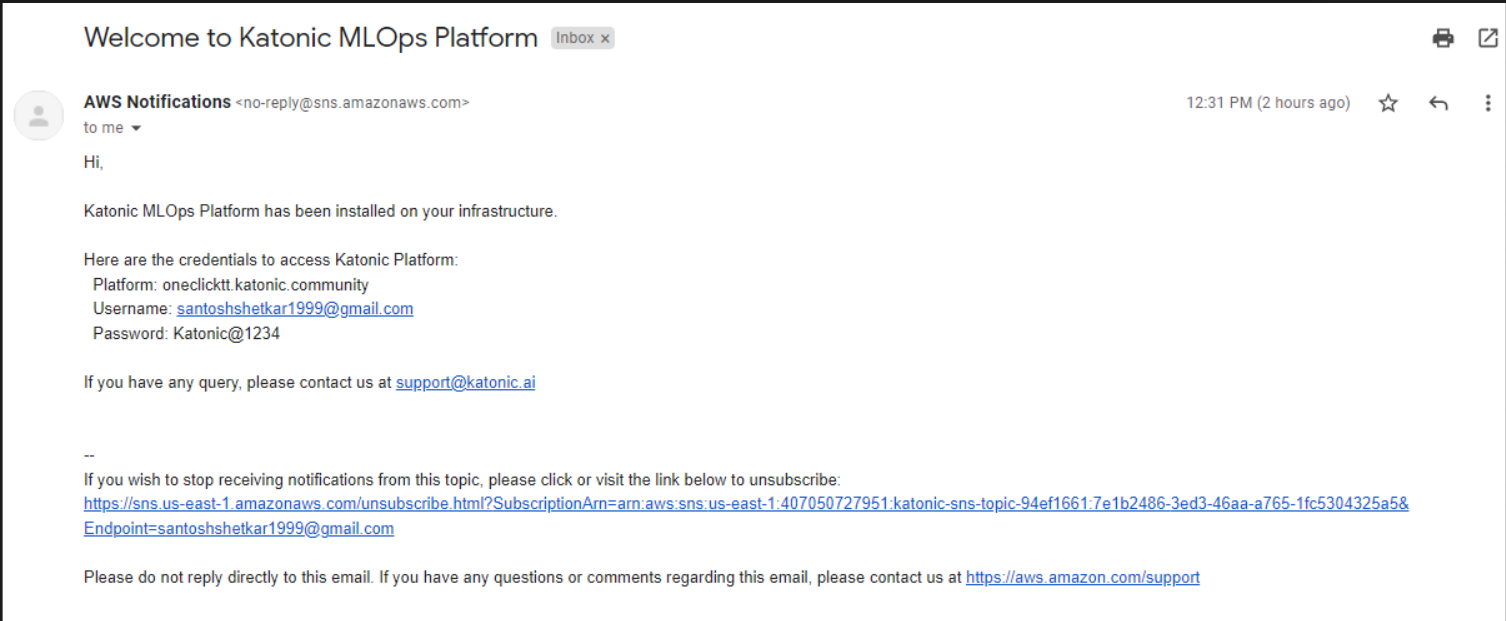
Open the platform in the browser and use the credentials for logging in.
Installation Verification
Accessing Deployed Cluster
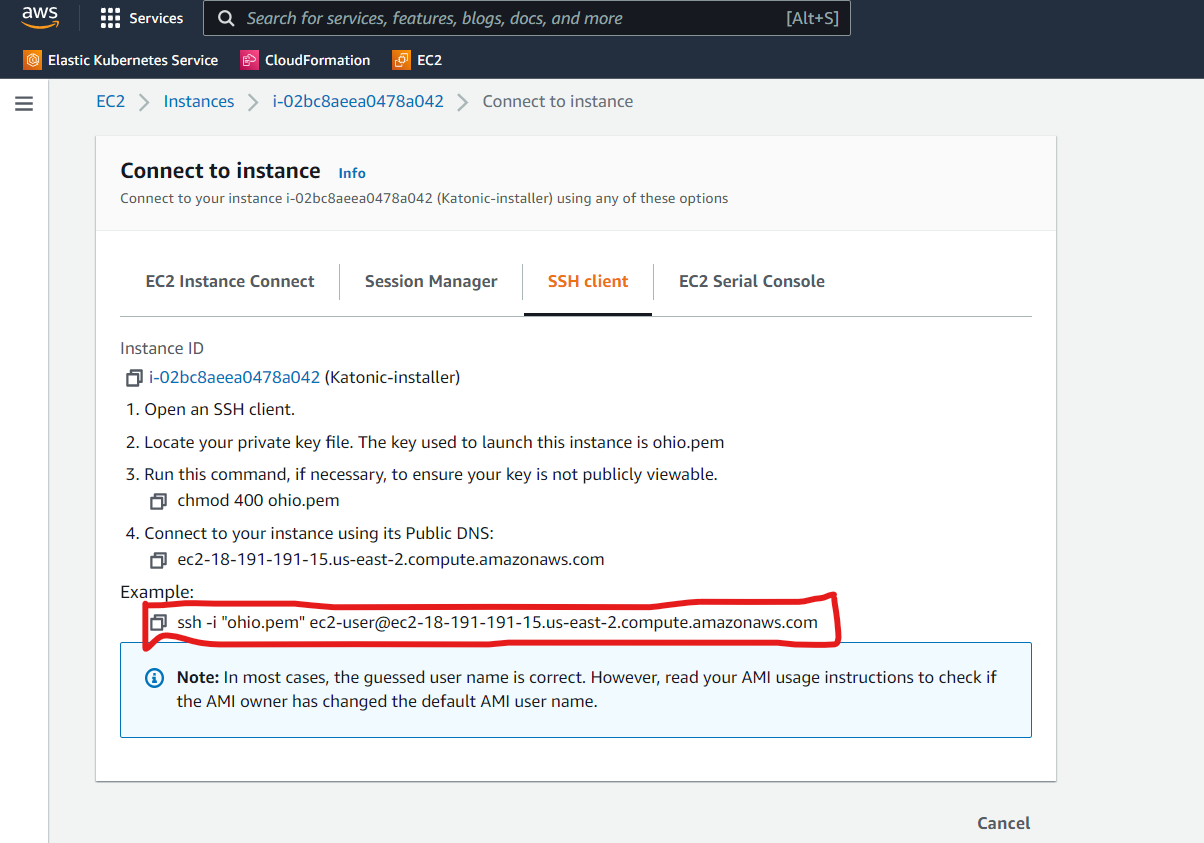
Step 1: Take access to the EC2 machine which installed the platform
In the ec2 service of AWS, You will see an instance named Katonic-installer in the region where the katonic stack is deployed.
Click on Connect

Step 2: Cloudshell
Leaving the last page as it is, in a new tab open the AWS Cloudshell service.
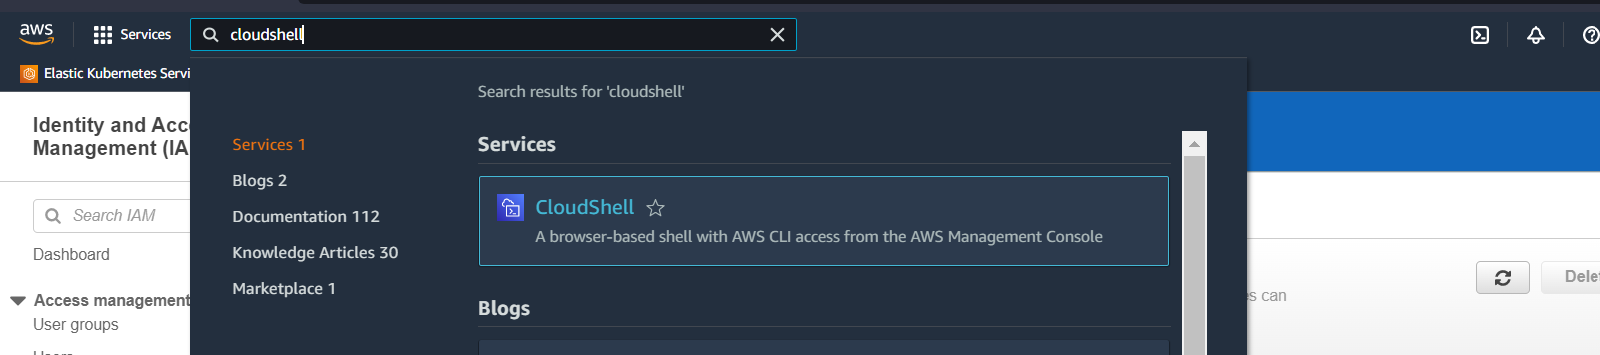
Open the service and wait for the shell to be ready.
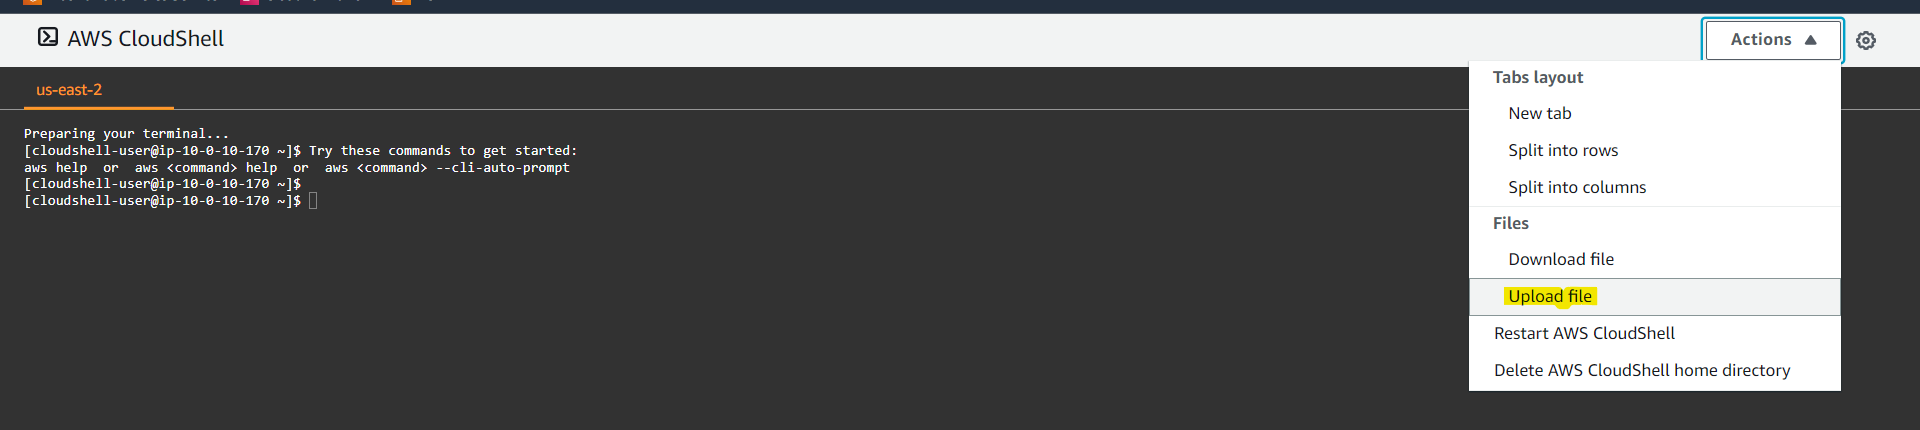
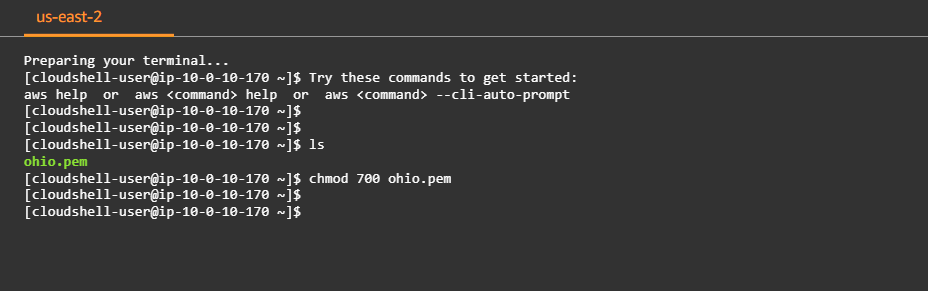
Step 3: Uploading SSH keypair to CloudShell
Click on actions in the top right corner, and select the upload file option.
Select the .pem file for the SSH keypair assigned Katonic-installer instance, and upload.
eg. we passed ohio named SSH keypair to the template. And the .pem file for that is saved in our local machine by the named ohio.pem.
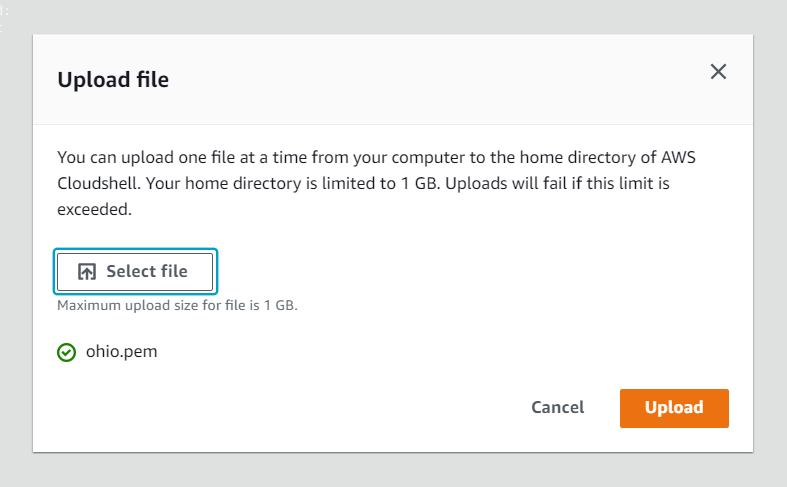
Click on upload.
Step 4: SSH into the machine using AWS Cloudshell
Use the following command to secure the uploaded .pem file.
Finally copy, the SSH command from the EC2 tab and paste it into Cloudshell.
Copy the command:
Paste in AWS Cloudshell. Switch to the root user using the sudo -i command.
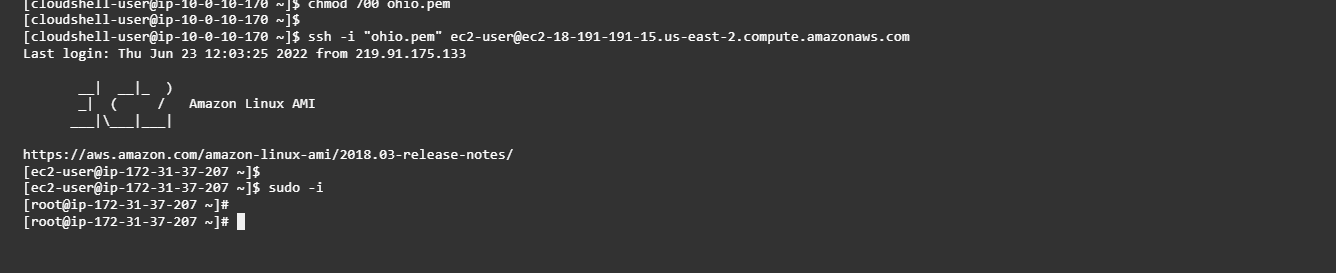
Use the following commands to get backend access(kubectl) to deploy AWS EKS in the cluster.
cd /root/katonic
aws eks --region $(cat /root/katonic/katonic.yml | grep aws_region | awk '{print $2}') update-kubeconfig --name $(cat /root/katonic/katonic.yml | grep cluster_name | awk '{print $2}')-$(cat /root/katonic/katonic.yml | grep random_value | awk '{print $2}')
Verification
First, take access to the EC2 instance named “katonic-installer” which is created by the One-Click CloudFormation Stack.
The installation process can take up to one hour to fully complete. The installer will output verbose logs, and commands to take kubectl access of deployed cluster and surface any errors it encounters. After installation, you can use the following commands to check whether all applications are running or not.
kubectl get pods --all-namespace
- This will show the status of all pods being created by the installation process. If you see any pods enter a crash loop or hang in a non-ready state, you can get logs from that pod by running:
kubectl logs $POD_NAME --namespace $NAMESPACE_NAME
However, the application will only be accessible via HTTPS at that FQDN if you have configured DNS for the name to point to an ingress load balancer with the appropriate SSL certificate that forwards traffic to your platform nodes.
Note: You can stop the Katonic-installer instance after installation complete. Do not terminate the Katonic-installer EC2 instance.
Test and troubleshoot
Run the following tests to verify that your Katonic installation was successful:
- If you are getting 500 or 502 error then take access of your cluster and run the below command:
kubectl rollout restart deploy nodelog-deploy -n application
- Login to the Katonic application and that all the navigation panel options are operational.
Failure of this test means you must check that Keycloak was set up properly.
- Create a new project and launch a Jupyter/JupyterLab workspace.
Failure of this test means you must check that default environment images have been loaded in the cluster.
- Publish an app with flask or shiny apps.
Failure of this test means you must check that the environment images have flask and shiny installed.
Deleting Katonic Generative AI Platform from AWS
After completing the Oneclick installation you will get the platform deletion script in the Katonic-installer instance on path /root/katonic. you just need to run the script.
./aws-cluster-delete.sh