Katonic Automated Pipeline Deployment
The Katonic Automated Pipeline Deployment component gives the data scientists the tools they need to orchestrate end-to-end ML workflows. Katonic Automated Pipeline Deployment provides a GUI in the form of a JupyterLab extension. The Katonic Automated Pipeline Deployment can be used to orchestrate workflows from any repository of Python code. The aim of the Katonic Automated Pipeline Deployment is to allow you to write plain Python code and then be able to convert it into fully reproducible pipelines without making any changes to the original source code. The JupyterLab extension provides a convenient GUI for workflow orchestration from within Jupyter Notebooks.
Overview
- JupyterLab Extension
JupyterLab Extension
The Katonic Automated Pipeline Deployment component allows you to operationalize your machine learning workflows as pipeline runs on Kubernetes deployments. Katonic Automated Pipeline Deployment is provided as both a Python SDK and a JupyterLab extension. In this section, we will describe how to use the Katonic Automated Pipeline Deployment user interface (UI) from a Jupyter Notebook. The Katonic UI enables you to annotate cells in a Notebook to define the steps of a machine learning pipeline. Using these annotations, Katonic Automated Pipeline Deployment adapts your Python code so that the steps of your pipeline can be containerized and run on Kubernetes clusters.
Overview
Annotate Cells
Katonic Automated Pipeline Deployment Notebook Cell Types
Run a Pipeline
Annotate Cells
In this section, we describe the basics for annotating notebook cells to define a pipeline using Katonic.
To annotate a cell:
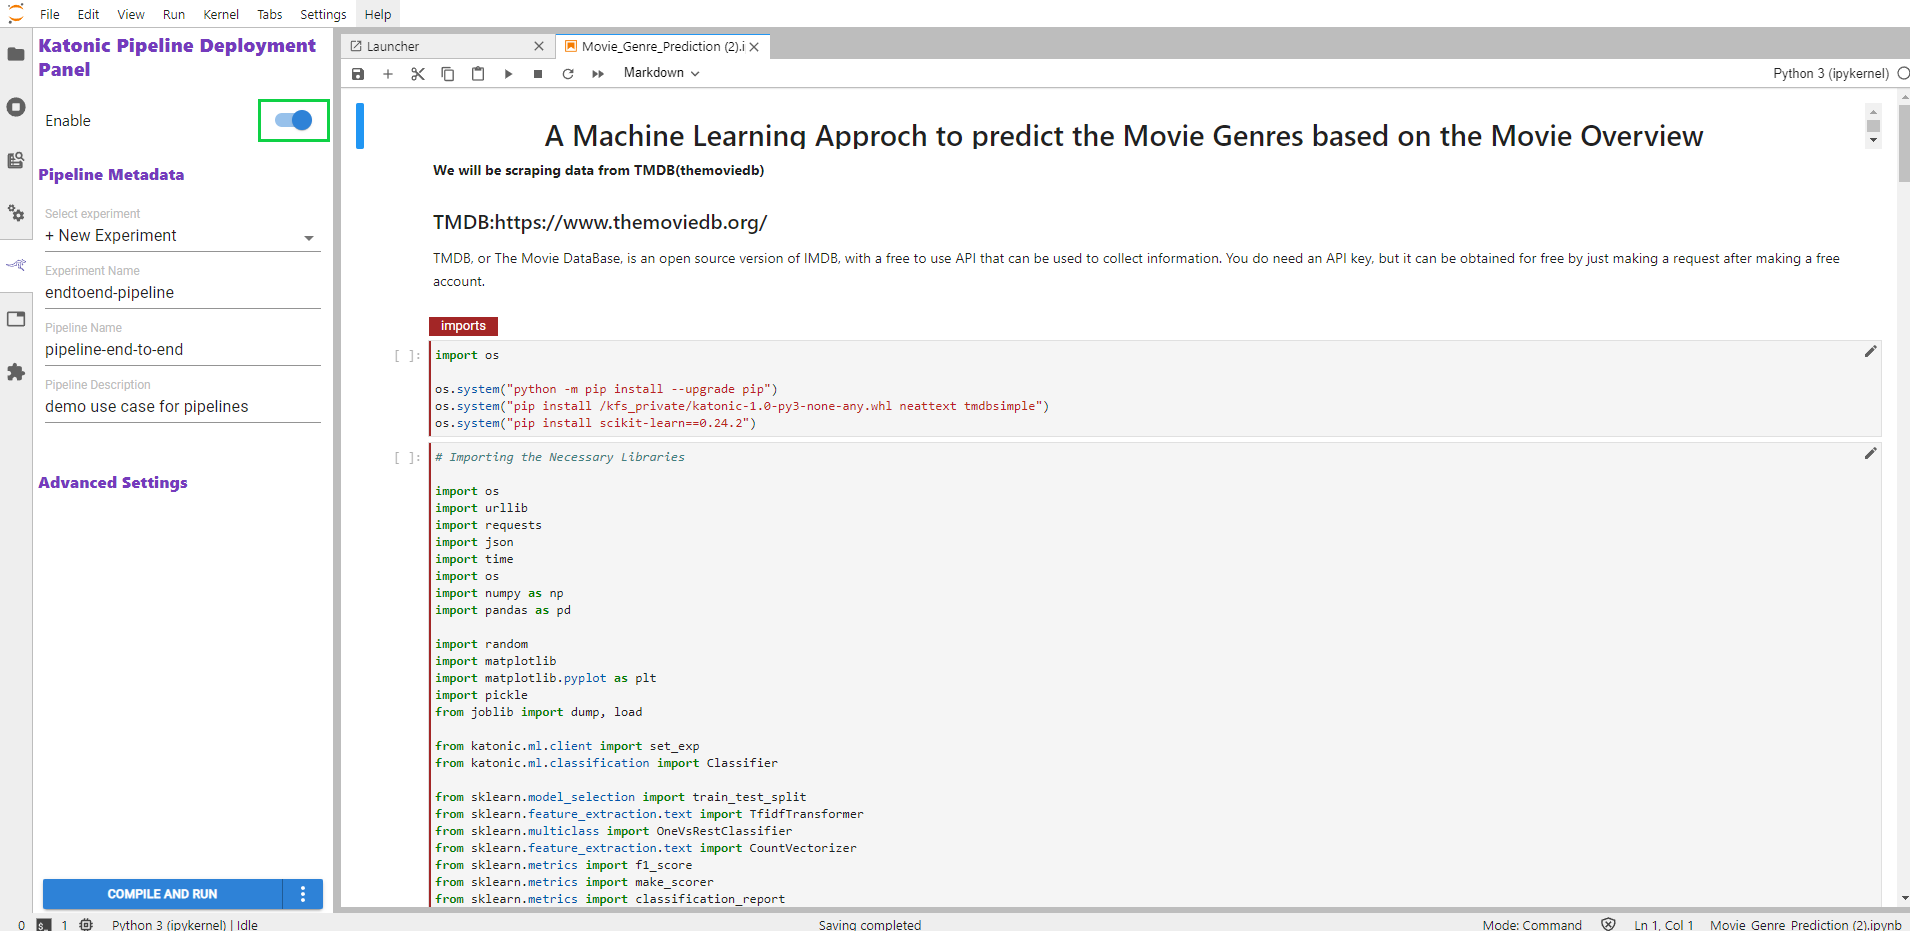
1.1. Ensure the Katonic Pipeline Deployment Panel is enabled.
1.2. Click the pencil icon.
1.3. Select the preferred cell type from the pull-down menu.
NOTE Some cell types support multiple parameters.
Annotate Multiple Cells
You may annotate multiple cells with the same cell type.
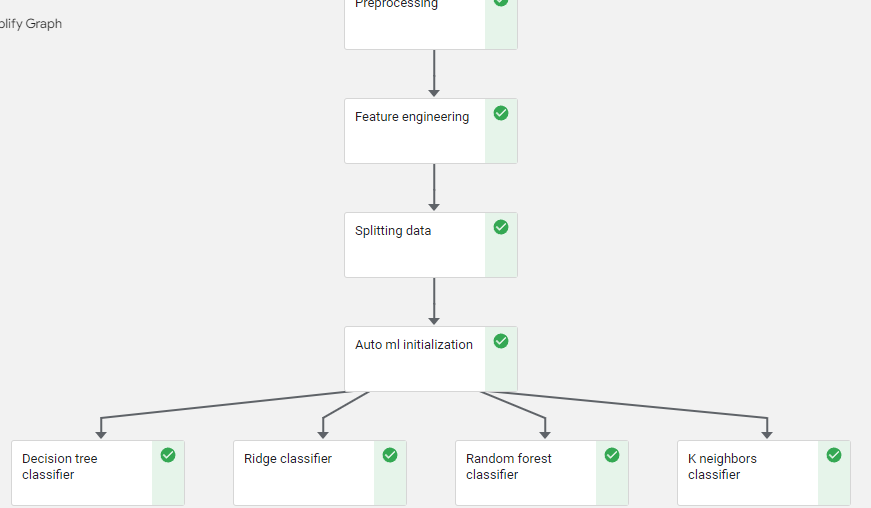
Katonic Automated Pipeline Deployment will group consecutive cells together using the annotation applied to the first cell in the sequence. For example, in the figure below, Katonic Automated Pipeline Deployment has grouped three cells together as a single pipeline step and indicated this with a vertical line matching the color of the step name.
If you need to annotate multiple cells in different sections of your notebook with the same cell type, annotate each cell separately following the annotation instructions for that cell type.
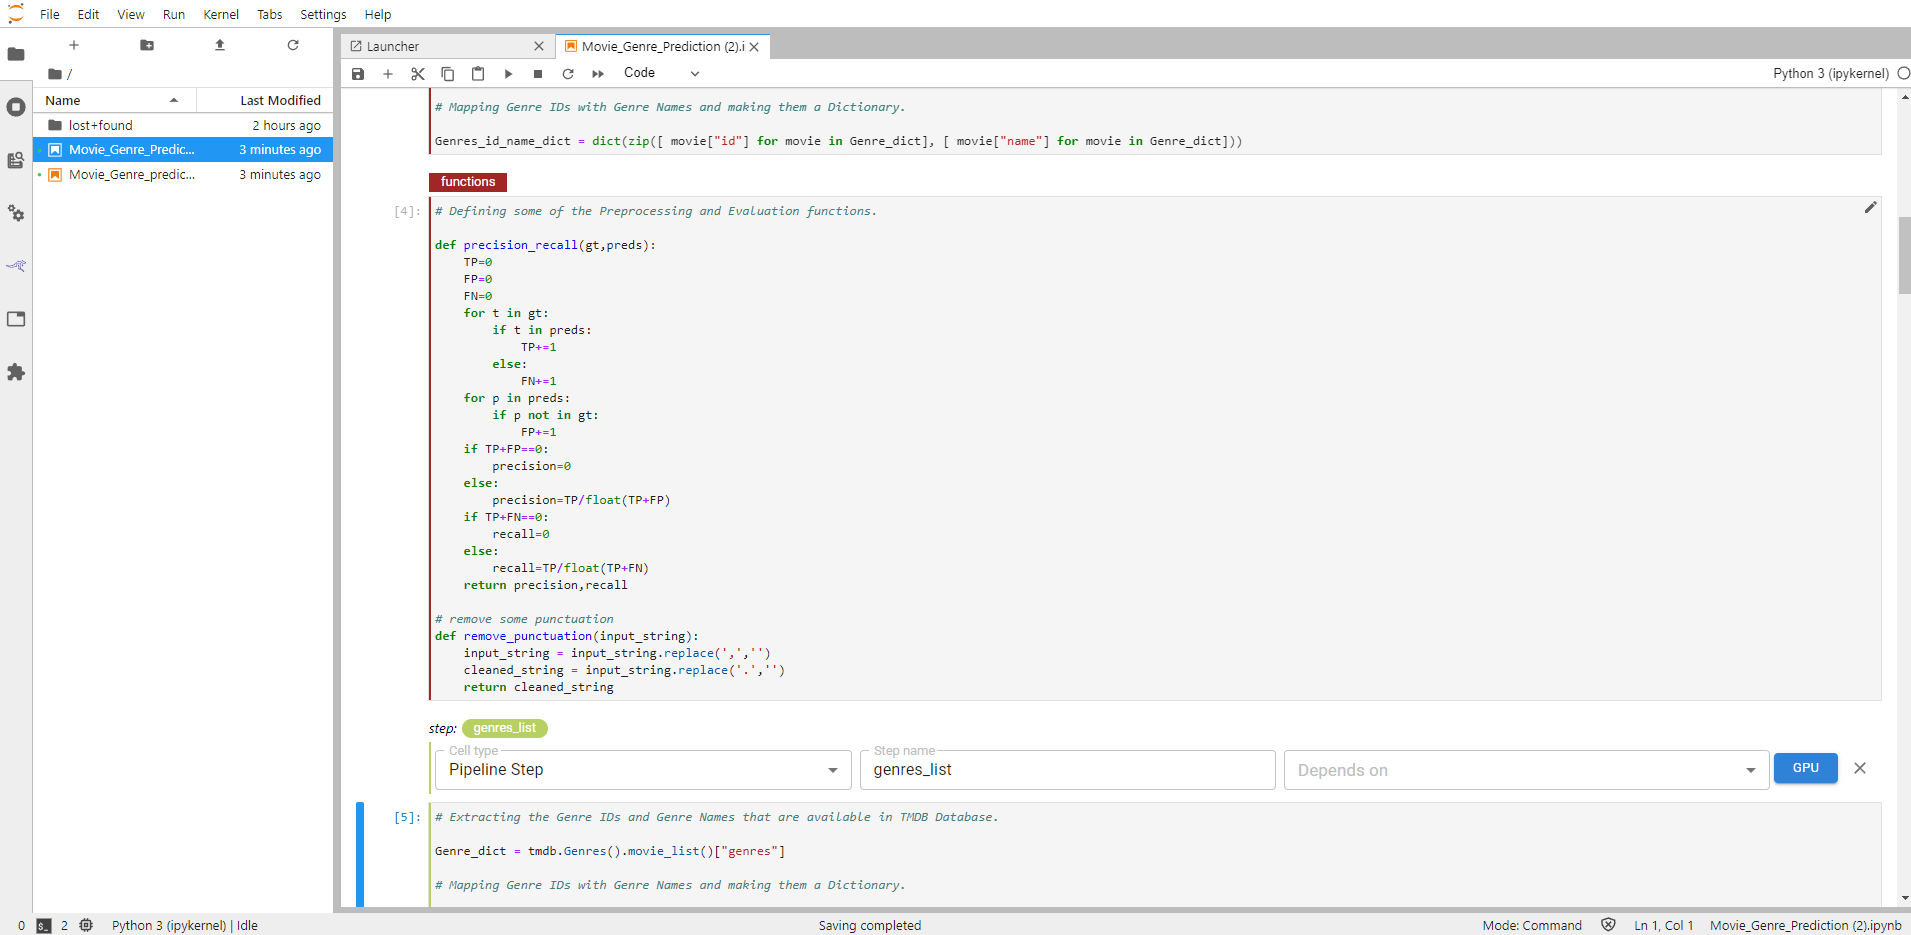
Katonic Automated Pipeline Deployment Notebook Cell Types
To create a Pipeline from a Jupyter Notebook using Katonic Automated Pipeline Deployment, annotate the cells of your notebook selecting from six Katonic Automated Pipeline Deployment cell types. Some of the cell types require a small number of parameters. Katonic Automated Pipeline Deployment uses the annotations you supply to define a pipeline. Each step of the pipeline will run in its own container in a Kubernetes deployment. The annotations you apply to cells in your notebook enable Katonic Automated Pipeline Deployment to manage dependencies for each step and marshal data correctly as inputs and outputs for each step of a pipeline. See below for the list of cell types and a brief summary of each.
| Cell type | Cell should contain |
|---|---|
| Imports | Blocks of code that import other modules your machine learning pipeline requires and may be needed by more than one step. |
| Functions | Functions used later in your machine learning pipeline; global variable definitions (other than pipeline parameters); and code that initializes lists,dictionaries, objects, and other values used throughout your pipeline. |
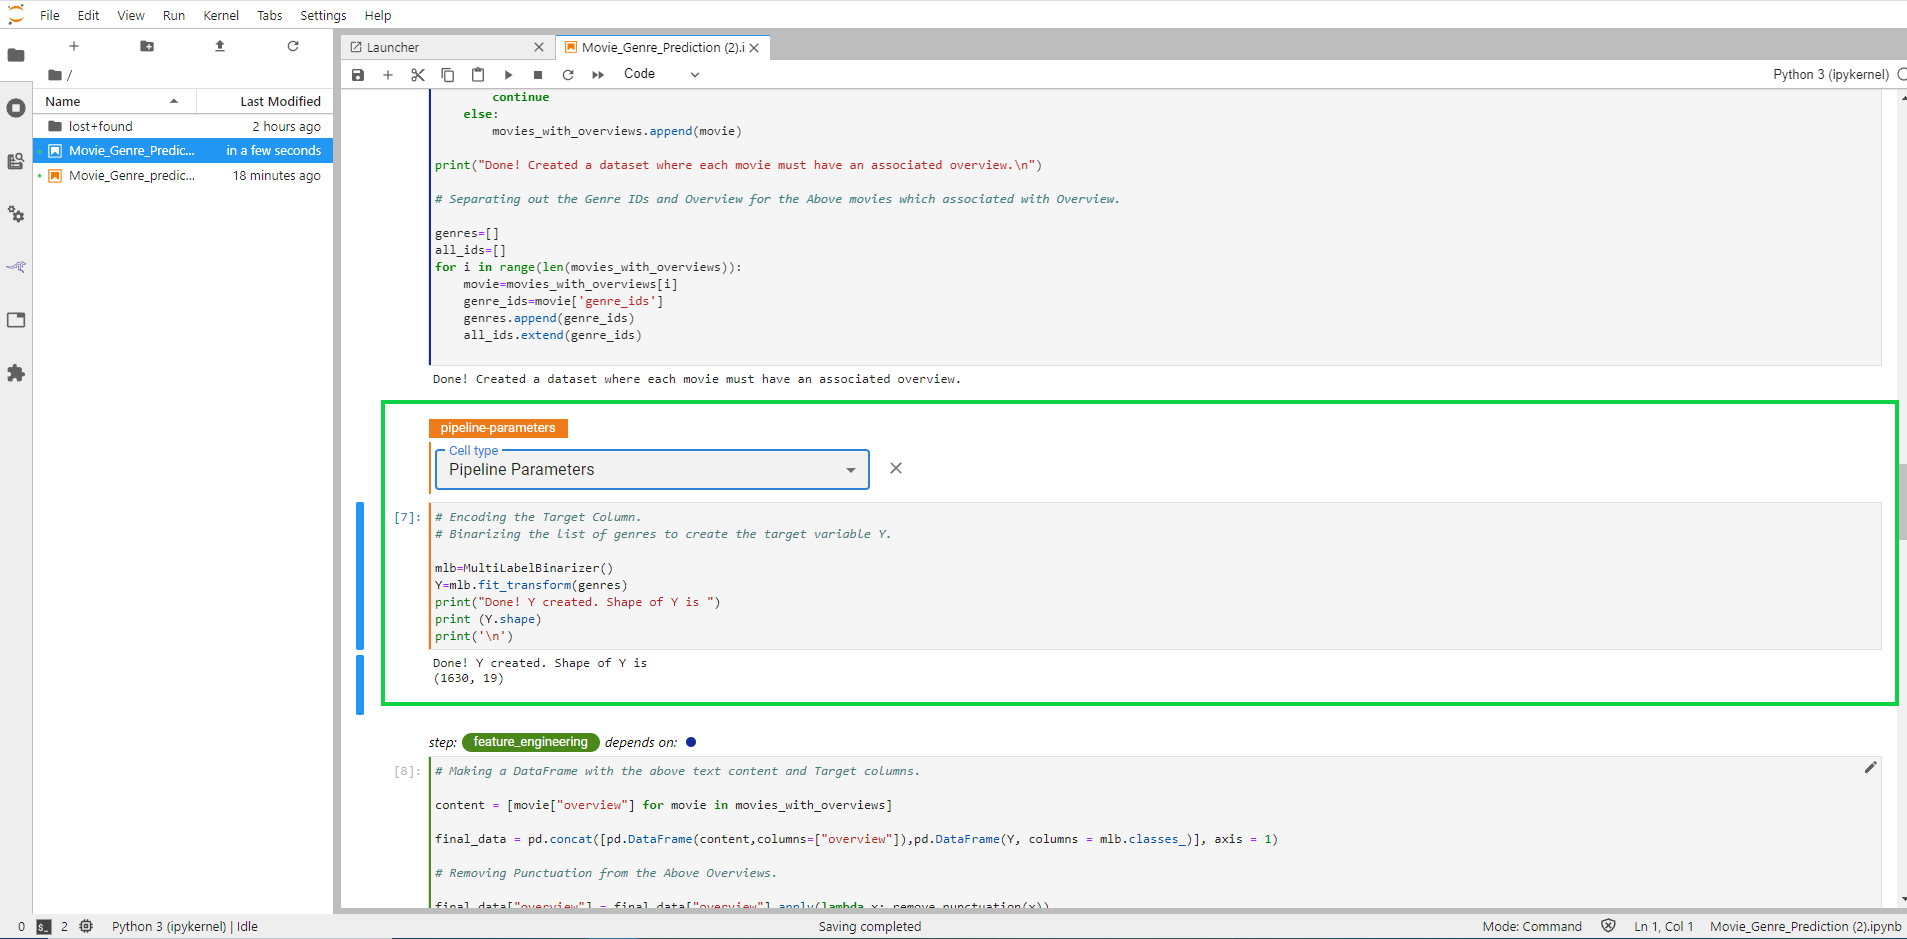
| Pipeline Parameters | Definitions for global variables used to parameterize your machine learning workflow. These are often training hyperparameters. |
| Pipeline Metrics | Lines of code that log or print values used to measure the success of your model. |
| Pipeline Step | Code that implements the core logic of a discrete step in your workflow. |
| Skip Cell | Any code that you want to ignore. |
Imports
Annotate notebook cells with the label Imports to identify blocks of code that import other modules your machine learning pipeline requires. Purpose
Imports cells help Katonic Automated Pipeline Deployment identify all dependencies for pipeline steps. Katonic Automated Pipeline Deployment prepends the code in Imports cells to the code specific to a pipeline step in the execution environment it creates for that step.
Annotate Imports Cells
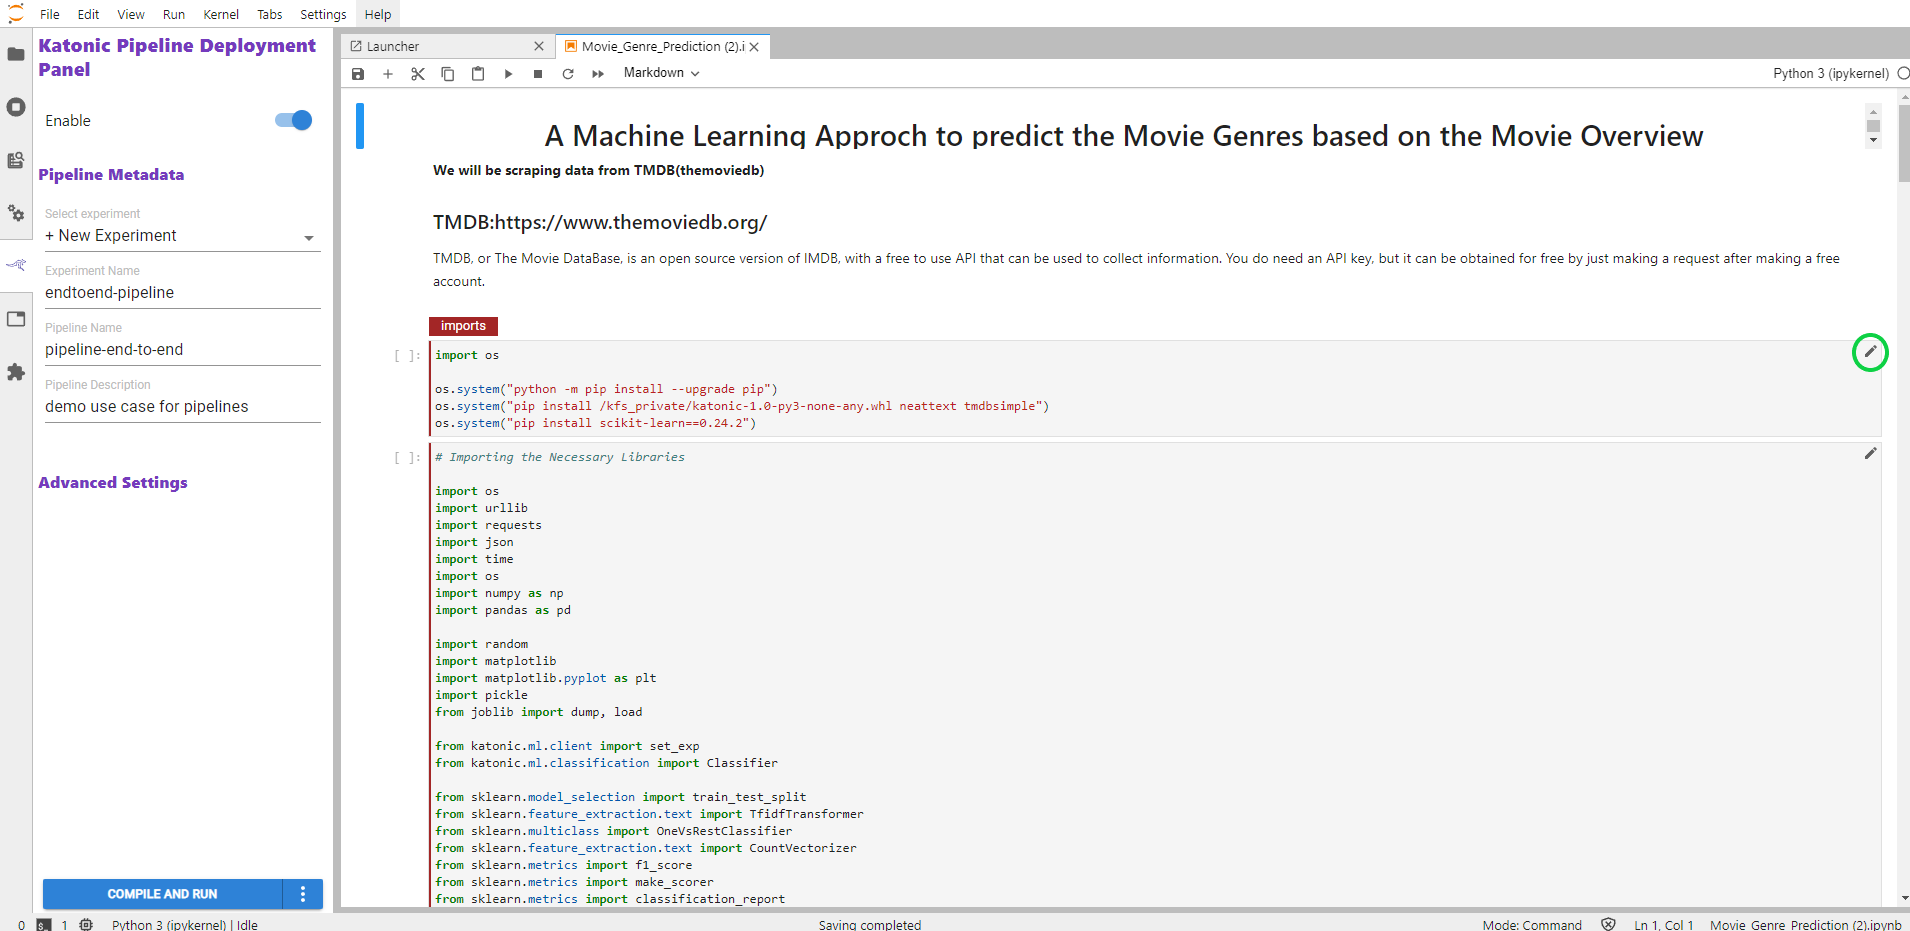
To annotate imports, edit the first cell containing import statements by clicking the pencil icon in the upper right corner and select Cell type > Imports.
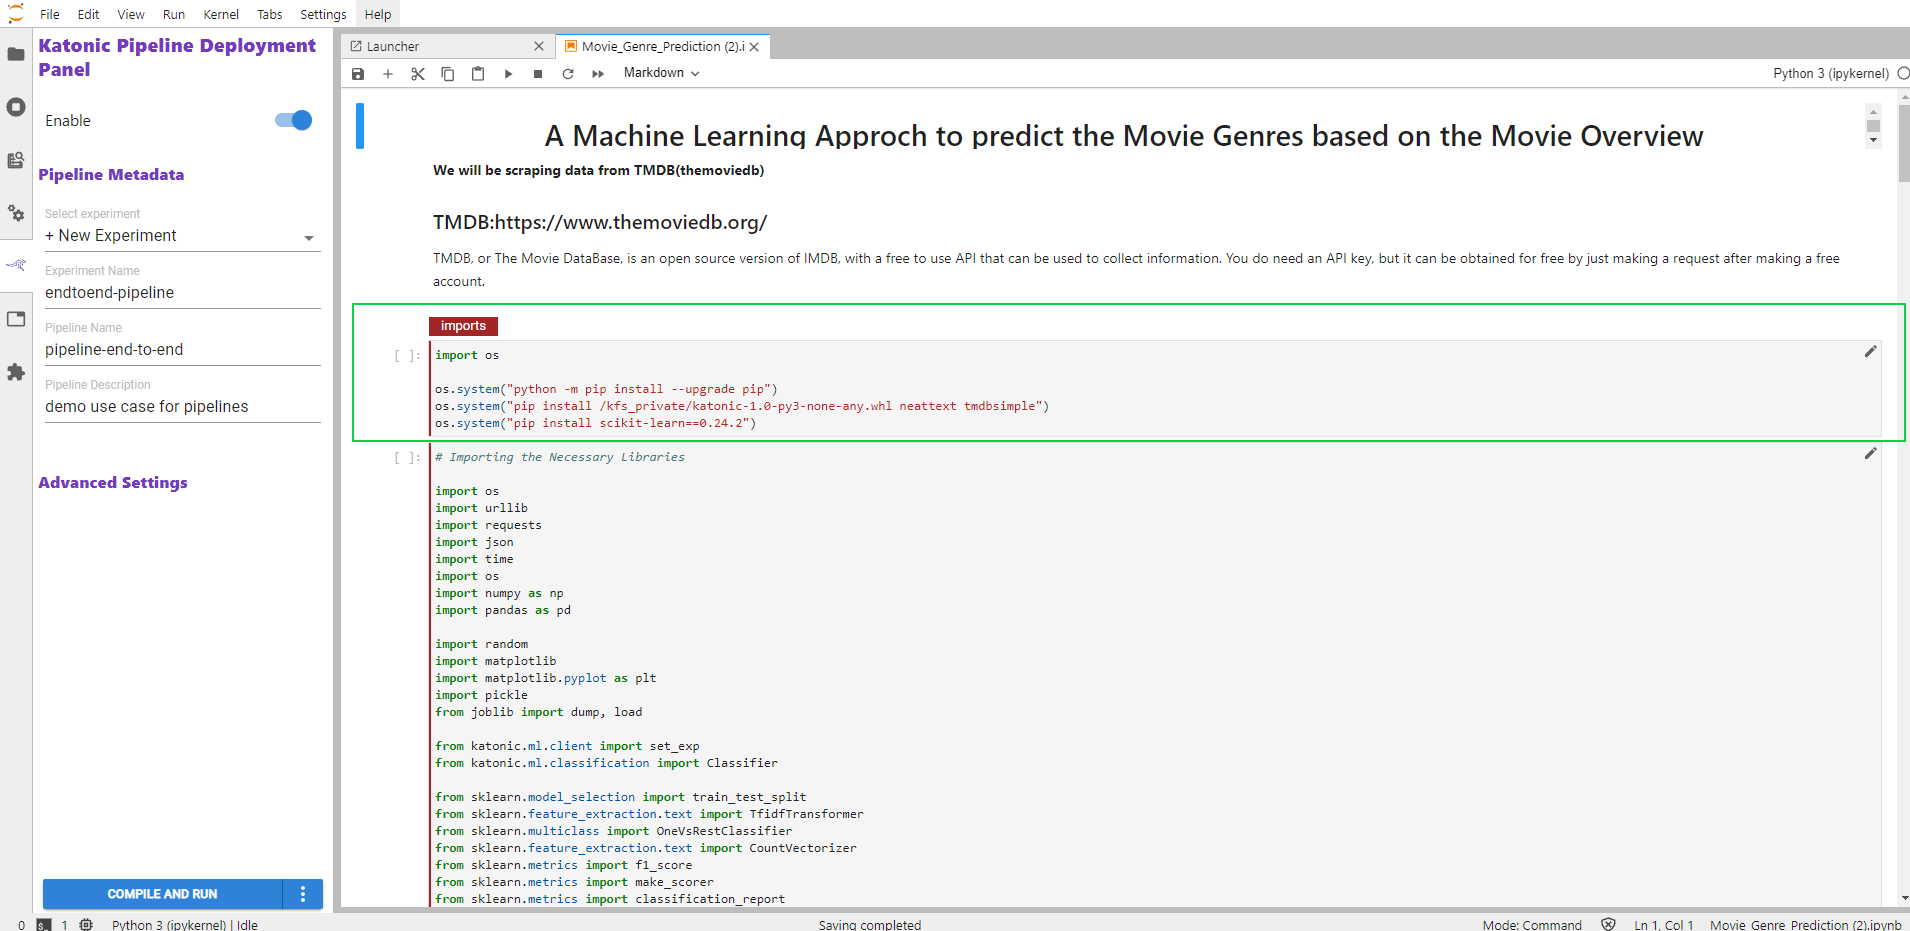
NOTE If you don’t see the pencil icon, please enable Katonic Automated Pipeline Deployment from the Katonic Automated Pipeline Deployment Panel.
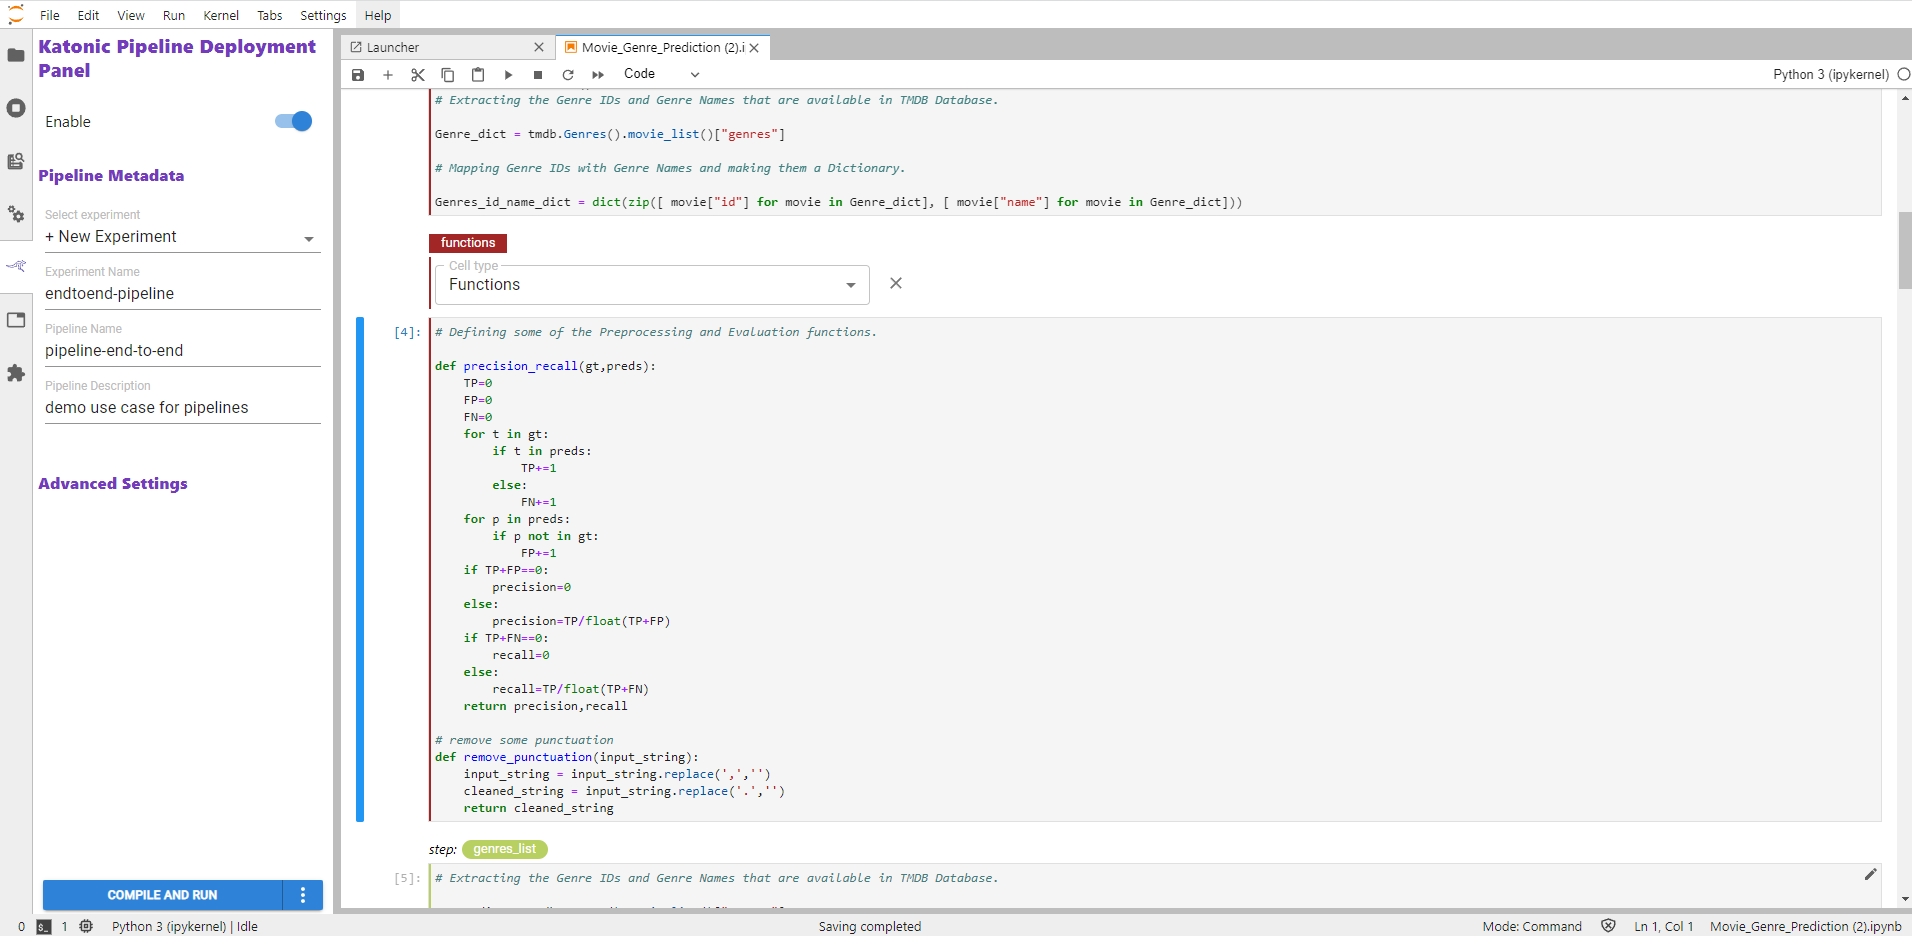
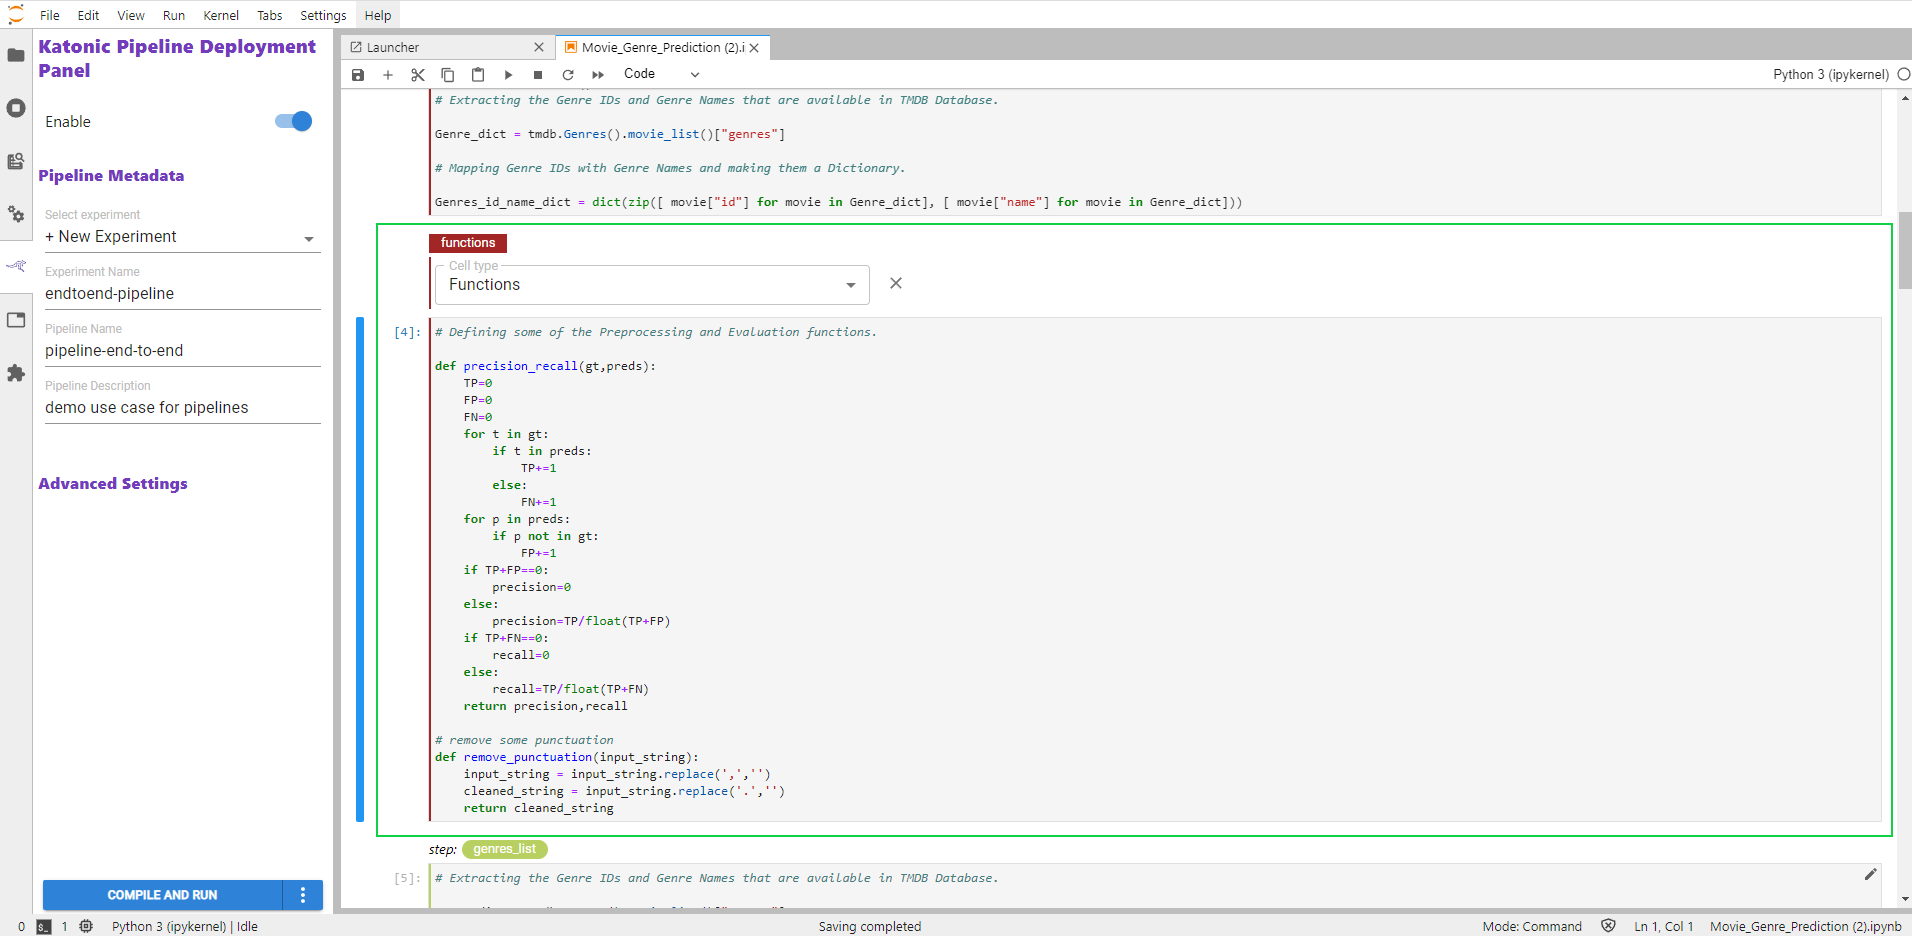
Functions Cells
Annotate notebook cells with the label Functions to identify blocks of code containing:
Functions used later in your machine learning pipeline.
Global variable definitions (other than pipeline parameters) and code that initializes lists, dictionaries, objects, and other values used throughout your pipeline.
NOTE Though pipeline parameters are often written as global variables, you should annotate pipeline parameters using the Pipeline Parameters label. This will enable Katonic Automated Pipeline Deployment to configure the pipeline it defines with the appropriate input parameters.
Purpose
Functions cells help Katonic Automated Pipeline Deployment identify all dependencies for pipeline steps. Katonic Automated Pipeline Deployment creates pipeline steps by prepending Imports cells followed by Functions cells to the code specific to a pipeline step in the execution environment it creates for that step. See How Katonic Automated Pipeline Deployment Creates a Pipeline Step for more detail.
Annotate Functions Cells
To identify functions, global variable declarations, and initialization code, edit the first cell in a block containing this code by clicking the pencil icon in the upper right corner and select Cell type > Functions.
NOTE If you don’t see the pencil icon, please enable Katonic Automated Pipeline Deployment from the Katonic Automated Pipeline Deployment Panel.
Pipeline Parameters Cells
Annotate notebook cells as Pipeline Parameters to identify blocks of code that define global variables used as inputs to specify some controls on the operation of a machine learning pipeline. These should be values that you might experiment with as you evaluate the relative performance of a pipeline run with different settings.
Purpose
Katonic Automated Pipeline Deployment uses the values in Pipeline Parameters cells to define Pipeline PipelineParam objects and initializes the Pipeline with these parameters. includes pipeline parameters values in the artifacts it creates for pipeline runs to facilitate review of results from experiments comparing multiple runs of a pipeline.
Annotate Pipeline Parameters Cells
To annotate pipeline parameters, edit the first cell containing pipeline parameters by clicking the pencil icon in the upper right corner and select Cell type > Pipeline Parameters.
NOTE If you don’t see the pencil icon, please enable Katonic Automated Pipeline Deployment from the Katonic Automated Pipeline Deployment Panel.
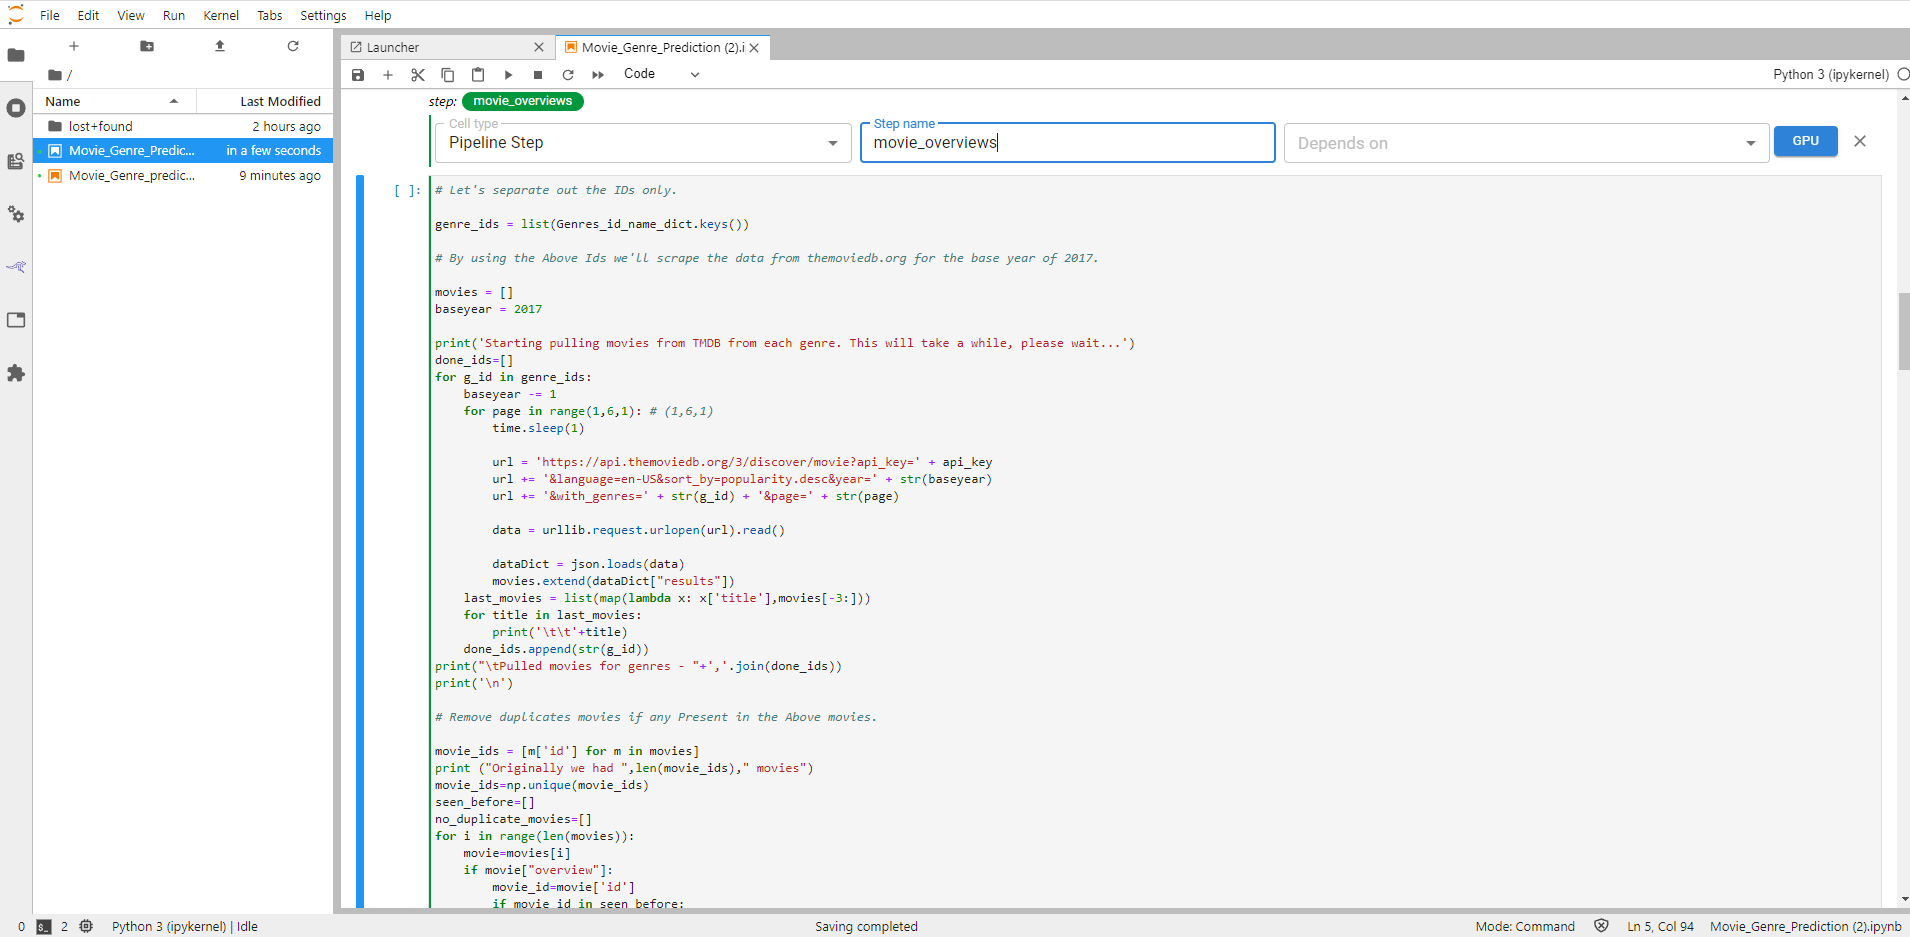
Pipeline Step Cells
Annotate notebook cells with the label Pipeline Step to identify code that implements one of the main components or tasks of a machine learning workflow. A pipeline step typically represents a milestone in data preparation, training, evaluation, tuning, prediction or other phases of a workflow.
Katonic Automated Pipeline Deployment creates pipeline steps by prepending Imports cells followed by Functions cells to cells annotated for a particular Pipeline Step. These cells together comprise the code Katonic Automated Pipeline Deployment uses in the execution environment it creates for a pipeline step. See How Katonic Automated Pipeline Deployment Creates a Pipeline Step for more detail.
Annotate Pipeline Step Cells
To identify code that implements a step in a machine learning workflow:
1.1. Edit the first cell containing this code by clicking the pencil icon in the upper right corner and select Cell type > Pipeline Step.
NOTE If you don’t see the pencil icon, please enable Katonic Automated Pipeline Deployment from the Katonic Automated Pipeline Deployment Panel.
1.2. Specify a unique step name.
1.3. (Optional) Select one or more steps that the step depends on.
1.4. (Optional) Specify that this step should run on a GPU node.
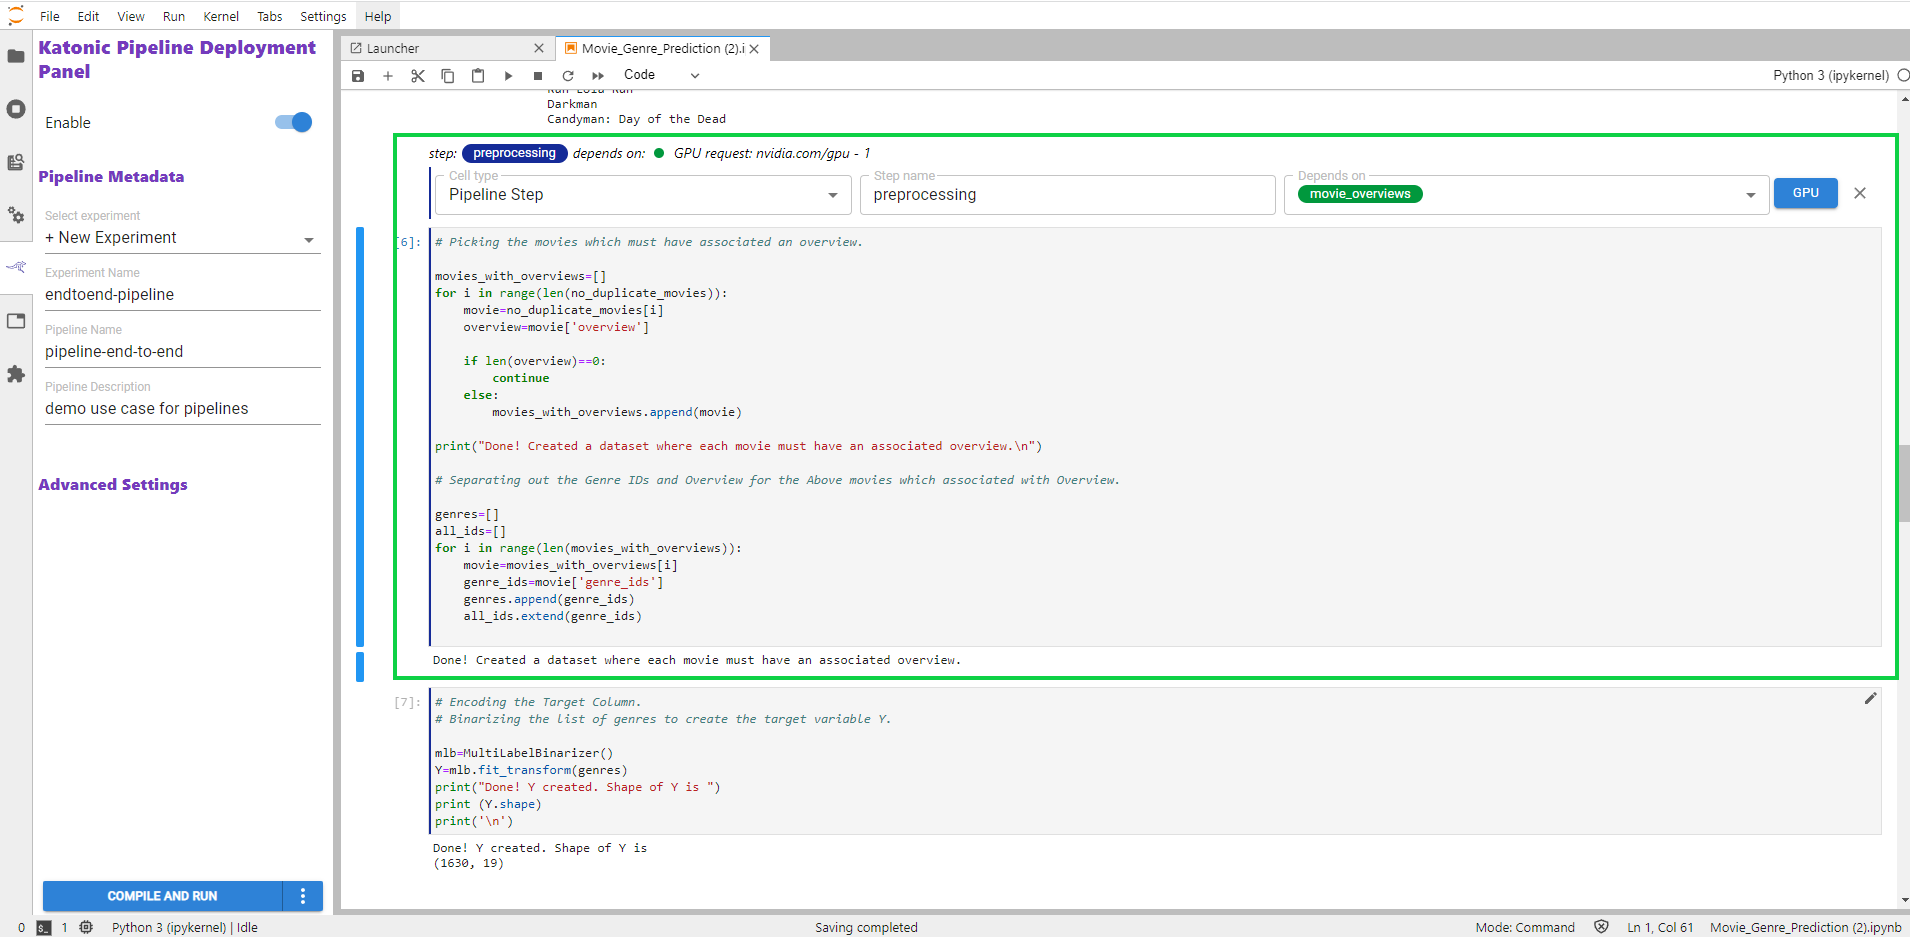
Step name Parameter
Step name is the label by which you reference a step in a pipeline. As the step name, create a label that is unique and descriptive. You will use this name as a reference as you define dependency relationships between steps in your pipeline.
NOTE The step name must consist of only lowercase alphanumeric characters or '_'. The first character must be a lowercase letter.

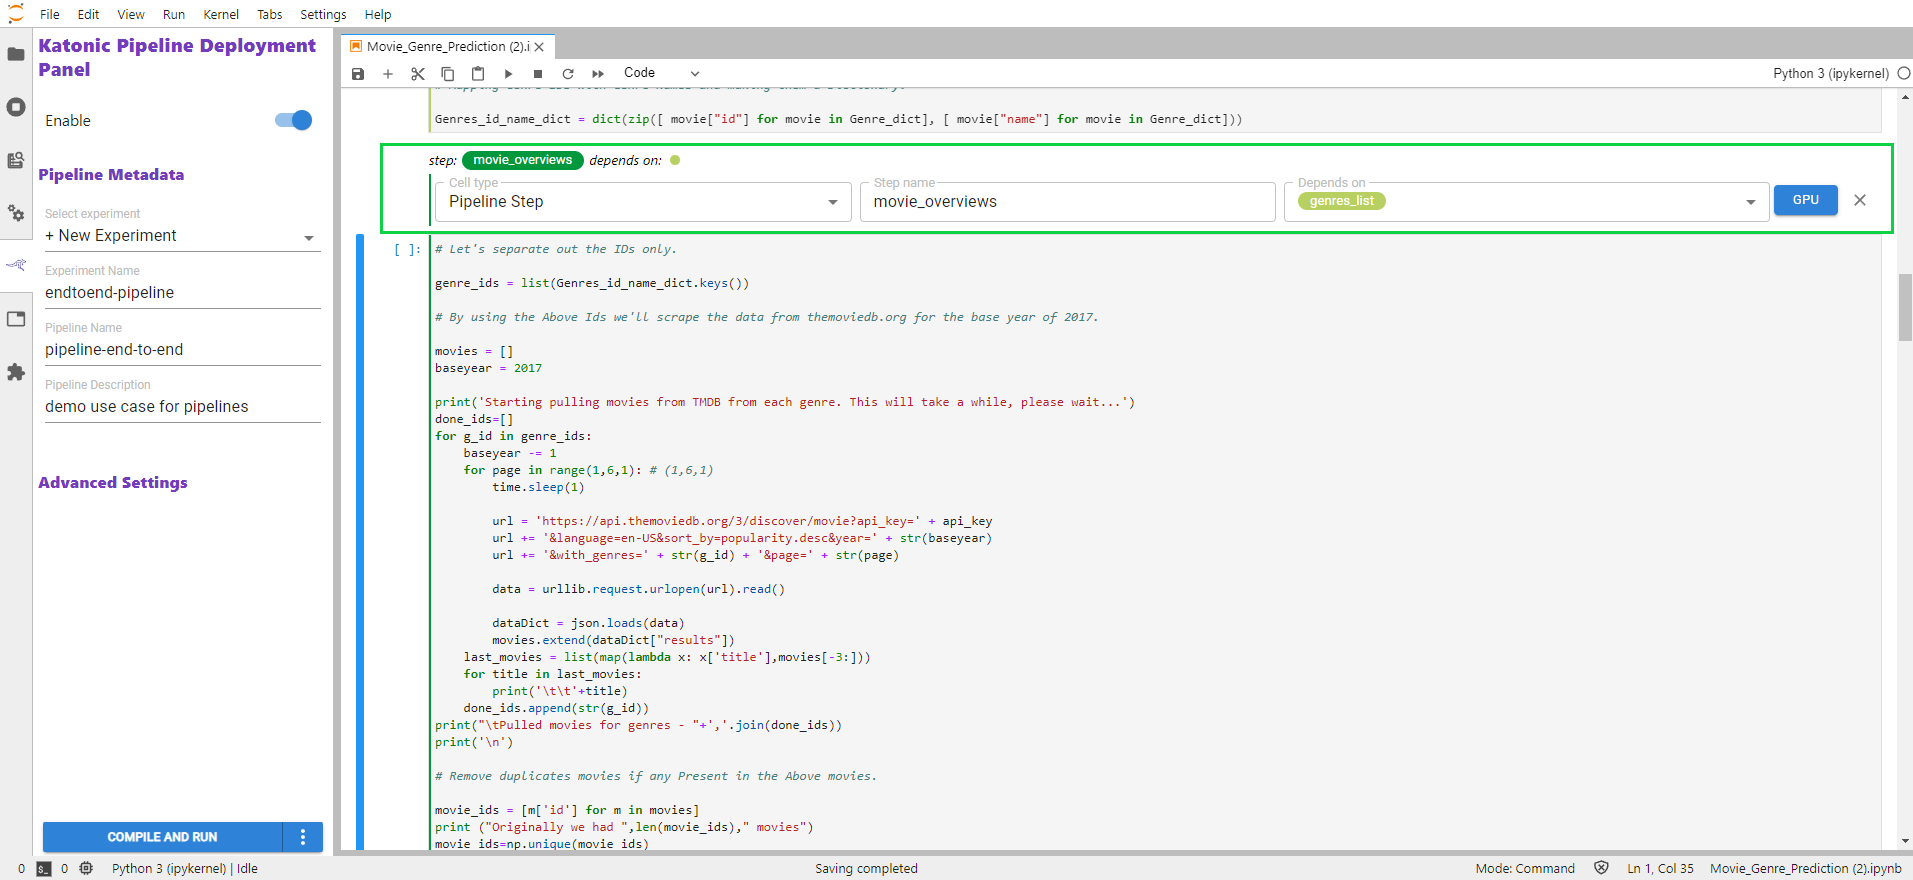
Depends on Parameter
The values you select for Depends on list the other steps that must execute before the step you are annotating.
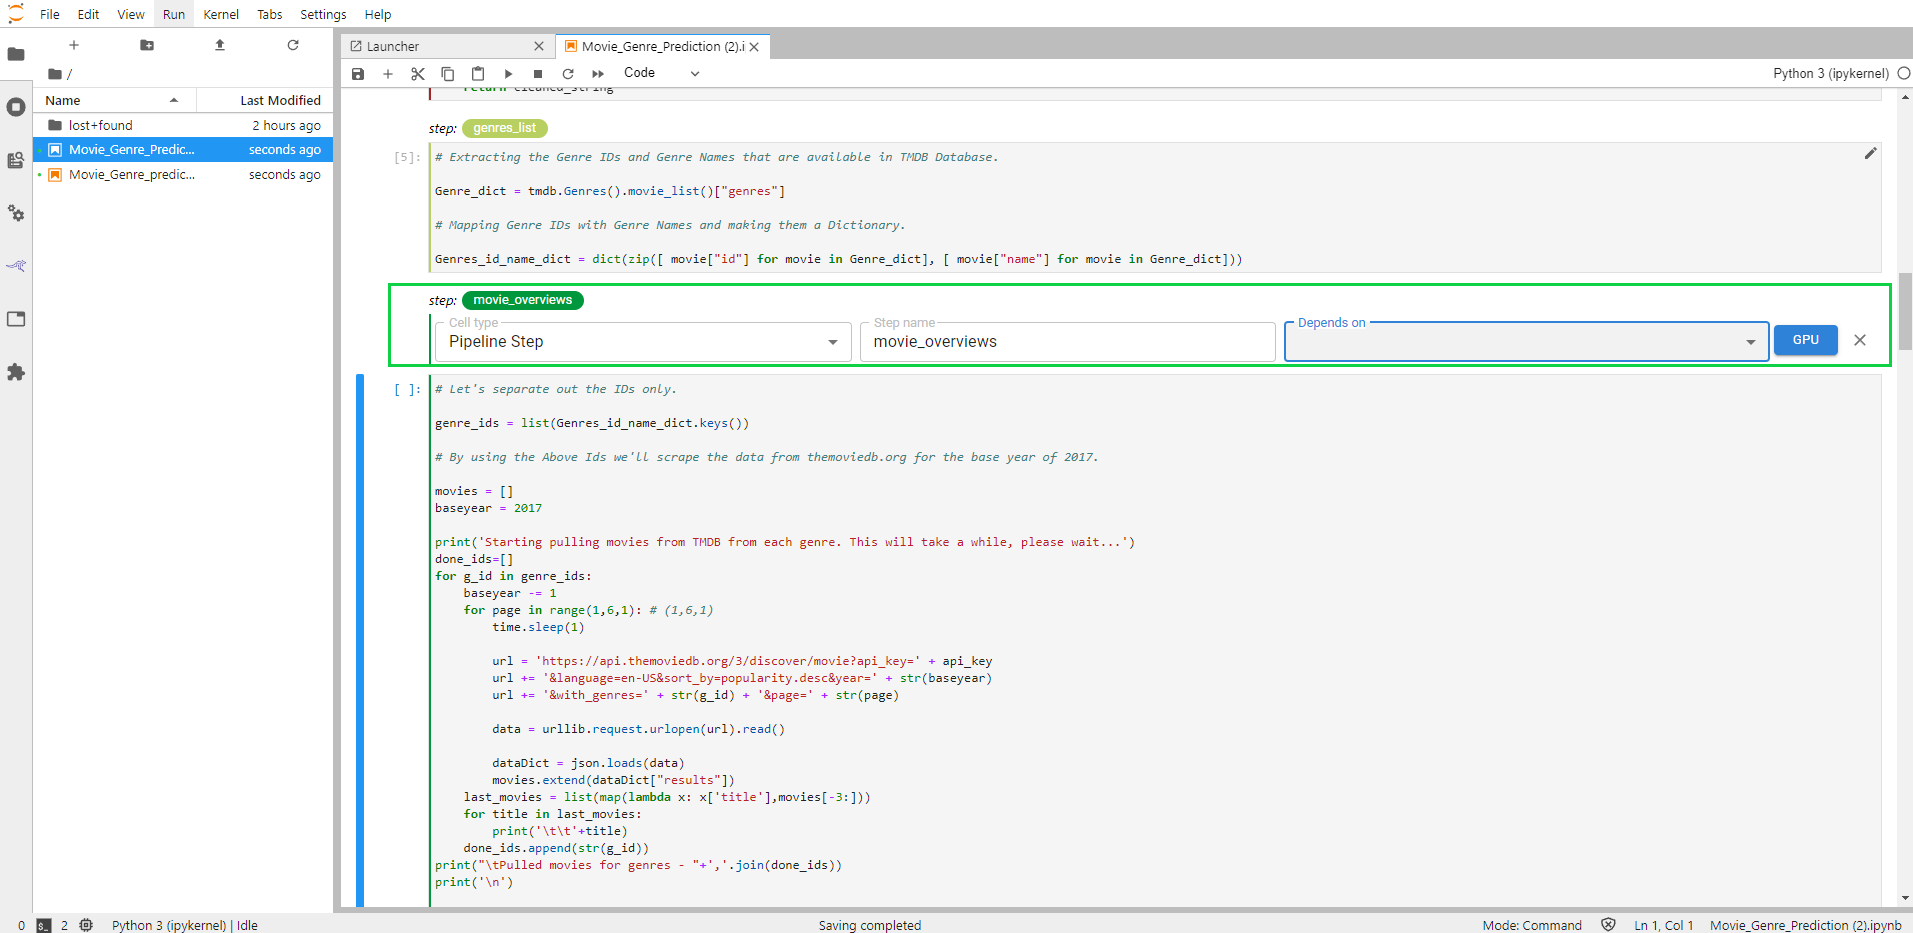
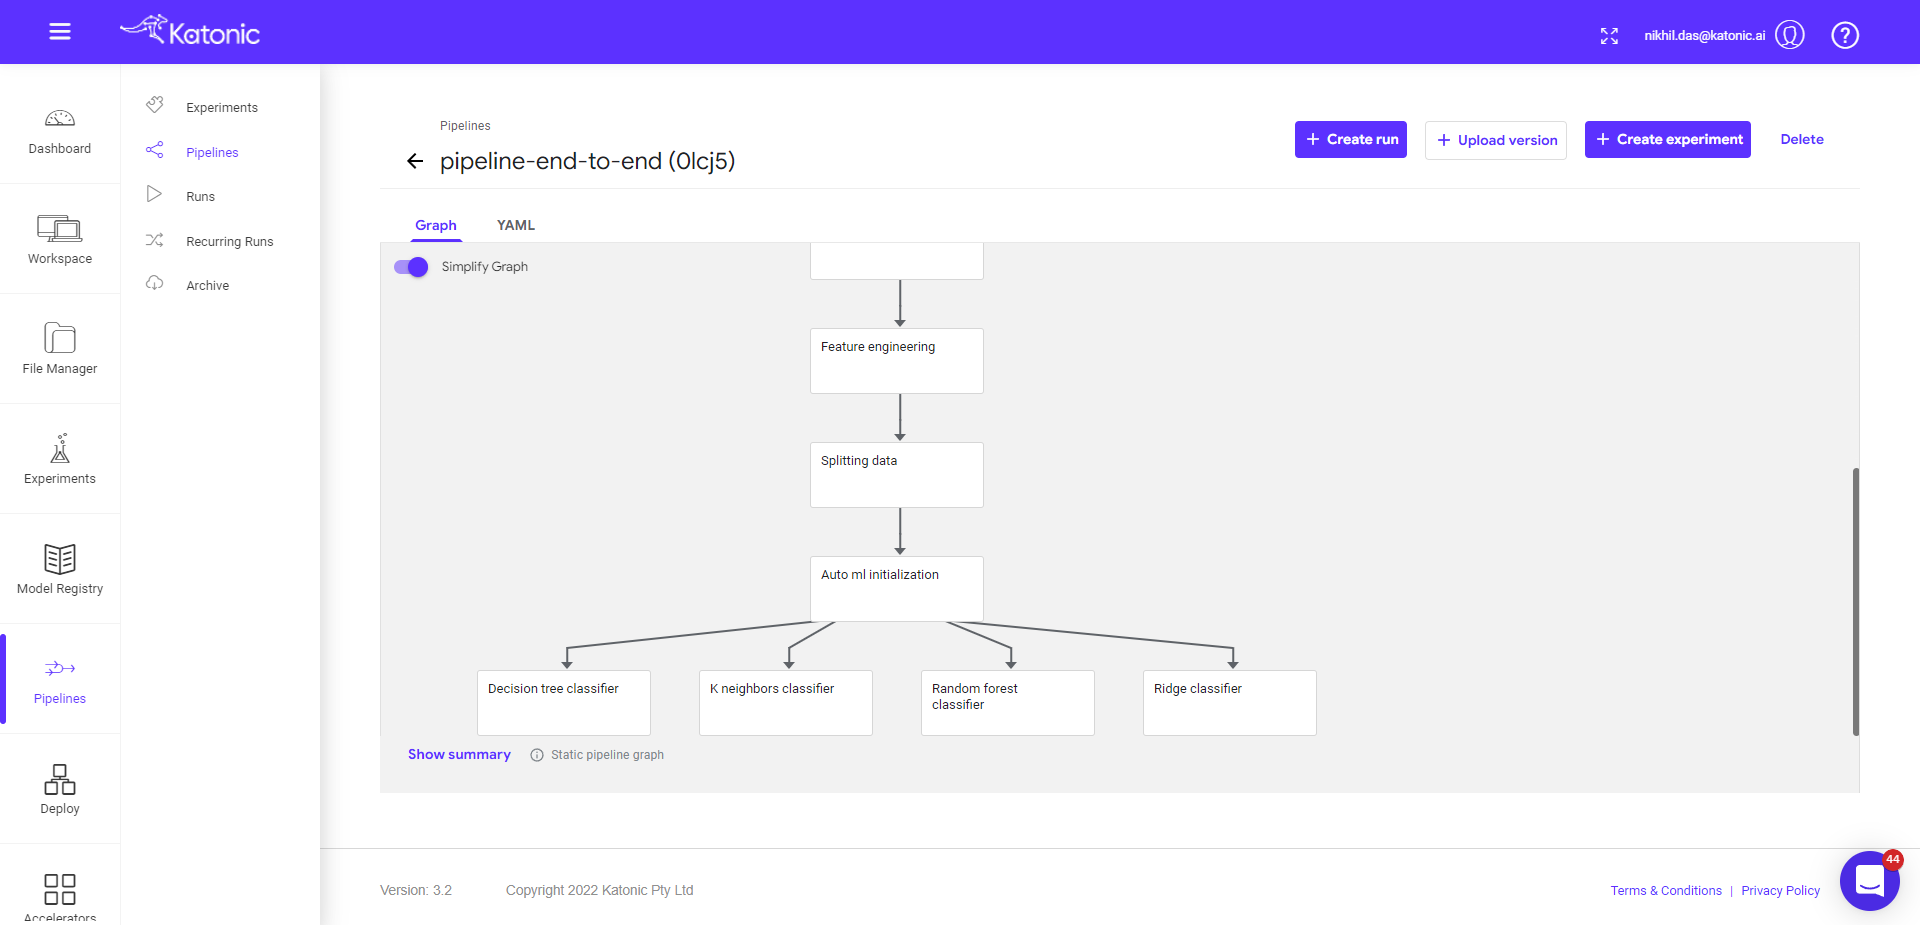
To add dependencies, use the Depends on pull-down menu to select each step whose output will serve as input for the step you are annotating. In the example below, since the step movie_overviews evaluates the model created in the step genres_list, we select that step from the Depends on pull-down menu.
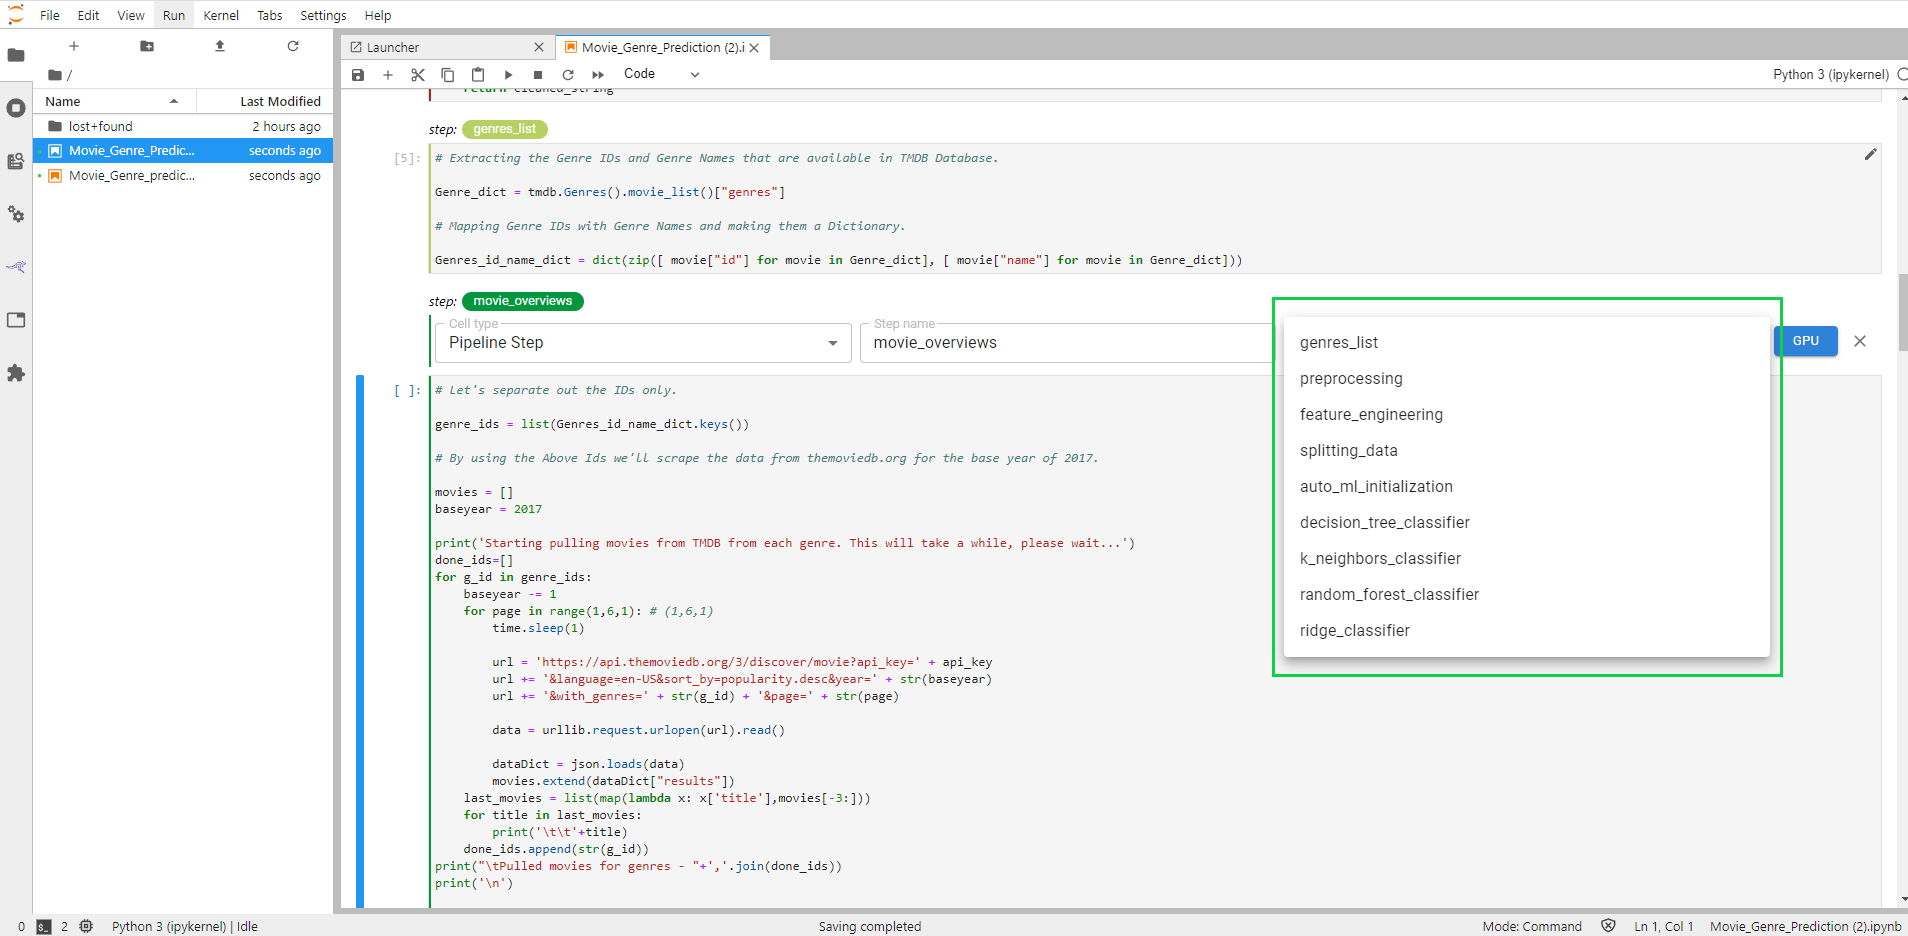
When selecting steps using the Depends on pull-down menu, identify only steps that are immediate dependencies. Do not include all dependencies back through the machine learning pipeline. Together, the dependencies for all steps in a pipeline, define the execution graph for that pipeline. This helps Katonic Automated Pipeline Deployment determine, for example, whether there are branches of your pipeline that can run in parallel.
Specify Multiple Dependencies
A given step may depend on the outputs from more than one other step. The Depends on pull-down menu enables you to select as many other steps as necessary. Select each dependency one at a time.
Remove Dependencies: To remove a dependency already selected, select the name of that step again from the Depends on pull-down menu. The items in this menu function as toggles for specifying other steps as dependencies.
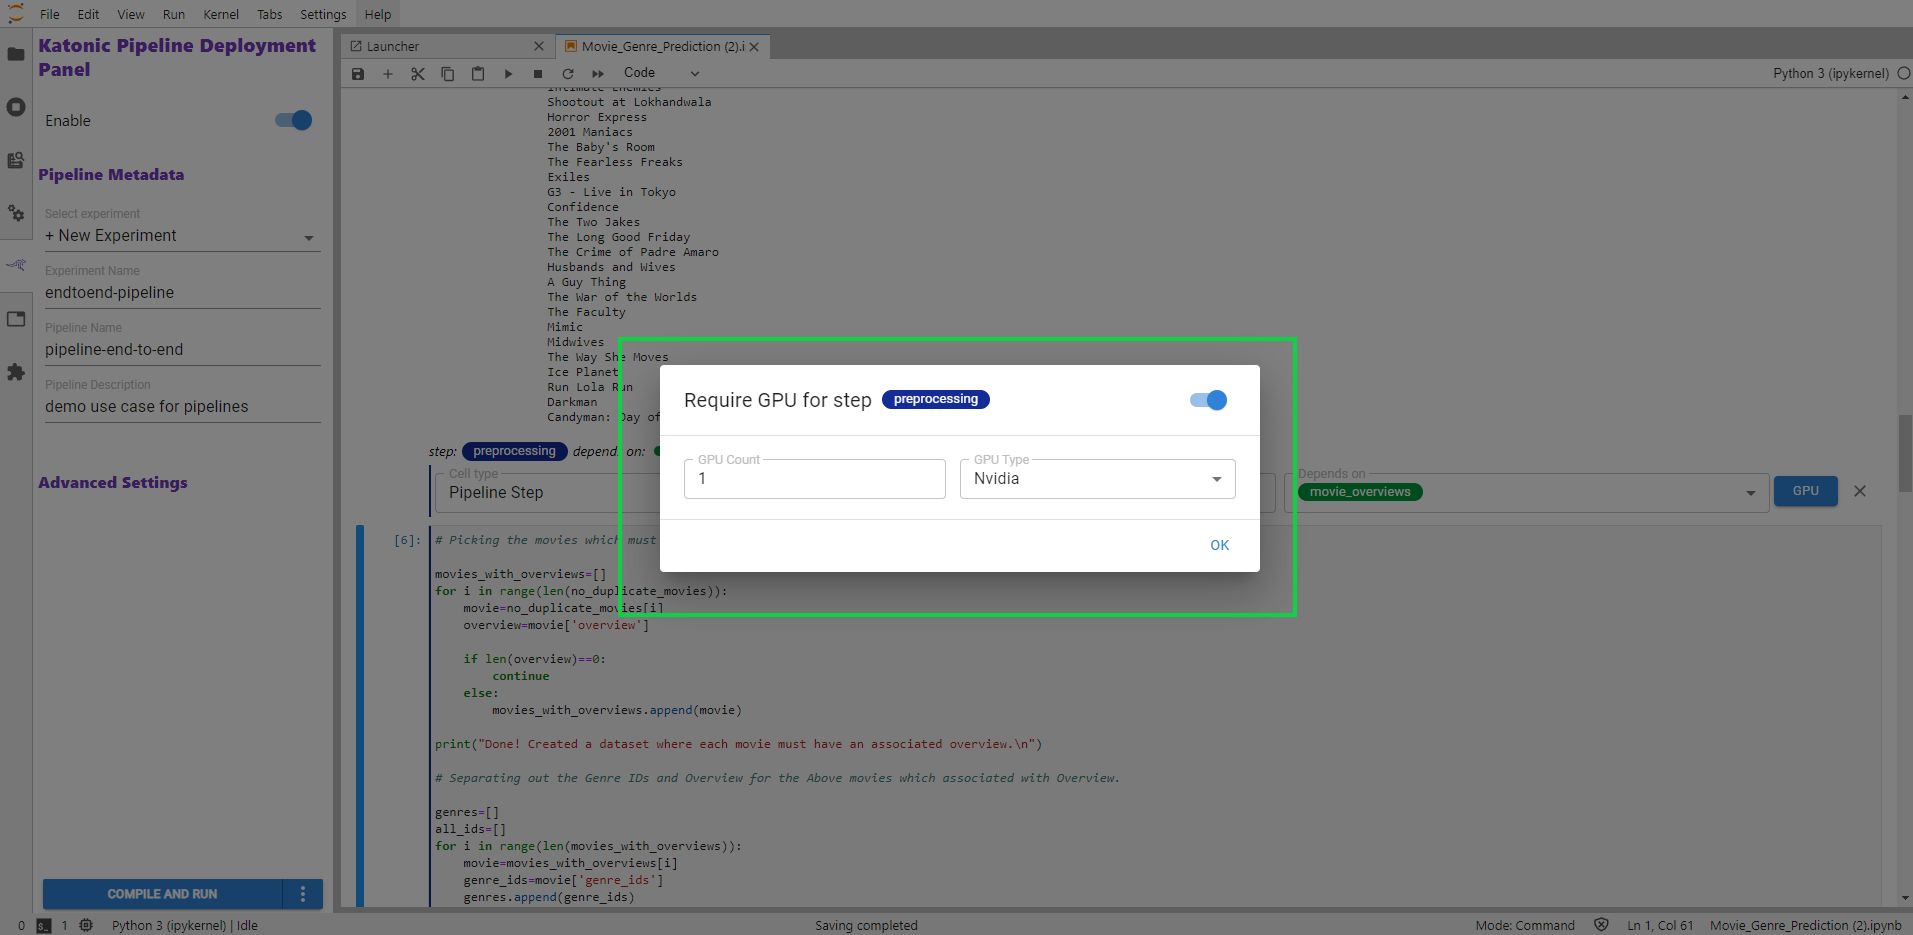
GPU parameter
Click the GPU button when annotating a step, to require that step to run on a GPU. In the modal that appears, enable this requirement using the toggle and specify a number of GPUs and the type of GPU requested.
Parallel Pipeline Steps
Pipeline steps that are independent of one another can run in parallel. For example, the two steps represented below each depend on a step named process_data, but are otherwise independent. Katonic Automated Pipeline Deployment uses the dependency graph reflected in the way you define pipeline steps to orchestrate pipeline runs, taking advantage of your Kubernetes infrastructure to run a pipeline as efficiently as possible.
The step movie_overviews can run in parallel with the step preprocessing.

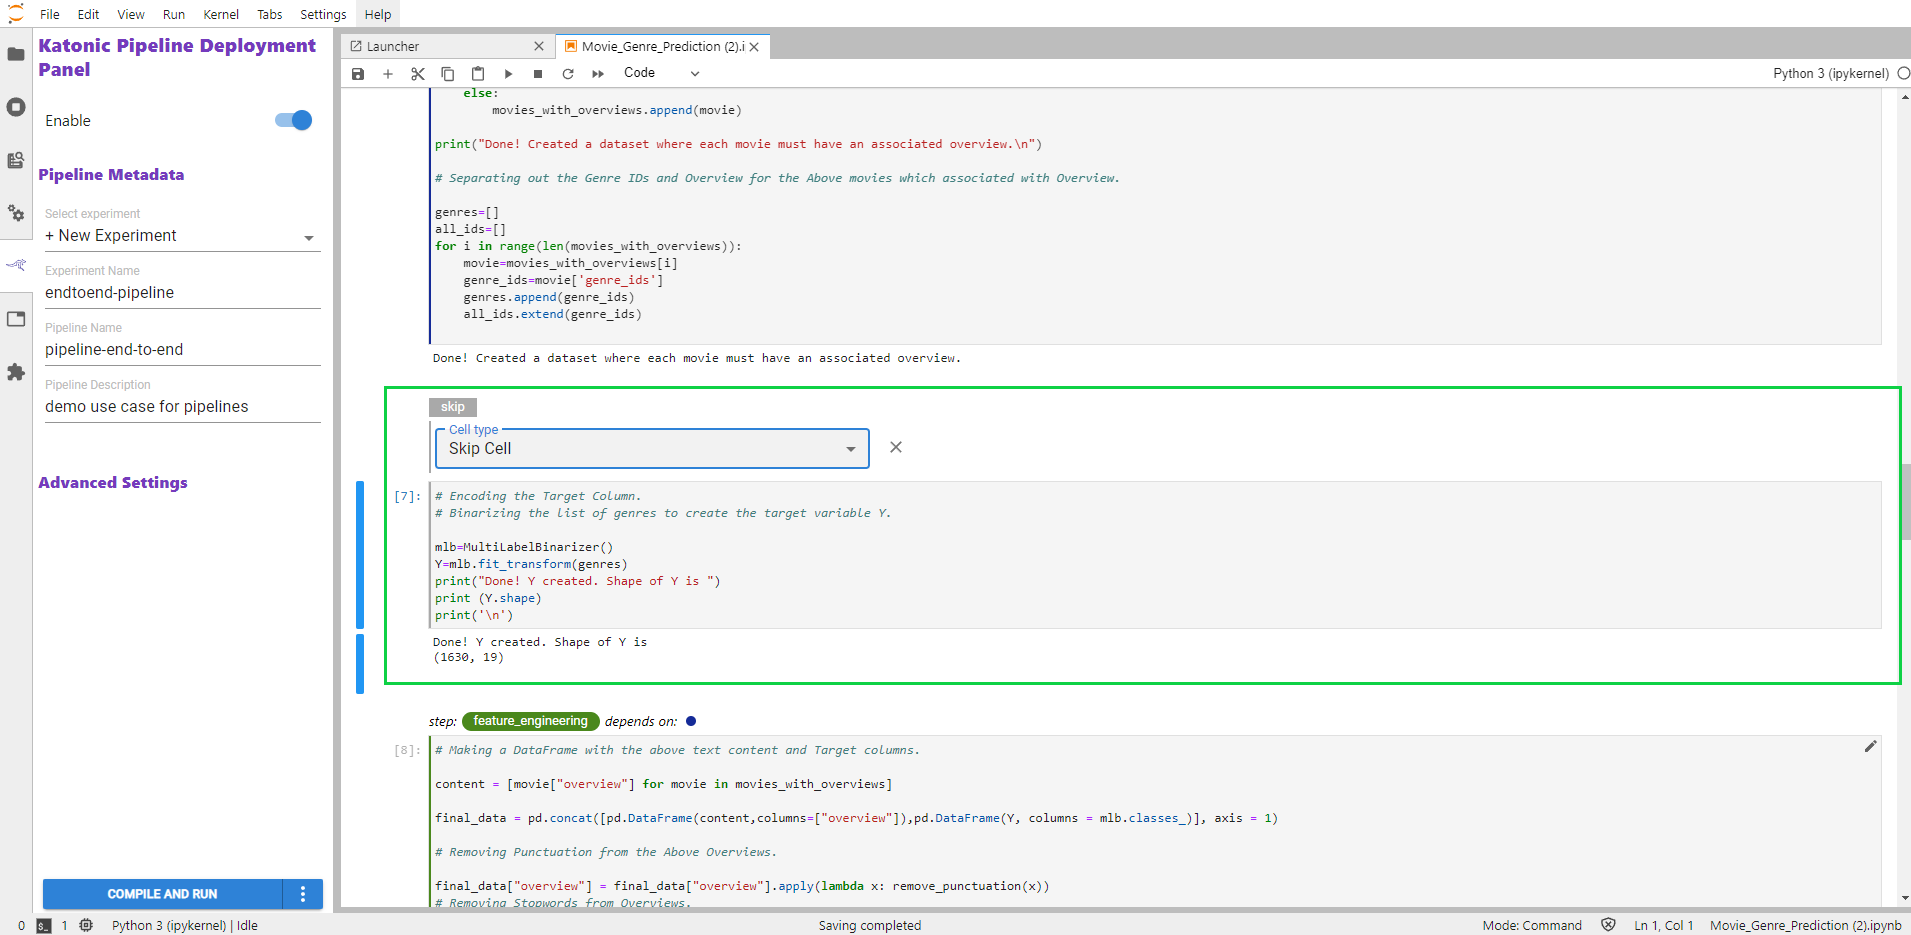
Skip Cells
Use Skip to annotate notebook cells that you want Katonic Automated Pipeline Deployment to ignore as it defines a pipeline. Purpose Common uses of the Skip annotation include identifying console logging and other diagnostic code useful in developing a step of pipeline, but which is not part of your machine learning workflow.
Annotate Skip Cells
To annotate skip cells, edit the first cell containing code you want Katonic Automated Pipeline Deployment to ignore by clicking the pencil icon in the upper right corner and select Cell type > Skip Cell.
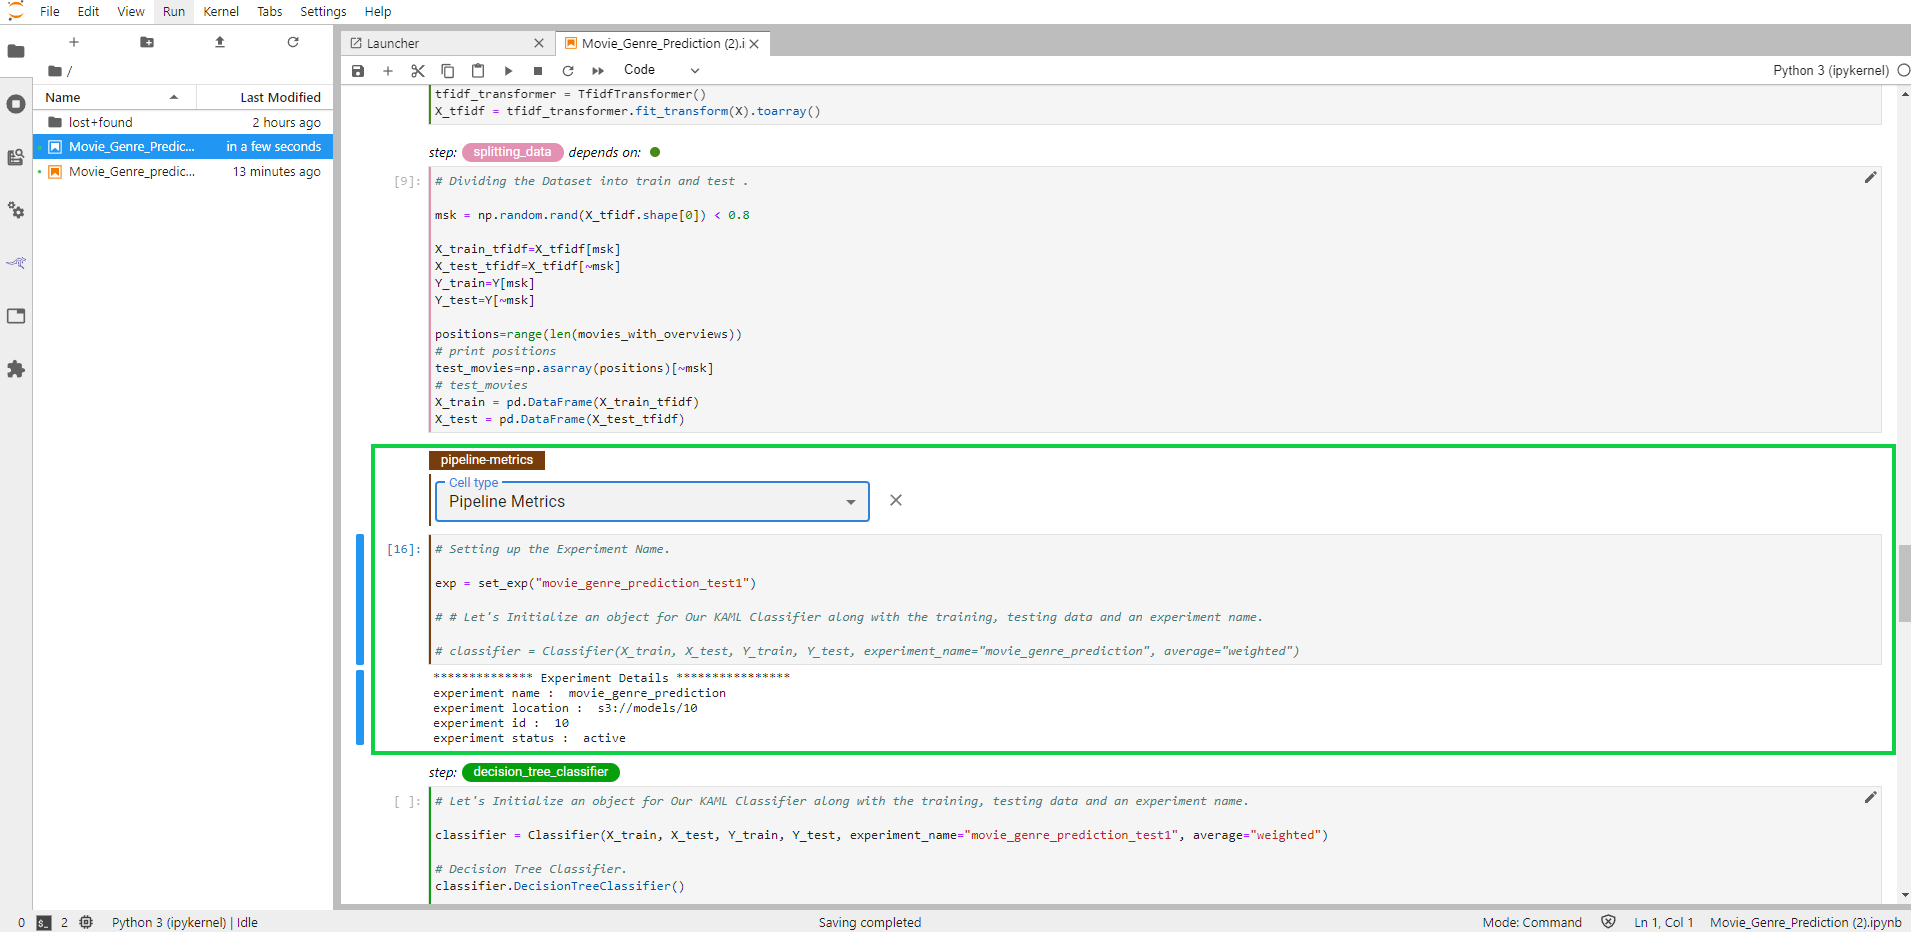
Pipeline Metrics Cells
Annotate a notebook cell with the label Pipeline Metrics to identify code that outputs the results you want to evaluate for a pipeline run. Purpose
Based on the variables referenced in a Pipeline Metrics cell, Katonic Automated Pipeline Deployment will define pipeline metrics that the Pipelines system will produce for every pipeline run. In addition, Katonic Automated Pipeline Deployment will associate each one of these metrics to the steps that produced them. Tracking pipeline metrics is essential to evaluating performance across multiple runs of a pipeline that have been parameterized differently or modified while still in the experimental phase of developing a model.
Pipeline metrics are also key to the AutoML capabilities of Katonic Automated Pipeline Deployment. For example, you will need to choose a single pipeline metric as the search objective metric for hyperparameter tuning experiments.
Annotate Pipeline Metrics Cell
NOTE Pipeline metrics should be considered the result of pipeline execution, not the result of an individual step. You should only annotate one cell with Pipeline Metrics and that cell should be the last cell in your notebook.
To identify pipeline metrics, edit the cell containing pipeline metrics statements by clicking the pencil icon in the upper right corner and select Cell type > Pipeline Metrics.
NOTE If you don’t see the pencil icon, please enable Katonic Automated Pipeline Deployment from the Katonic Automated Pipeline Deployment Panel.
Run a Pipeline
In this section, we describe how to run a pipeline you created using the Katonic Automated Pipeline Deployment JupyterLab extension and summarize how Katonic Automated Pipeline Deployment organizes and executes pipeline steps.
How to Run a Pipeline
To run an annotated notebook as a pipeline using Katonic Automated Pipeline Deployment:
1.1. Enter a name in the Select experiment field under the Pipeline Metadata heading or select an existing name from the pull-down menu. Katonic Automated Pipeline Deployment enables you to group multiple pipeline runs together under the same experiment name. This simplifies comparisons across pipeline runs.
1.2. Enter a name in the Pipeline Name field. Katonic Automated Pipeline Deployment will use this name to identify your pipeline when producing output from a pipeline run, when creating snapshots.
1.3. (Optional) Enter a description in the Pipeline Description field.
1.4. Click the COMPILE AND RUN button at the bottom of the Katonic Automated Pipeline Deployment Panel.

When you click COMPILE AND RUN Katonic Automated Pipeline Deployment will do the following:
1.1. Validate your notebook to ensure Katonic Automated Pipeline Deployment can create a pipeline based on the annotations you have applied.
1.2. Take a snapshot of your notebook environment workspace and data volumes.
1.3. Compile your notebook into a pipeline represented as a YAML file.
1.4. Upload your pipeline to the Kubernetes cluster.
1.5. Run the pipeline.
Katonic Automated Pipeline Deployment produces output in the Katonic Automated Pipeline Deployment Panel as each of these tasks progresses. The links following the status message for each task enable you to explore the outcome of each task.
How Katonic Automated Pipeline Deployment Creates a Pipeline Step
Katonic Automated Pipeline Deployment containerizes pipeline steps for execution on your Kubernetes cluster. Therefore, each pipeline step runs in a separate execution environment. To organize the code for a pipeline step, Katonic Automated Pipeline Deployment creates a new notebook with cells containing the code that the step needs in order to run. The cells Katonic Automated Pipeline Deployment creates are as follows, in order:
1.1. (Optional) A cell to set the Pipeline Parameters if such a cell was annotated in your notebook.
1.2. A cell with the code necessary to unmarshal the data values the step depends on.
1.3. One or more cells for all code annotated as Imports in the order specified in your notebook.
1.4. One or more cells for all code annotated as Functions in the order specified in your notebook.
1.5. One or more cells for the code annotated as Pipeline Step for the specific step Katonic Automated Pipeline Deployment is creating.
1.6. A cell to marshal the data values that other steps depend on.
1.7. (Optional) A Pipeline Metrics cell if such a cell was annotated in your notebook.
Katonic Automated Pipeline Deployment configures each pipeline step to execute in an iPython environment. This simulates the way your code would execute if you were simply running your Jupyter notebook.
After complete process of compile and run the pipeline which is executed is in pipeline section.